View the latest Paperless Pipeline updates.
Pipeline eSign
eSign Now Available on All Accounts! (Action Needed to Use)
Pipeline built-in eSignature tool is officially here!🎉 You can now send documents out for signature directly from within Pipeline, no need to juggle outside tools or download or upload files. Everything stays in one system, saving time and keeping admins in the loop.
eSign is powerful enough to be your sole signature solution, or it can be used only as needed, alongside another e-signature tool.
eSign is NOT turned on by default. Master Admins can try it out by sending up to two free signature requests, then enabling it and setting a budget if they decide it’s a good fit for their office.
👉Learn more about how Pipeline eSign can get your documents signed faster, simpler, and for a fraction of the cost HERE →.
👉Try it out - Master admins: send 2 free requests from any transaction, Reference Library, or top eSign menu in Pipeline.
👉Pricing + Turn it on — click here to view PRICING or enable eSign →

* Some Enterprise accounts may be opted out from this rollout.
Send Standalone Signature Requests
Signature requests can now be created and tracked completely outside of the transaction workflow, giving you full control over when (and IF) a signed document is added to a transaction.
It’s like having an independent electronic signature system, parked inside Pipeline for instant access.
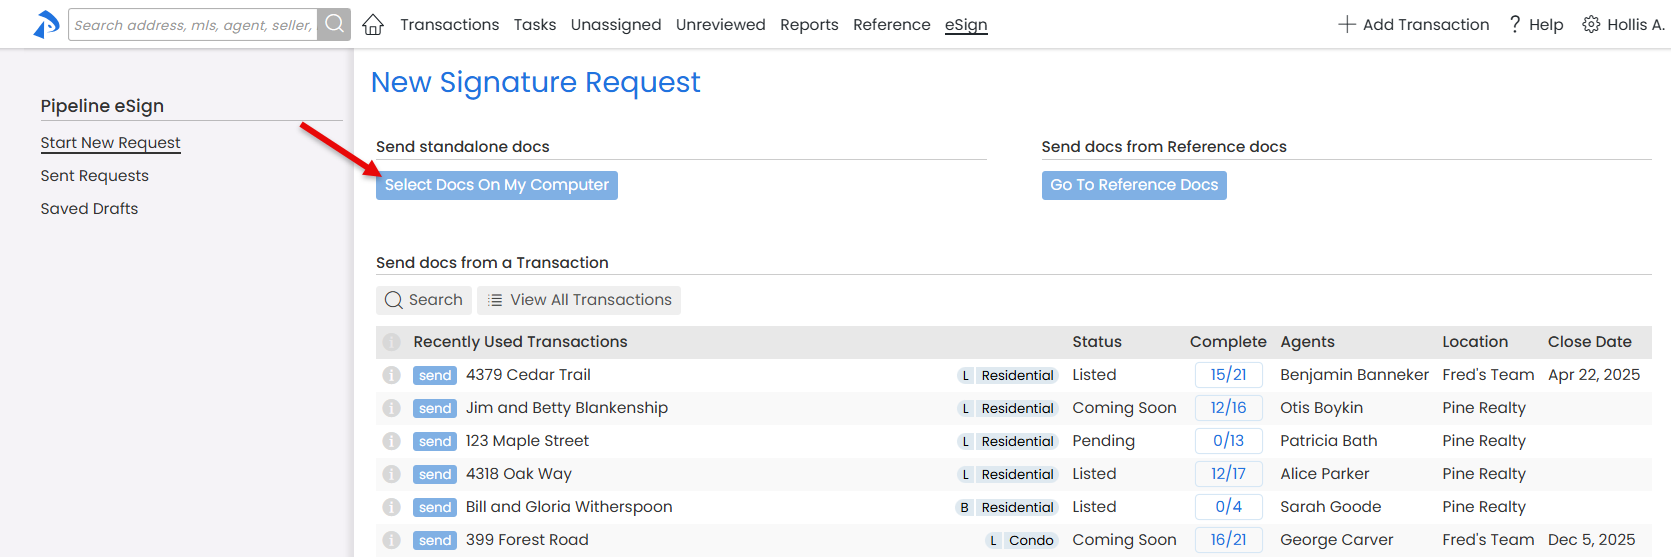
If eSign has been enabled on your account, a new eSign menu item will appear at the top of every page, taking you to a central hub where you can send standalone requests, launch requests from a transaction or the Reference Library, and manage everything you’ve sent.
Allow Buying Agents to Update their Transaction Names
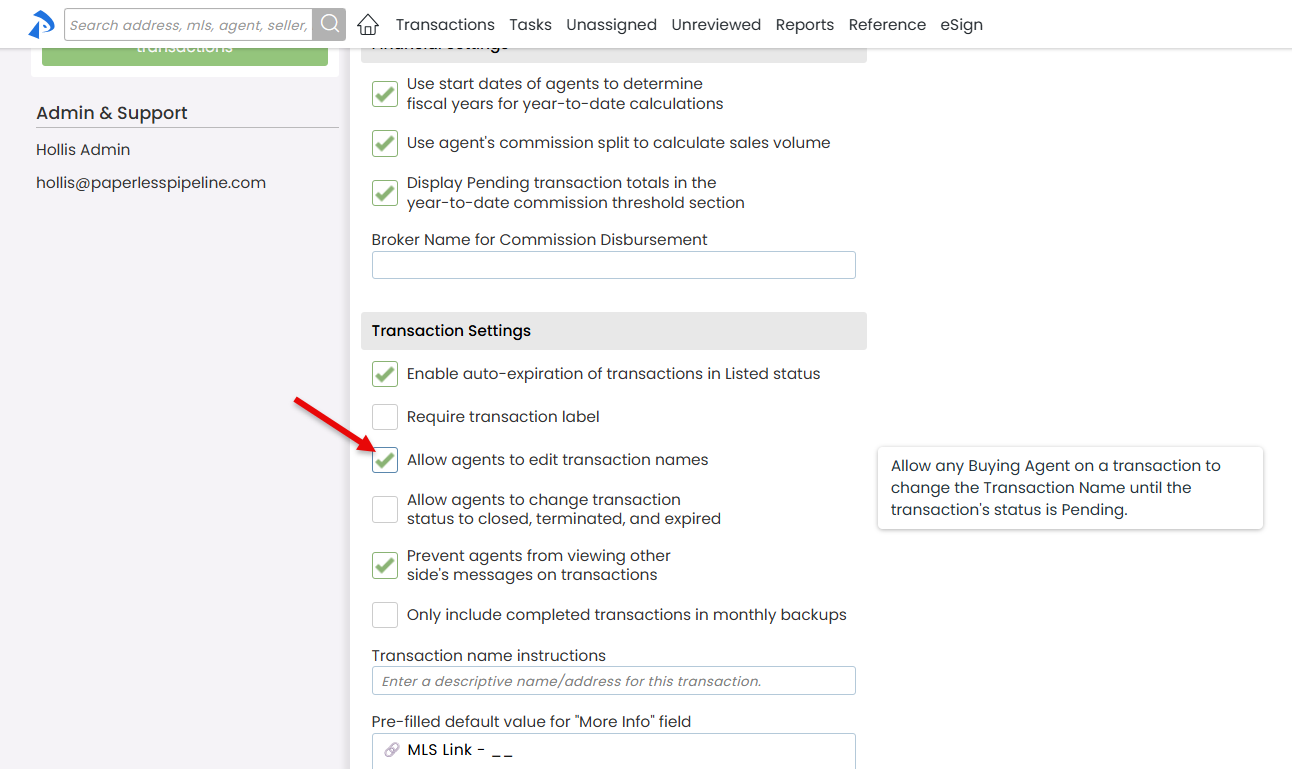
Agents often create buyer-side transactions before a property address is known. You can now allow buying agents to update Transaction Names once addresses are known, cutting down on back-and-forth and keeping Transaction Names accurate and up to date.
Master Admins can turn this option on by clicking Allow agents to edit Transaction Names under Company Settings. If enabled, buying agents can edit their transactions' names up until Pending status. To make sure Admins remain aware of such changes, an email notification is automatically sent to the appropriate Admins whenever a Transaction Name is changed by an agent.
Keep Your Transaction Documents Neatly Grouped—Automatically
👉👉 Please alert your team of this new feature for the smoothest transition.
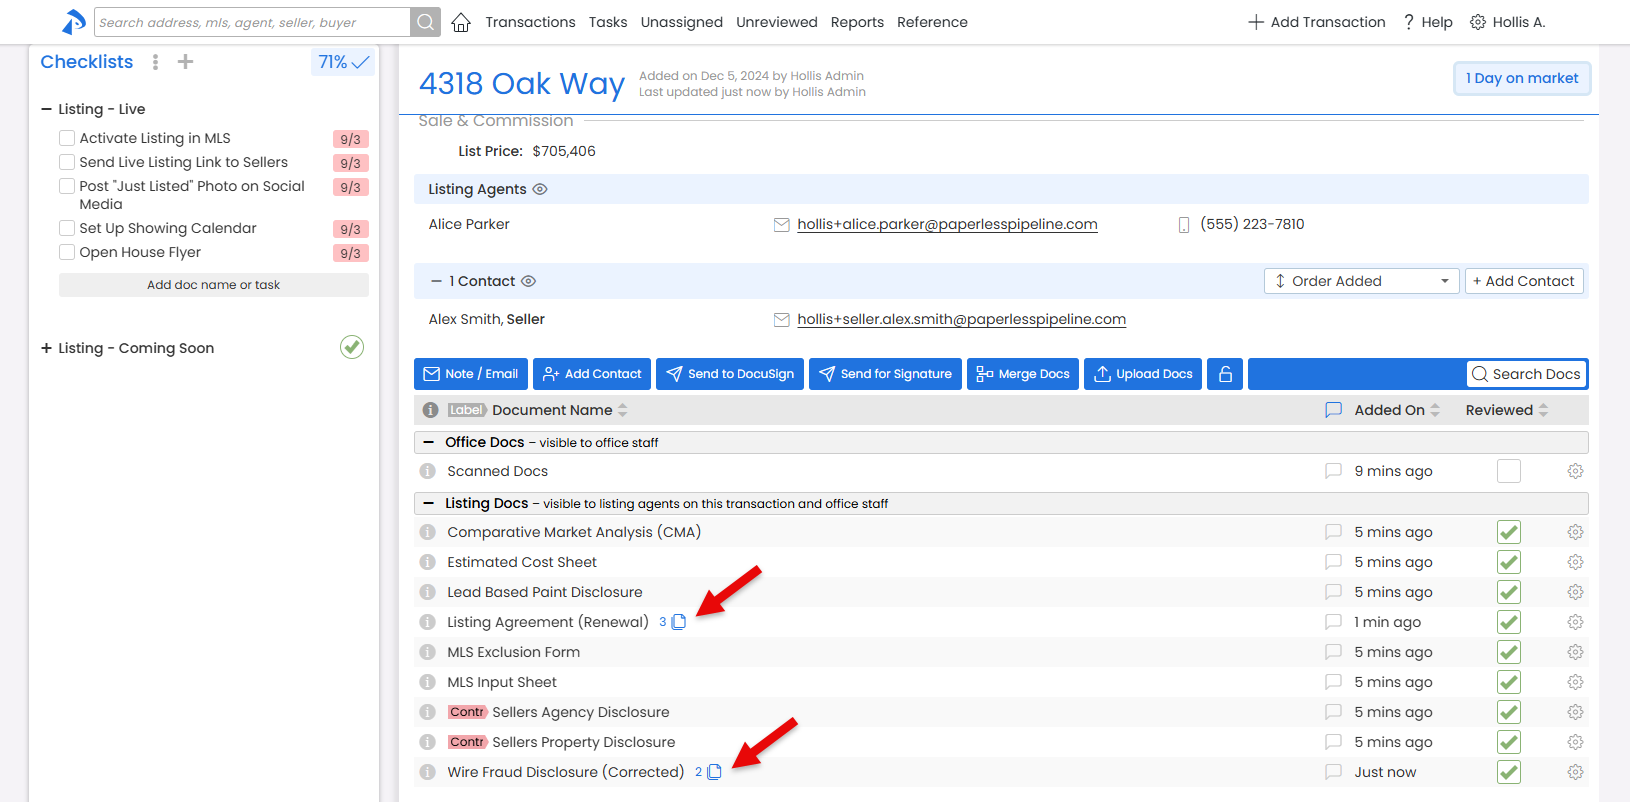
Pipeline’s new Automatic Document Name Grouping helps your transaction doc lists stay clean and easy to navigate. Documents with the same base name are now collapsed into a single, tidy group, showing only the most recent or designated version of the doc by default.
Here’s how it works. Docs that share the same base name (the text before any parentheses) will be grouped. The most recent (or designated) doc will be displayed by default, while the rest will be collapsed behind it, accessible with just a click, if ever needed.
No setup needed. Most offices' normal naming convention will already take advantage of the grouping naturally.
If your office prefers that your similarly named docs not be grouped, no sweat! Just turn the Group documents by name feature off under Company Settings.
Learn more about Automatic Doc Name Grouping here →
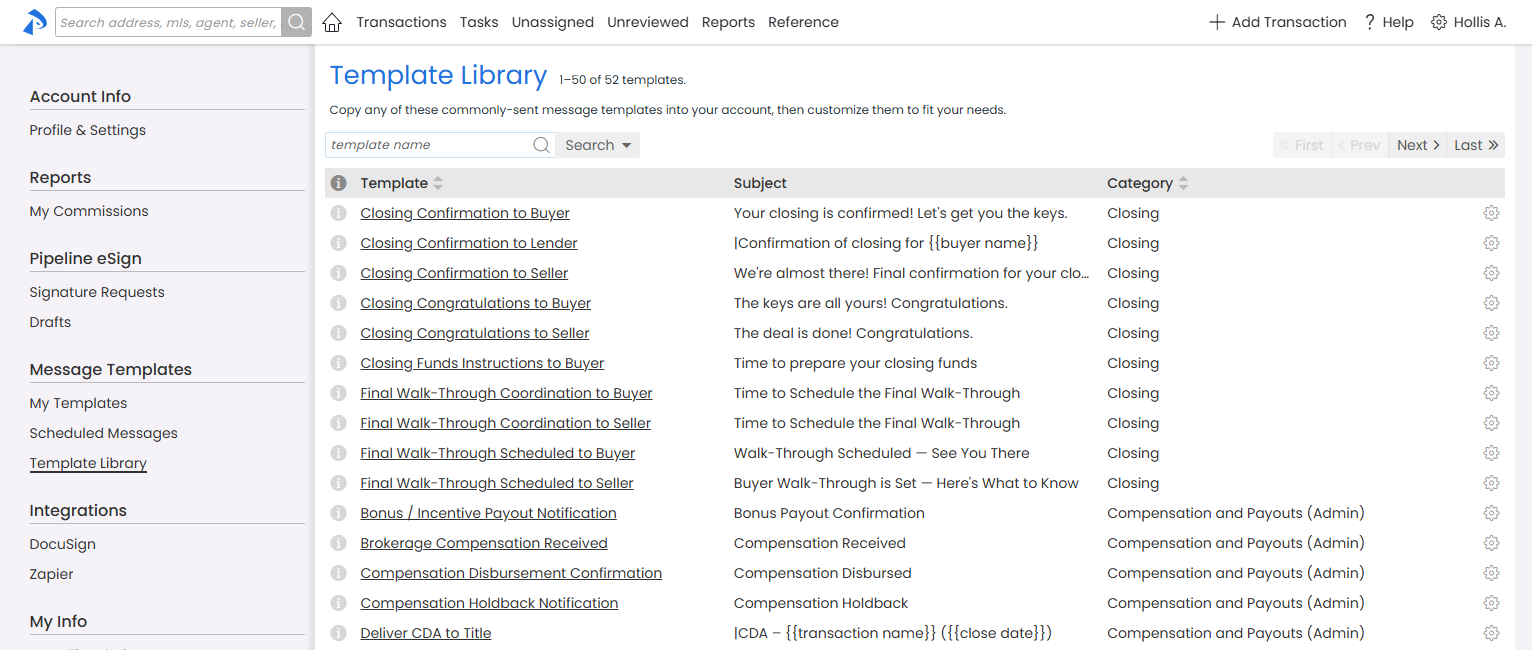
NEW Message Template Library: Ready-to-Use Messages in Seconds
Pipeline’s Message Templates let you draft messages instantly. The new Message Template Library makes it easy to expand your collection of templates. Find, copy, and customize a wide variety of professional, ready-made templates for every step of your workflow, including client updates, helpful reminders, and more.
Highlights:
- Browse and copy prebuilt templates
- Easily customize templates for your needs
- Admin-only templates are hidden from agents
- No setup required—access from the My Info | Template Library
- Share copied templates with your team, like normal
👉 Browse the Message Template Library today to see if any are right for your team.
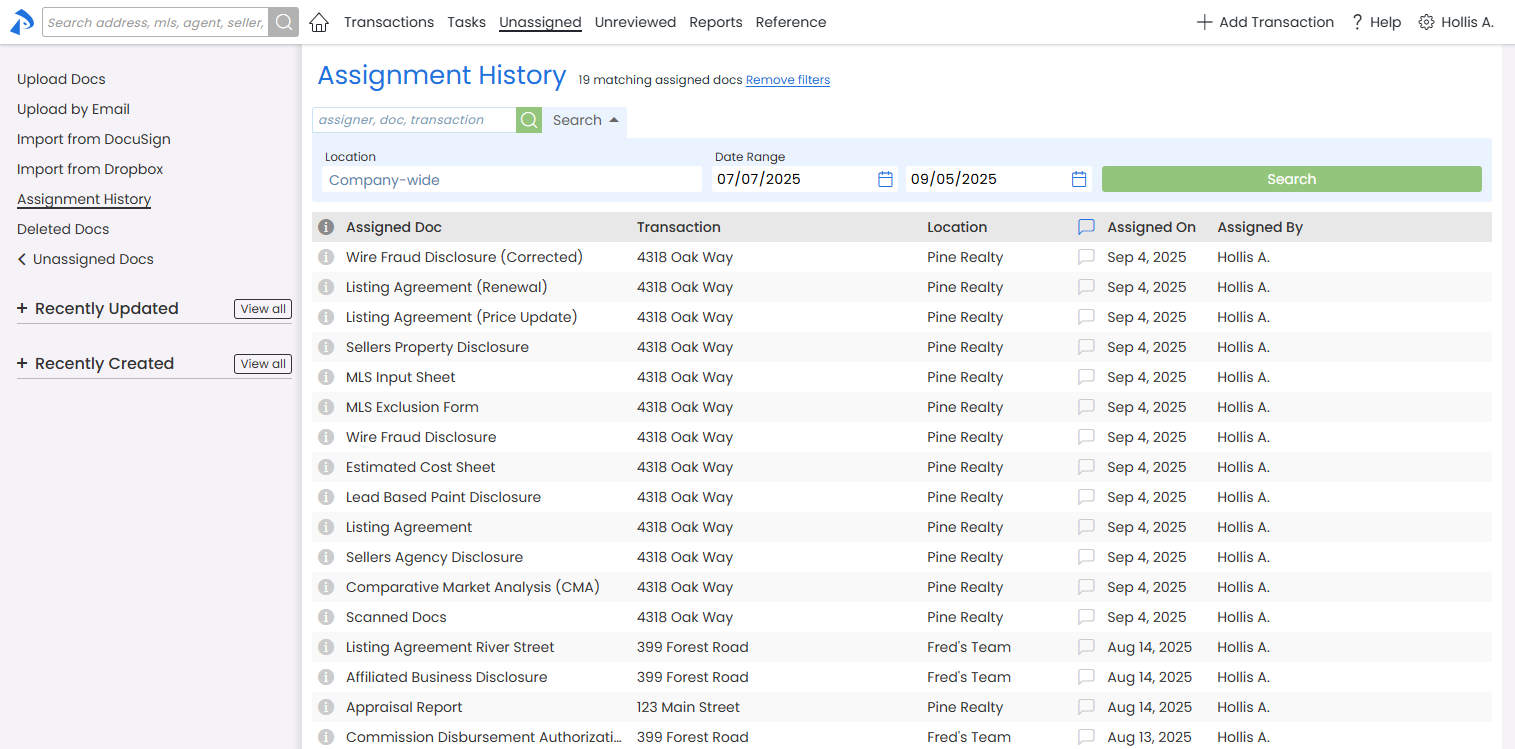
Find Assignment Details Fast
You can now search all key fields in Assignment History to quickly find the exact details you need.
This makes Assignment History the perfect tool for tracking what happened to an uploaded document, who took action, and when.
Minor Navigation Updates: Find What You Need, Faster
You might notice a few small changes to Pipeline’s navigation. We’ve moved a few items to more intuitive locations to help you find what you need, faster. If you’re missing something, glance around—it should be close by.
Pipeline eSign
Track and Manage Your Team’s eSign Drafts
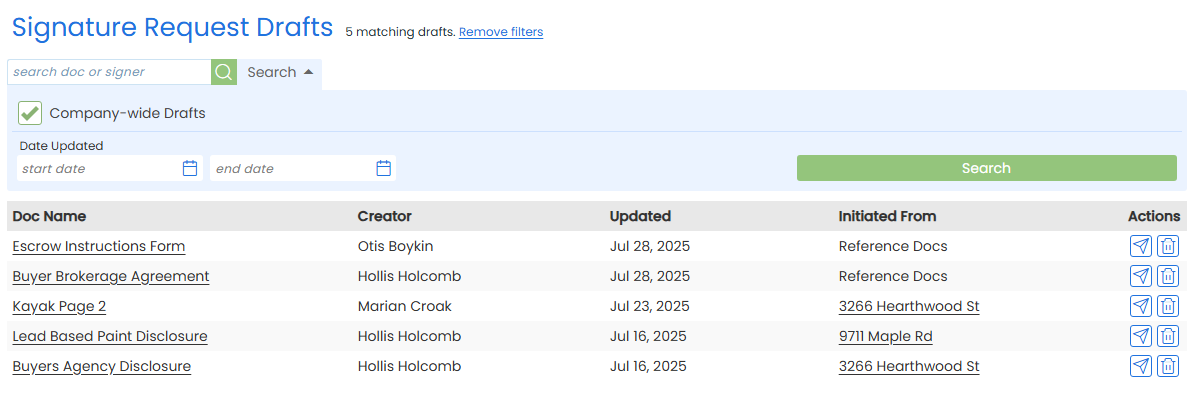
Drafts of eSign signature requests make it easy to save signature requests mid-preparation or set them aside for review. Now, admins can view eSign drafts for transactions in the locations they manage—access previously limited to Master Admins.
This new access lets admins review signature requests before they’re sent, and easily track or support eSign draft activity across their team.
From their Drafts page, Admins can still manage their own drafts, or click [Company-wide] to view all eSign drafts in their location.
Learn more about Managing Company-Wide eSign Drafts here →
Create Clean New Buyer Offers in Seconds
When a transaction is buyer-side only, New Offer now works smarter, creating a new transaction that only brings over the buyer-related fields, contacts, and docs you need, and nothing you don’t.
There's nothing new to click or learn. Just use New Offer as you always have. The system will detect when the transaction is buyer-side only, and handle the rest.

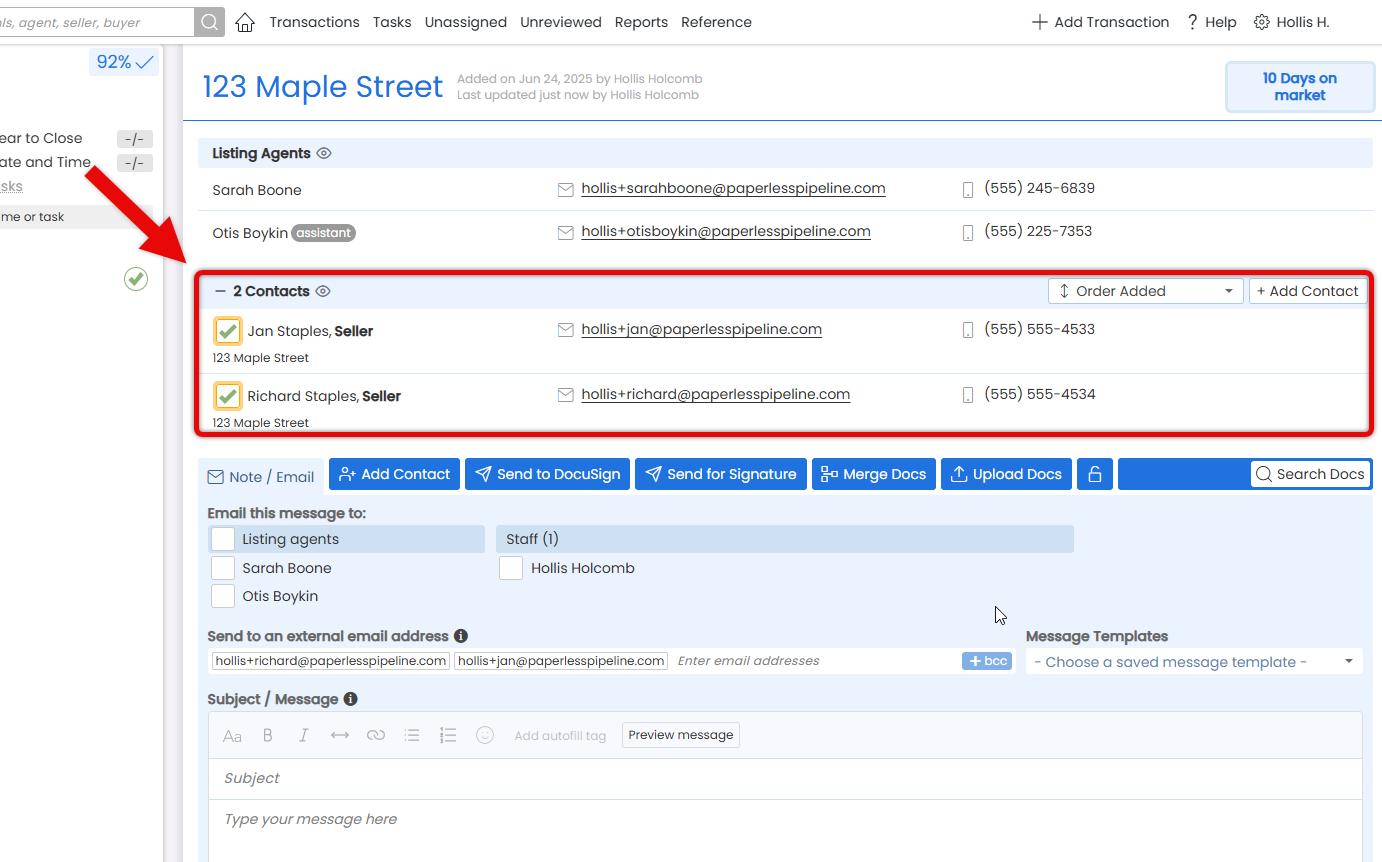
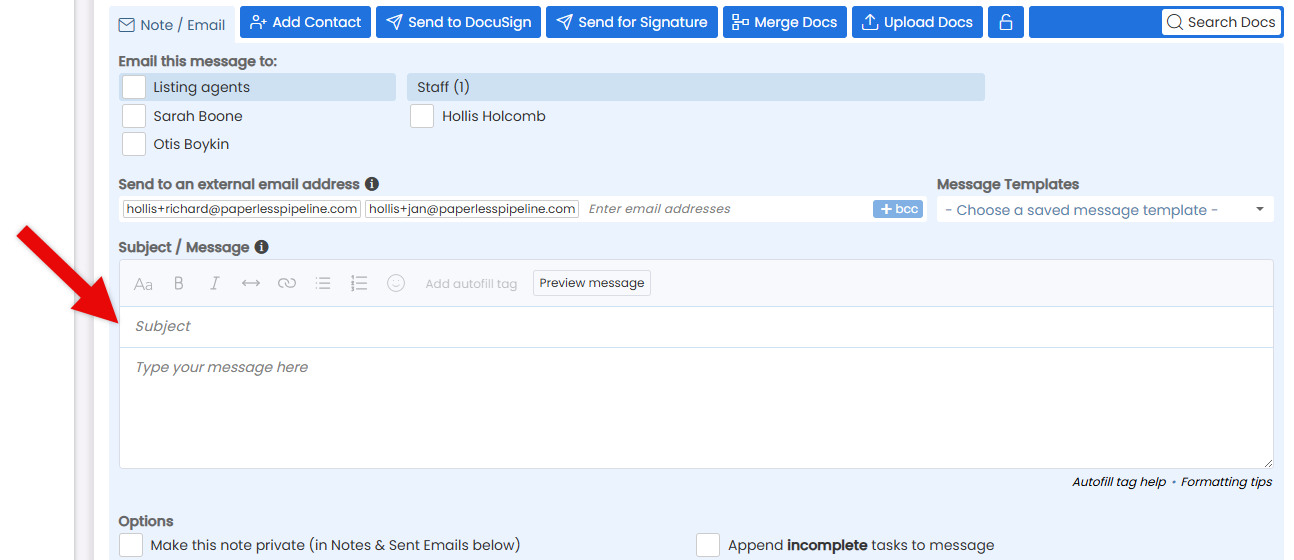
Send Messages Faster by Selecting Contacts with a Single Click
When sending a note or email from Pipeline, you can now select contacts with a single click.
It’s a faster, more intuitive way to visually select contacts, saving you time every time you send.
Agents and staff can still be checked from within the blue area when sending.
Learn more about Sending Notes & Emails here →
Cleaner Message Layout: Subject Now Lives Inside the Message Box
Heads up that when sending a note or email, the Subject field is now contained within the message box.
Same workflow, just a cleaner, more streamlined layout.
Learn more about Sending Notes & Emails here →
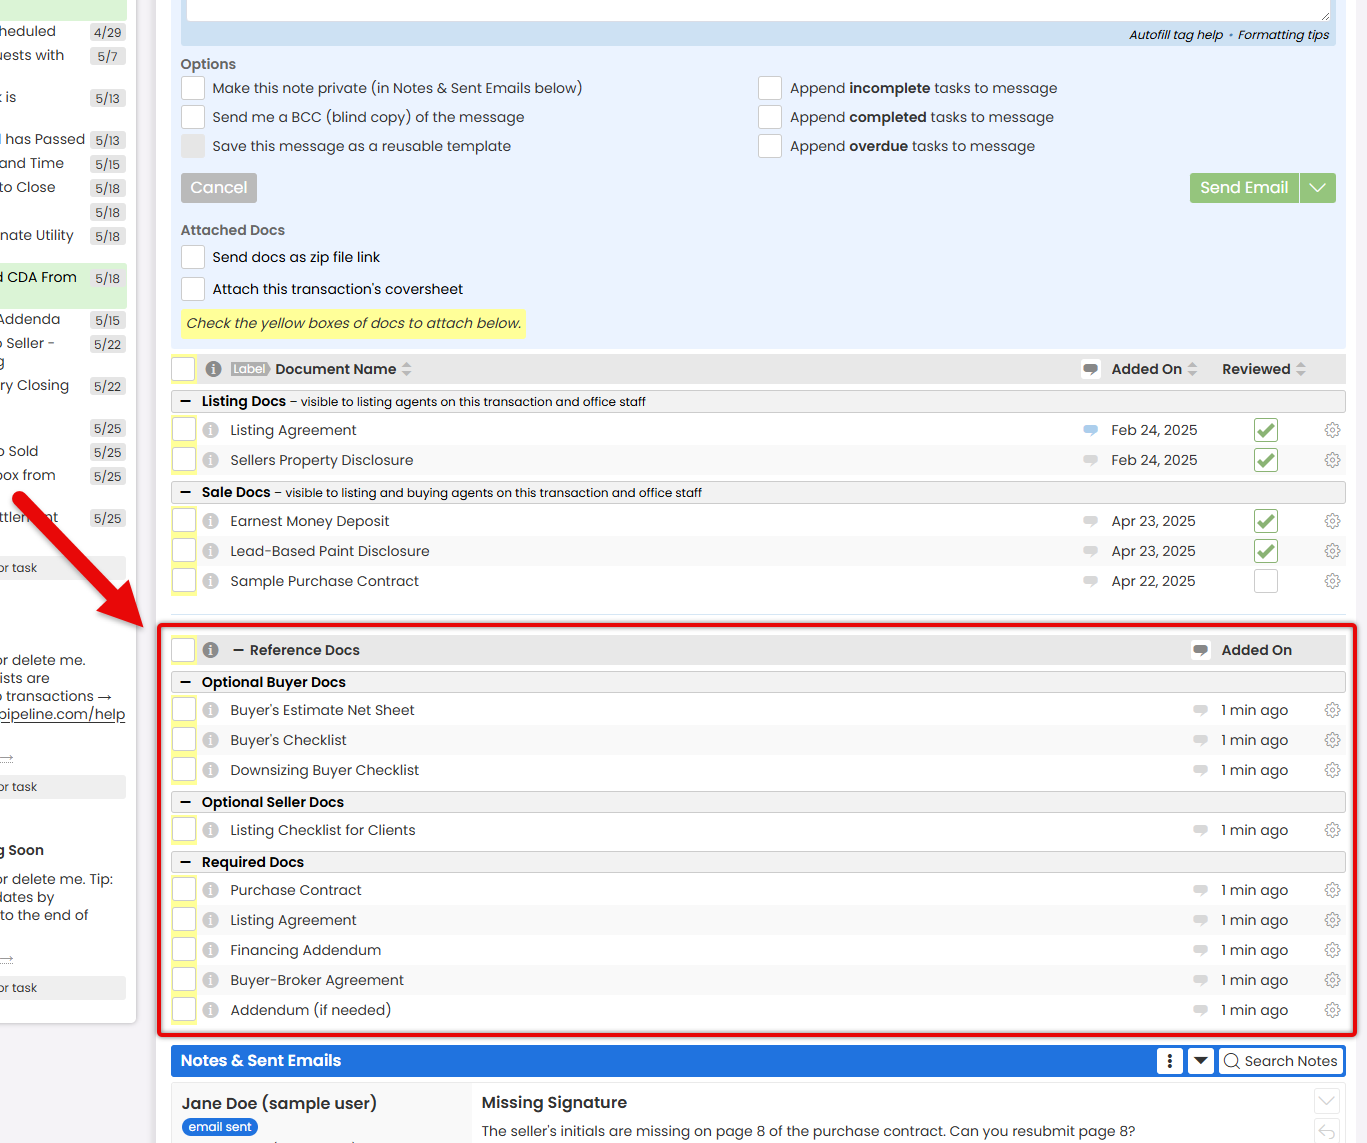
Send Reference Docs Directly from Transactions
Save time and steps by attaching Reference documents directly to messages you send from transactions. It’s a fast, natural way to share the docs your team uses everyday, right from where you’re already working.
Just like everything else you send from a transaction, these messages are automatically tracked in the transaction’s history and Notes & Sent Emails, keeping all communication in one place.
Learn how to Email Docs & Notes from Transactions →
🚀 Next up: Sending Reference docs from transactions is a precursor to the exciting launch of Pipeline eSign, our upcoming built-in forms and digital signing platform.
⏰Want early access to Pipeline eSign? Reply to this message and we’ll reach out with more information.
Save Time on New Offers by Not Having to Remove Buyer Side Contacts
When initiating a New Offer on a transaction, any buyer-side contacts will no longer be carried over automatically. This means you can now enter fresh buyer contacts on New Offers without the hassle of manually removing old ones.
Buyer-side contacts are defined as those containing any of the following words:
- “Buyer”
- “Lender”
- “Lending”
- “Escrow”
- “Title
Heads up that we’ll be adding more buyer side offer options in the very near future.
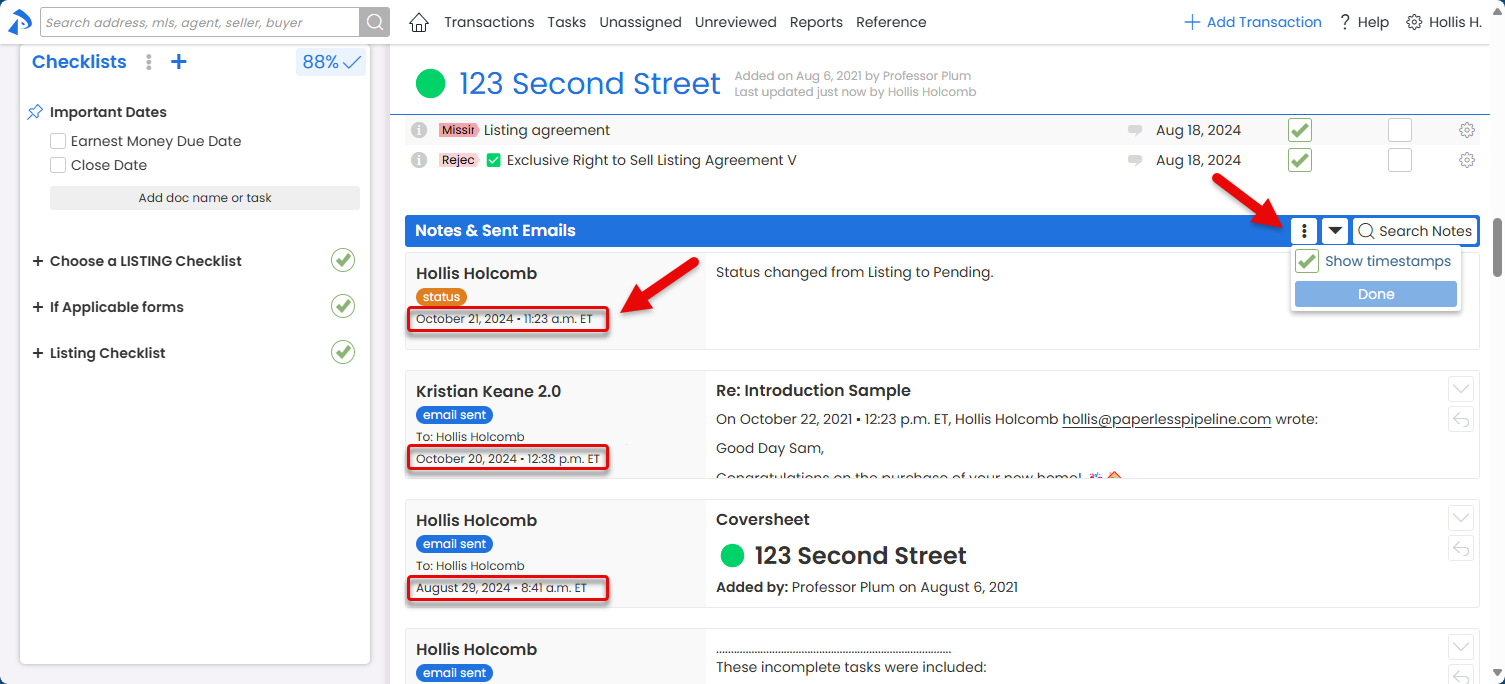
Instantly View Timestamps for Notes & Sent Emails—No Hover Needed
Need to know exactly when messages were received or other actions took place on a transaction without having to hover over the date. You can now set the times that actions took place to be automatically visible—no hover needed.
To turn on visible timestamps, scroll down to the Notes & Sent Emails section on any transaction, click the Settings dots [⁝], then [Show timestamps]. The system will remember your selection and show (or hide) the timestamps on every transaction.
Name Your Docs Even Faster!
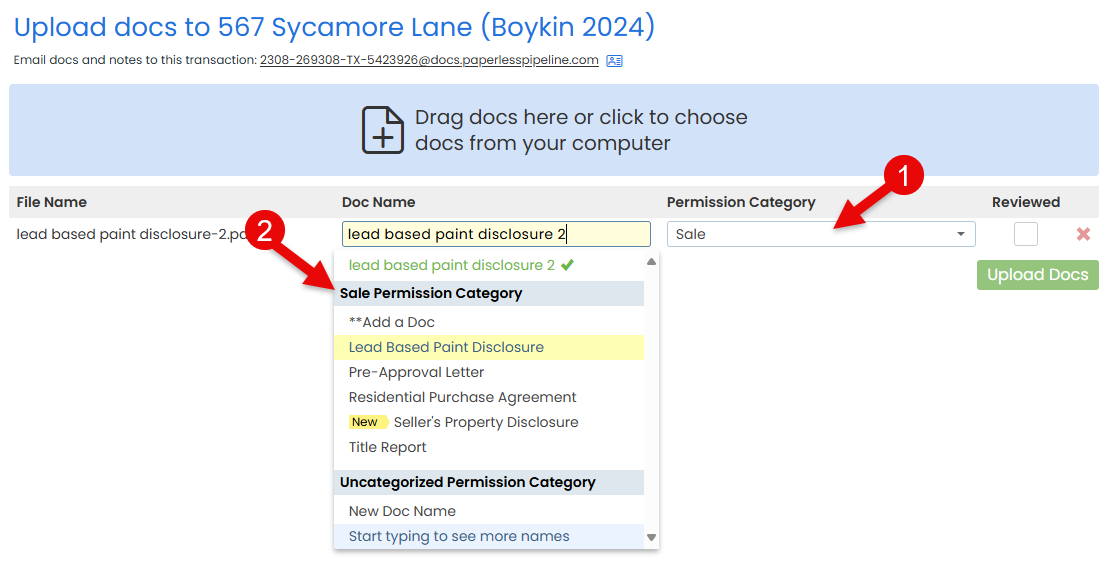
When naming docs in Pipeline, the dropdown list of your office’s Standard Doc Names just got smarter. If your Standard Doc Names have been set up with pre-set Permission Categories, the system can prioritize showing the appropriate doc names when naming docs.
To display the list of docs that match a specific Permission Category, simply select the Permission Category FIRST (before typing the doc name). Then, when you begin typing the doc name, docs matching your selected Permission Category will appear in a section at the top of the doc name list.
Learn more about Pre-setting Doc Permission Categories for Doc Names →
Fully Manipulate Your PDF Docs in One Place with Ease
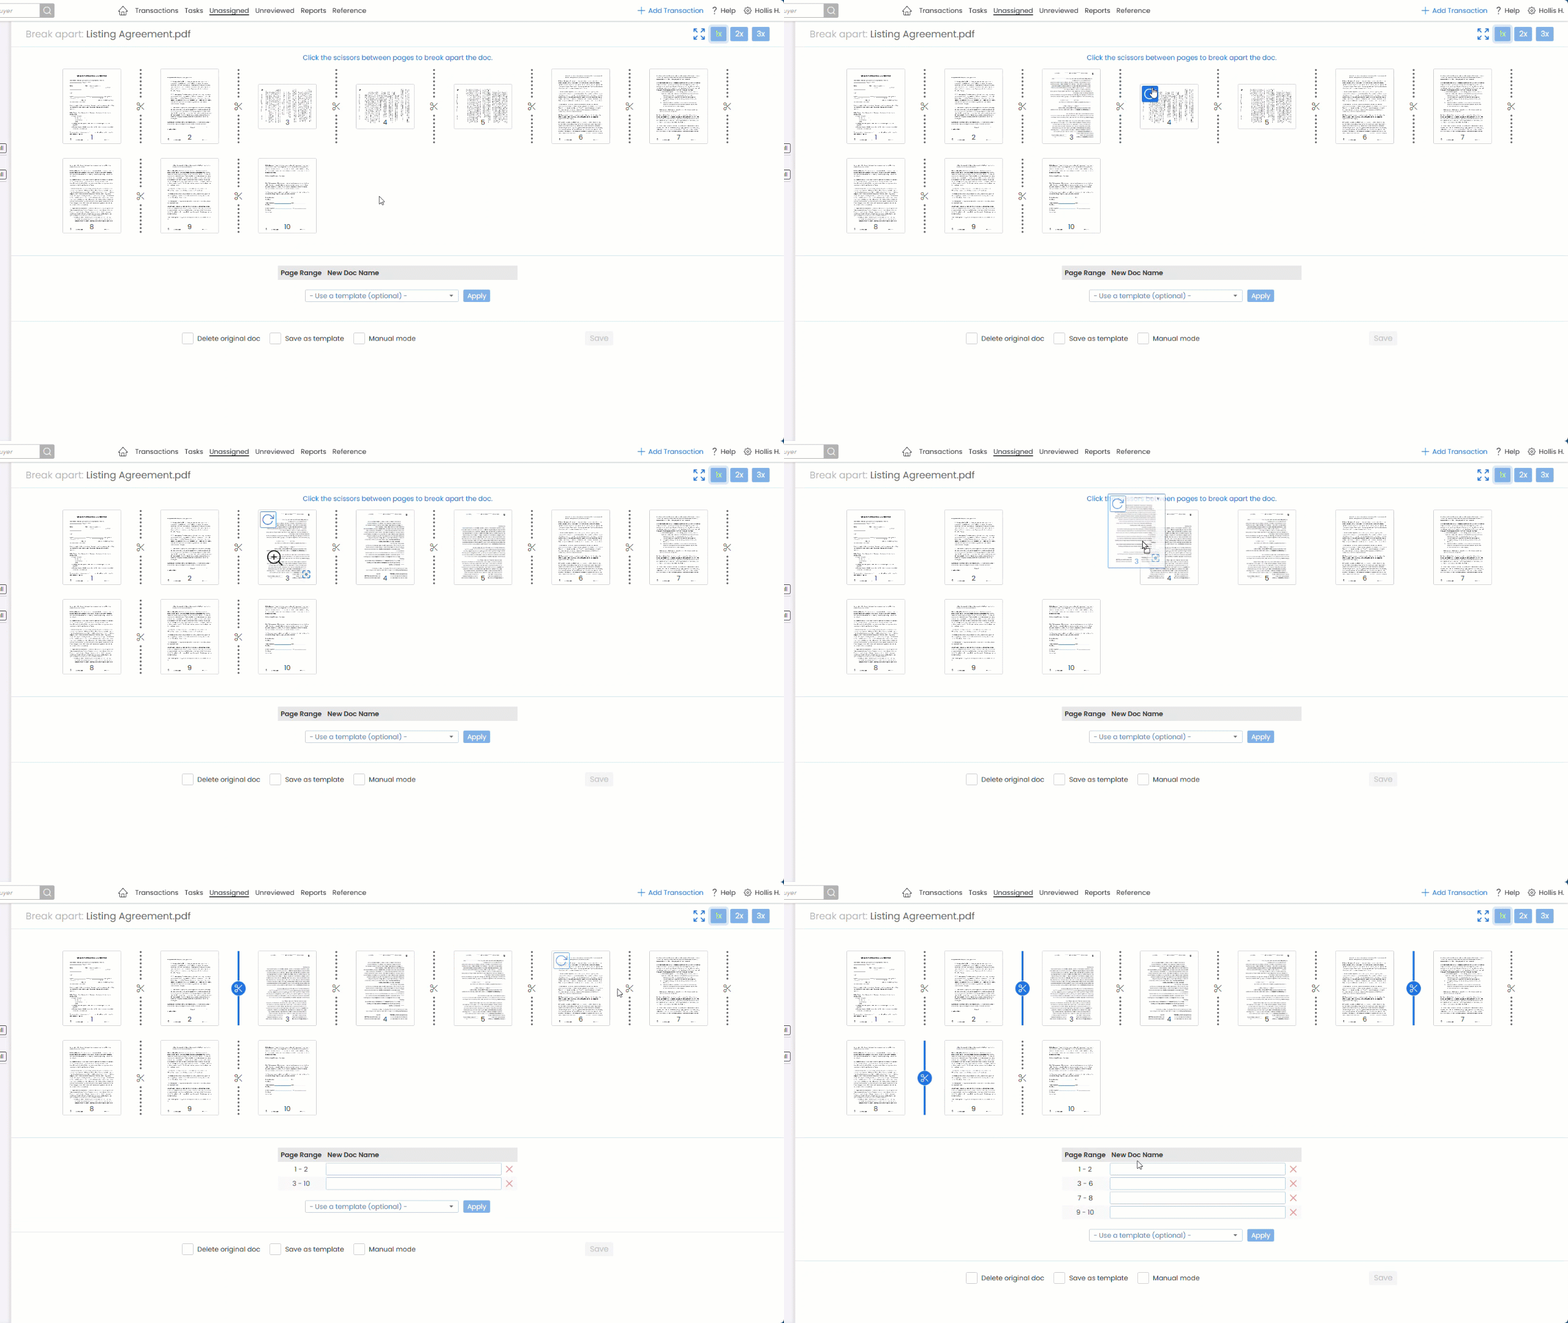
Need to break apart a doc, rearrange its pages, or rotate some or all of the pages? We’ve got you covered! The Break Apart/Arrange feature now allows you to do all of the above!
To start using the features, go to the same Break Apart page for any transaction doc or unassigned doc like you always have (by clicking the doc’s gear icon, then Break Apart). Then:
To break apart: No changes—you can still click the scissors in between pages to break the doc apart.
To rotate a page: hover over the page and click the [↻] icon.
To rearrange: Click and drag a page to its desired new position.
While the system can manage rearranged pages after you start breaking apart and naming docs, we recommend rearranging the pages before you begin the break-apart process. This helps keep your workflow organized, making it easier to navigate through the process without confusion.
Learn more about Breaking Apart Docs →
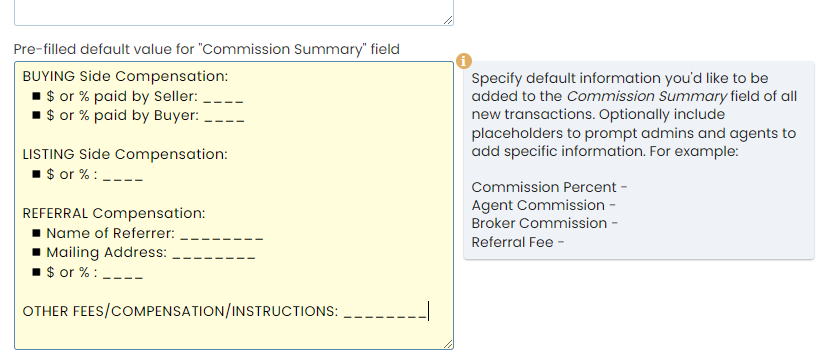
Default Value for Commission Summary Now Available to All Accounts
To help meet recent NAR Settlement requirements and simplify tracking compensation sources, all Pipeline accounts may now set a default value for the Commission Summary field. Once set, the default value will automatically populate in the Commission Summary field for each new transaction, prompting team members to enter Buying side sources.
Previously, this option was limited to Commission Module accounts.
The Commission Summary field is commonly used to store and share compensation details with everyone who has access to the transaction. It allows agents to easily add any negotiated compensation figures or specifics, making them visible to admins for better transparency.
Here's how to set it up:
- Go to Company Settings by clicking your name in the upper right corner, then [Admin / Settings].
- Scroll to the Transaction Settings section and locate the Pre-filled default value for Commission Summary field.
- Enter your desired default information and save to apply it to all new transactions.
Commission Module
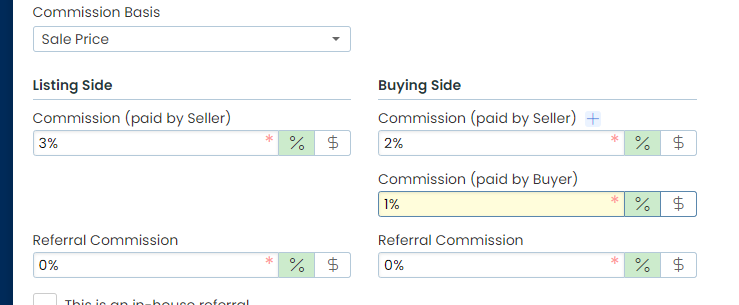
Set a Default Value to Prompt Entry of Buying Side Sources
When managing commissions, you now have the option to distribute Buying Side commission between seller and buyer sources. As a result, the old commission fields have been renamed Commission (Paid by Seller), so that the source is clear.
Buyer-sourced commission can be entered into a new, optional Commission (Paid by Buyer) field by clicking [+] next to the Commission field.
Learn more about Managing Commissions →
Commission Disbursement Authorization is Now Compensation Disbursement Authorization
The term "Commission" has been replaced with "Compensation" throughout the CDA to clarify that it includes various sources of compensation.
You’ll see this change in the document name as well as in the fields and labels within the form.
This update will help ensure consistent terminology and a clearer understanding of the complete compensation picture for each transaction.
Enter Dual Buyers or Sellers Once and Forget It
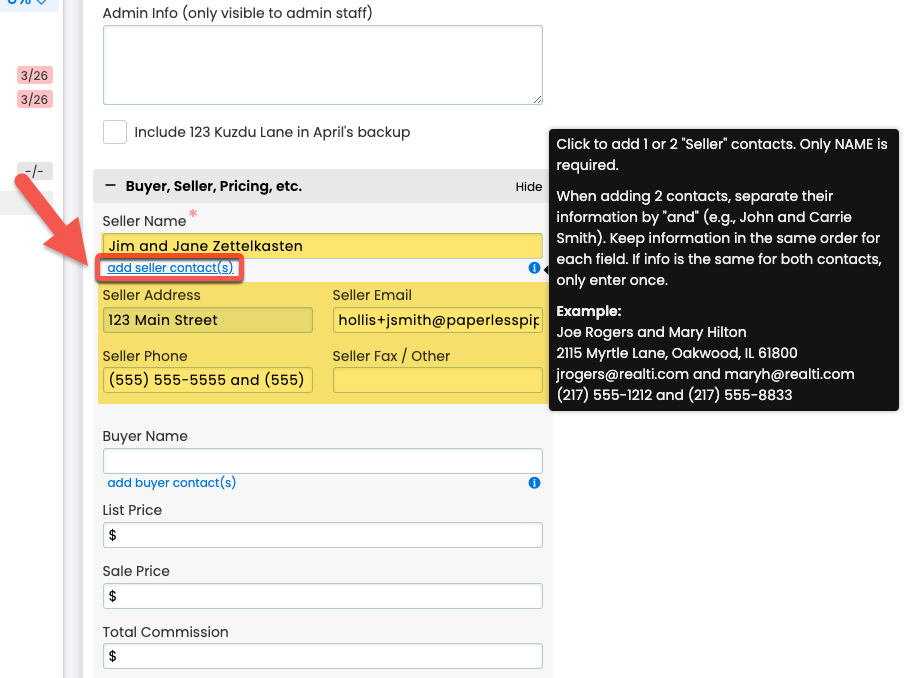
When there are two buyers or two sellers on a transaction, you can enter them both directly on the Add or Edit Transaction page. Doing so will automatically add them as contacts on the transaction, saving you the time of entering their information in both places.
To add dual buyers or sellers, from the Add or Edit Transaction page, click [add buyer/seller contact(s)], then enter their information (address, email, phone, etc.) separated by the word and. When the transaction is saved, a new contact will automatically be added for each.
View the ℹ tooltip below the Buyer / Seller fields for more details.
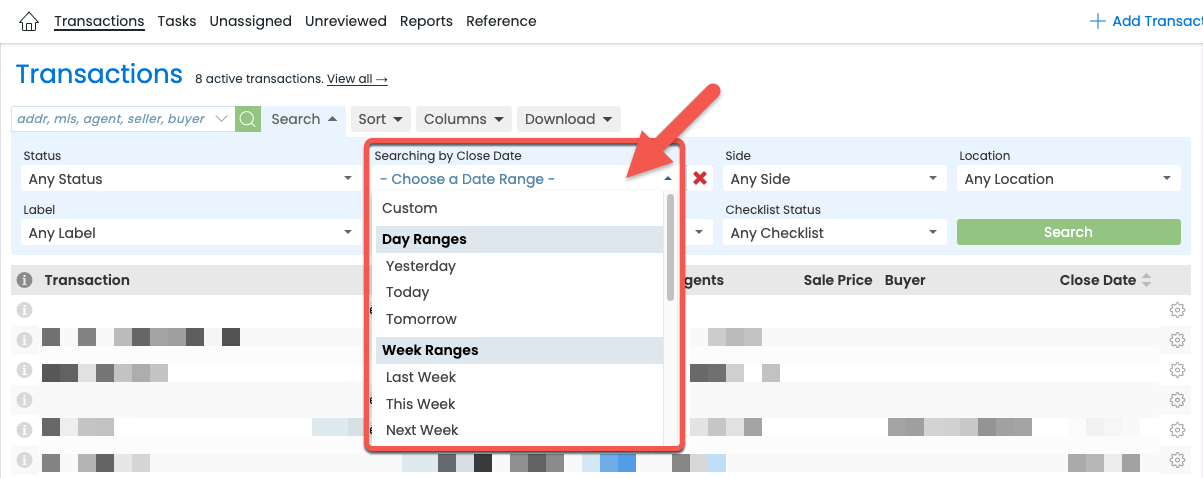
New Date Ranges Give You Instant Access to Transactions Within a Specific Number of Days
Four new relative date range options allow you to easily find transactions that are a certain number of days from the current date:
- Yesterday
- Next 7 days
- Next 14 days
- Next 30 days
Combine your date searches with other search options to isolate the exact transactions you're looking for. And since these ranges are relative to when the search is being run, you can save them as custom shortcuts for speedy access later.
Learn more about Searching & Sorting Transactions →
New Password Requirements Strengthen Your Account Security
We've updated our password requirements to adhere to the latest guidelines recommended by the National Institute of Standards and Technology (NIST). If your existing password doesn't meet the minimum requirements, you'll be prompted to create a new one the next time you log in.
Don't worry, we won't require you to concoct an arbitrary composition of numbers, symbols, uppercase/lowercase, etc. NIST has found that such strict requirements actually do not improve security. Ironically, they can do the opposite, leading people to create more uniform passwords to satisfy the criteria, making passwords easier to guess and harder to remember.
Learn more about Login Security →
Commission Module
Make the Important Parts of Your CDA Instructions Stand Out
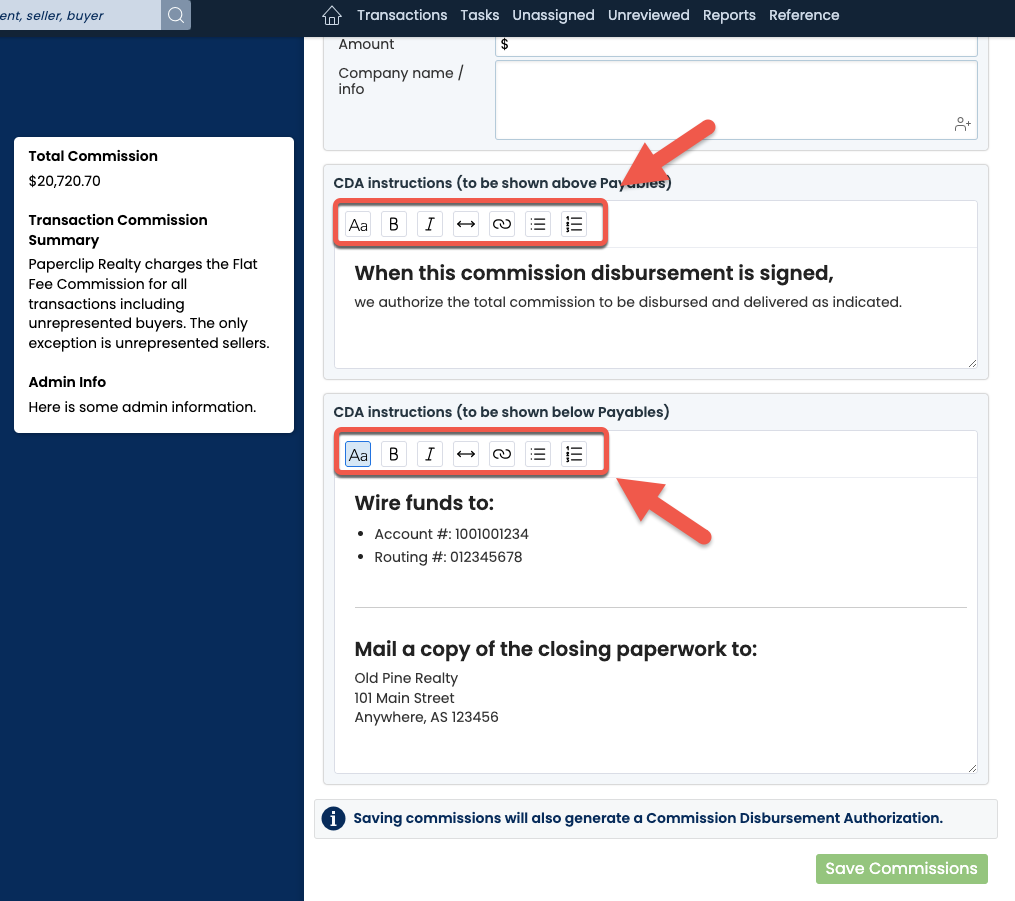
The 1-click formatting tools you've been enjoying when drafting your messages, company announcements, and email signatures are now available on your CDA Instructions.
Use the standard formatting icons to easily format and instantly preview visually compelling instructions to the title company or other readers.
Emphasize important information by adding headers, bold or italic text, links, horizontal lines, and bulleted and numbered lists.
Break Apart: Split and Name Docs While Zoomed In
If you need to get a closer look at a doc as you're breaking it apart, you can now complete the entire process while zooming in on a single page.
You can now split, name, and assign permissions to your docs while you're navigating between full-sized pages. This allows you to specify your docs while taking a closer look at them vs. having to return to the grid view to split and name them, potentially disrupting your workflow.
Of course, this zoomed-in method simply serves as an added convenience when needed. You can still break apart docs from the thumbnail grid to take advantage of the bird's eye view.
Watch a 2-minute video on how it works →

Easier Formatting is Now Available in More Places
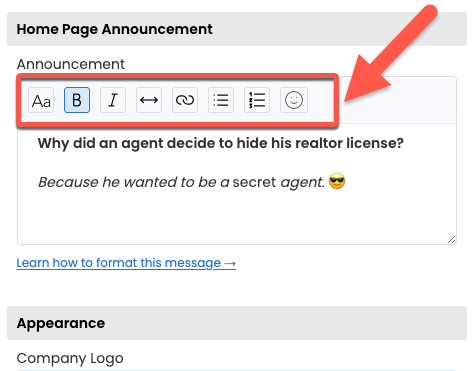
The formatting tools you've been enjoying in messages are now available in your email signature and company announcements. Create visually appealing signatures and announcements by adding bold text, links, lists, emojis, and more using the standard formatting icons.
 Learn more about Email Signatures → Learn more about Email Signatures →
|  Learn more about Announcements →
|
View Past and Future Commission Figures at a Glance
Need quick access to commission-related figures from three months ago or two months ahead? Access your Commission Summary across multiple months and years by clicking the forward and back arrows on the Commission Summary page.

Preset Shortcuts Have Been Retired: Use Custom Shortcuts Instead
The six preset Shortcuts that previously resided on the left Transactions menu have been retired. Use your own Custom Shortcuts to create and quickly access any reports you regularly view.
Learn more about Custom Shortcuts here →

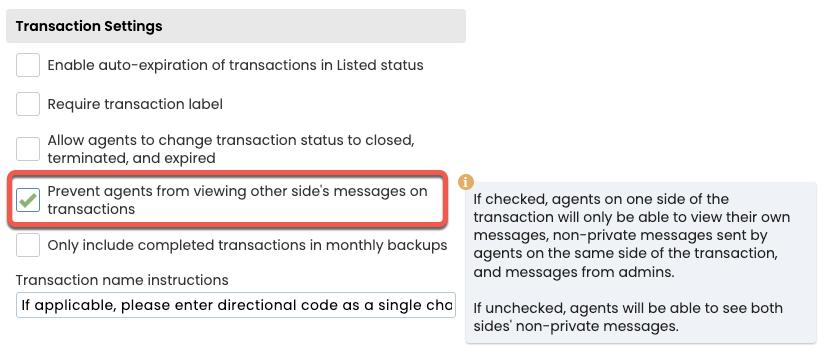
Only Allow Agents to See Messages on their Side
Need for notes and messages sent by agents on one side of a dual-sided transaction to be shielded from agents on the other side?
Set your account to automatically hide these messages from the other side's agents by turning on Prevent agents from viewing other side's messages under Company Settings.
Commission Module
Track Agents' Progress Toward Commission Splits or Measure Their Total Brokerage Contributions
With the new Agent Contribution report, you can view agents’ commission contributions to the brokerage during a given time period, as well as monitor how close they are to their Next Commission Splits.
Download an Agent Contribution report from the Reports area by clicking [Agent Contribution] on the left menu and selecting your desired options for the report.

Duplicate Transaction: The Time-saving Tool You Didn't Know You Needed
Say goodbye to repetitive manual transaction entries. Pipeline's new Duplicate Transaction option can streamline your team's workflow in unique and creative ways you won't be able to live without.
Here are a few examples of how duplicating transactions can save time every day:
Transactions as Templates: Create a transaction to be used as a template, containing whatever default information is appropriate for that template's scenario (e.g., Transaction Name: "Sunset Office Listing Template", or "Team Willow - Template"). Include as much or as little info, docs, contacts, checklists, etc. as needed. Whenever that template transaction gets duplicated, its info will automatically be copied over. Then any remaining, transaction-specific information can be added to the resulting transaction.
Copy Buyer Offer Transaction: Duplicate an existing buyer's offer transaction when it falls through to effortlessly copy the transaction.
Support a Parcel of Properties: Save time by duplicating transactions representing a parcel of several properties with nearly identical property information.
To duplicate a transaction: From the Transaction List, click the transaction's gear, then select [Duplicate].
Learn how to Duplicate A Transaction →

Instantly Track a Transaction's Progress and Verify Activity
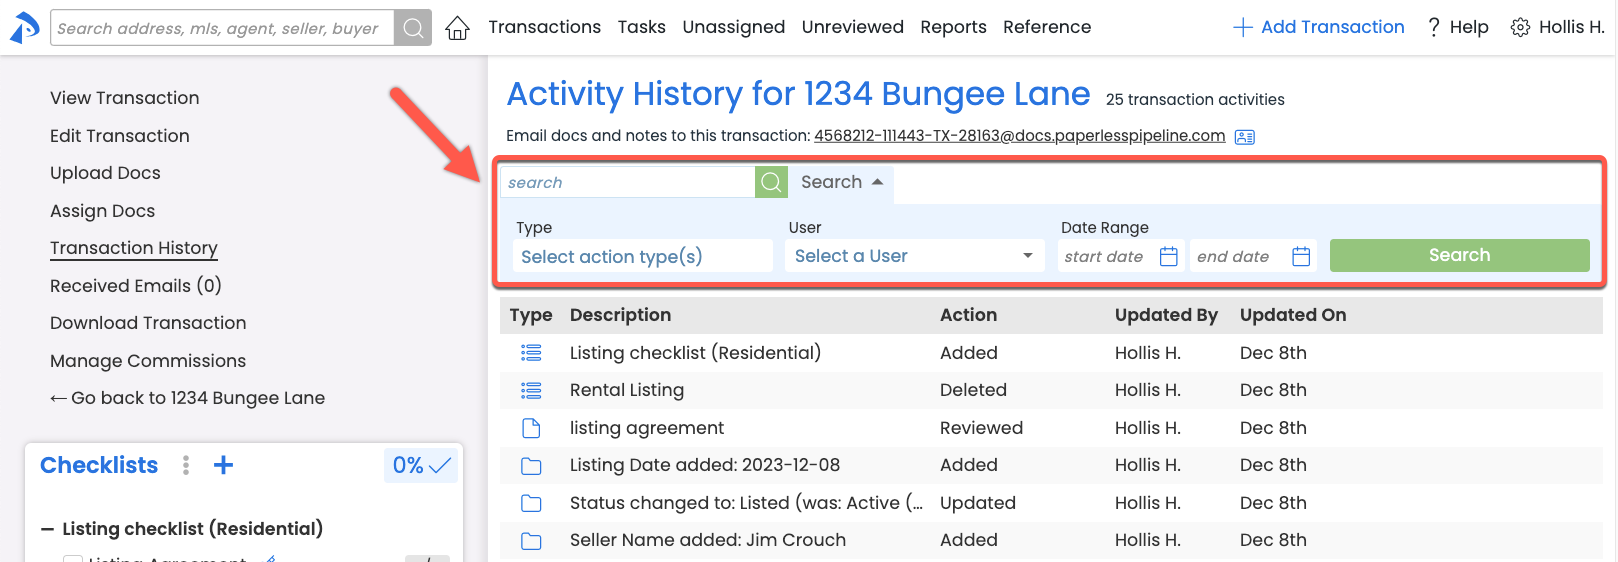
You can now quickly locate the exact actions that have occurred on a transaction, saving the time of having to browse potentially long transaction histories.
To find specific actions, click on [Transaction History] in the left menu of a transaction. Then, use the search filters at the top of the page. You can filter by the type of action, the user who performed it, and/or a date range.
Learn how to Search A Transaction's Activity History →
Save Time By Running Combined Searches in a Single Step
You can now access Power Search in the area where it has the most power, and save time in the meantime. Power Search has always been at your service in the upper left corner of each Pipeline page, with the resulting search criteria conveniently copied into Transactions – Advanced Search, where you can add additional search criteria, if desired.
But now your Power Search options can be accessed directly from Advanced Search, allowing you to Power Search and add any additional filters in a single step.
Learn more about Power Search →
Spot and Address Important Transactions Instantly with Custom Flags
Need to see which transactions were recently added? Which have recently received messages? Which are ready for a certain action? Avoid missing or overlooking transactions that are important to you by flagging them with your very own custom flags. Transaction Flags can be based on any search criteria that can be defined in the Transaction Search area.
To create a custom flag from the Transaction List, run you desired search, then click [Save Search], choose a flag, name it, and save it.
That's it! Transactions matching that criteria will be flagged for you on the Transactions List going forward.
Learn more about Transaction Flags →

Automatic Doc Versioning Saves Your Team Typing
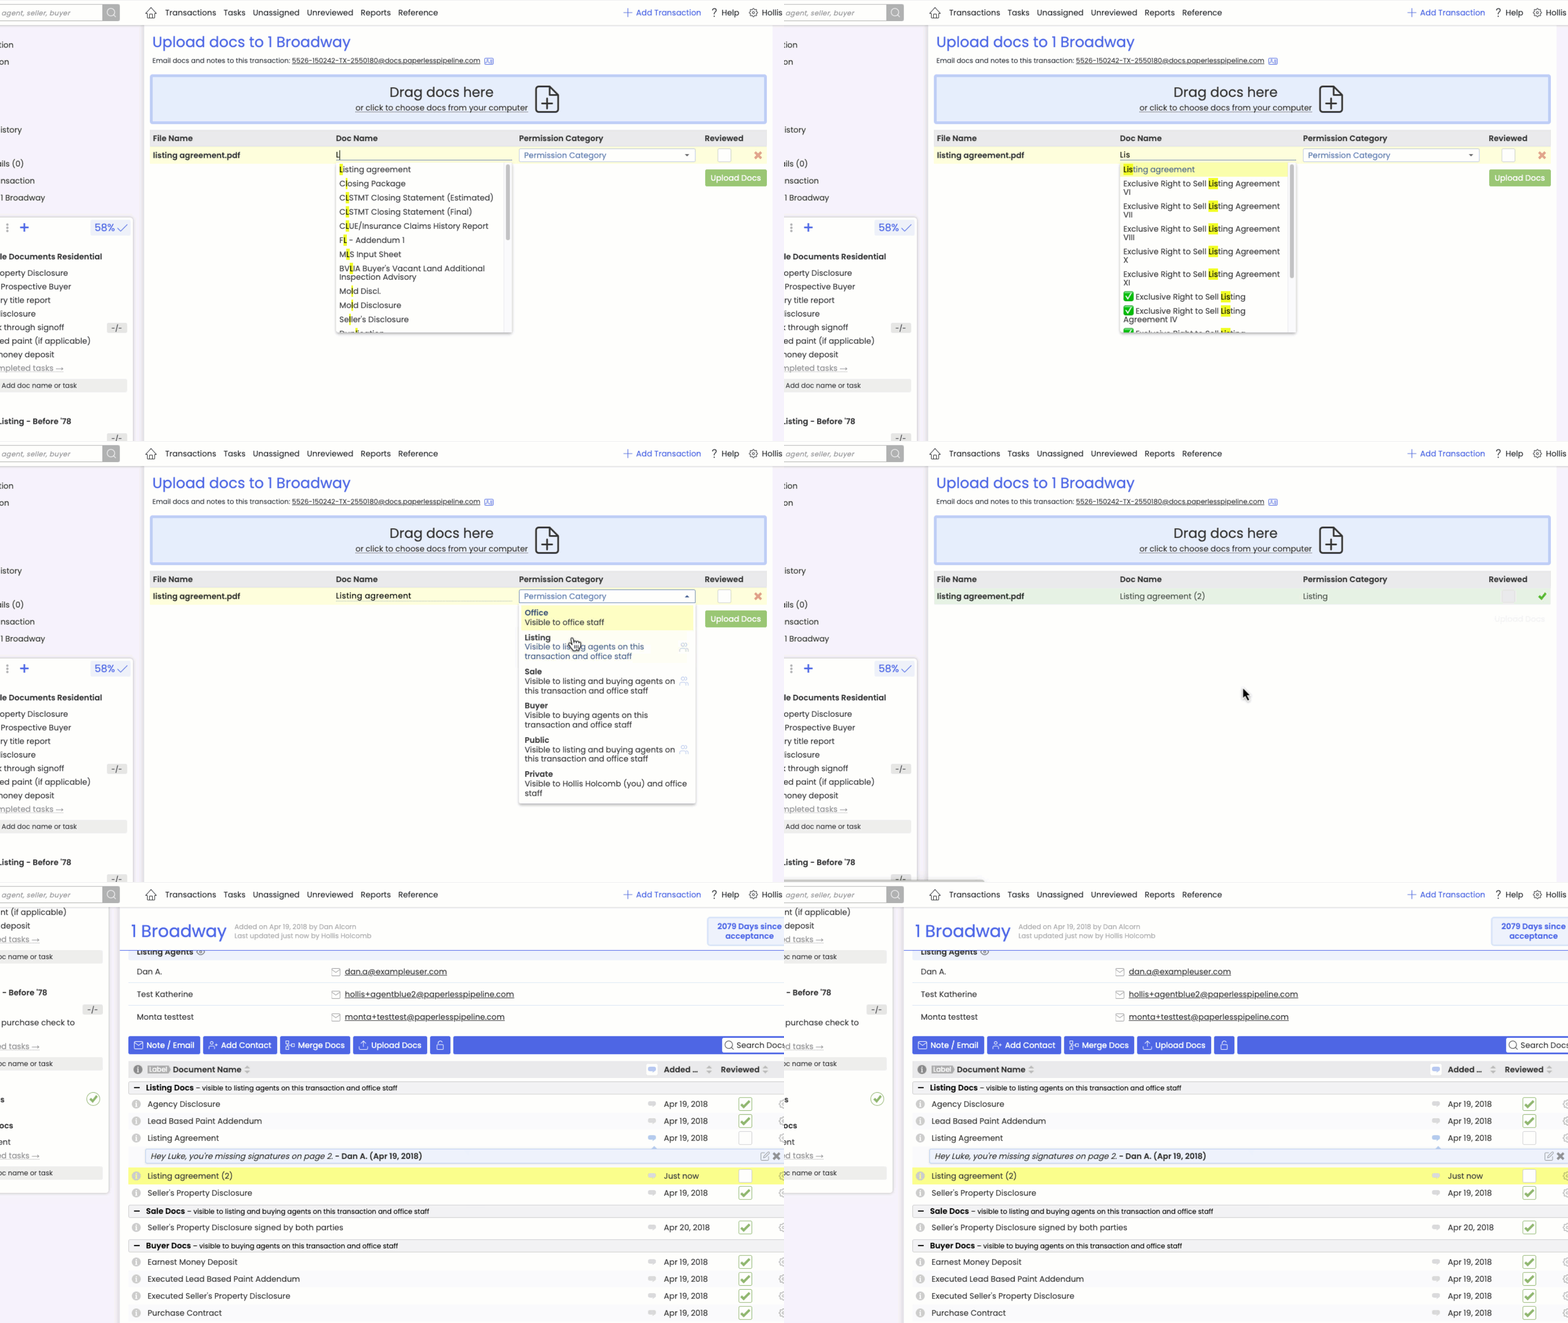
Pipeline will now allow docs with duplicate names to be added to transactions. Any duplicate doc name will have a version number appended to the end (e.g., Listing Agreement (2)).
See a Transaction's Agents at a Glance
You can now view the agent associated with a transaction directly from the Transactions List without hovering. When there is more than one agent on a transaction, "Multi" will be displayed, and you can continue to hover to view those agents.

One-click Text Formatting: Make Important Parts of Your Messages Stand Out
Use standard formatting icons to format text within messages you send from Pipeline – no special markings/markdown needed. This new WYSIWYG (what you see is what you get) editor allows you to format your text with a single-click, and see what it looks like in real time.
Create visually appealing and engaging messages by adding headings, emphasizing important points with bold or italic text, turn text into links, inserting horizontal lines, and creating bulleted and numbered lists.
Learn how to Format A Message →

Personalize Your Emails with Agent Signatures (for Transaction Coordinators)
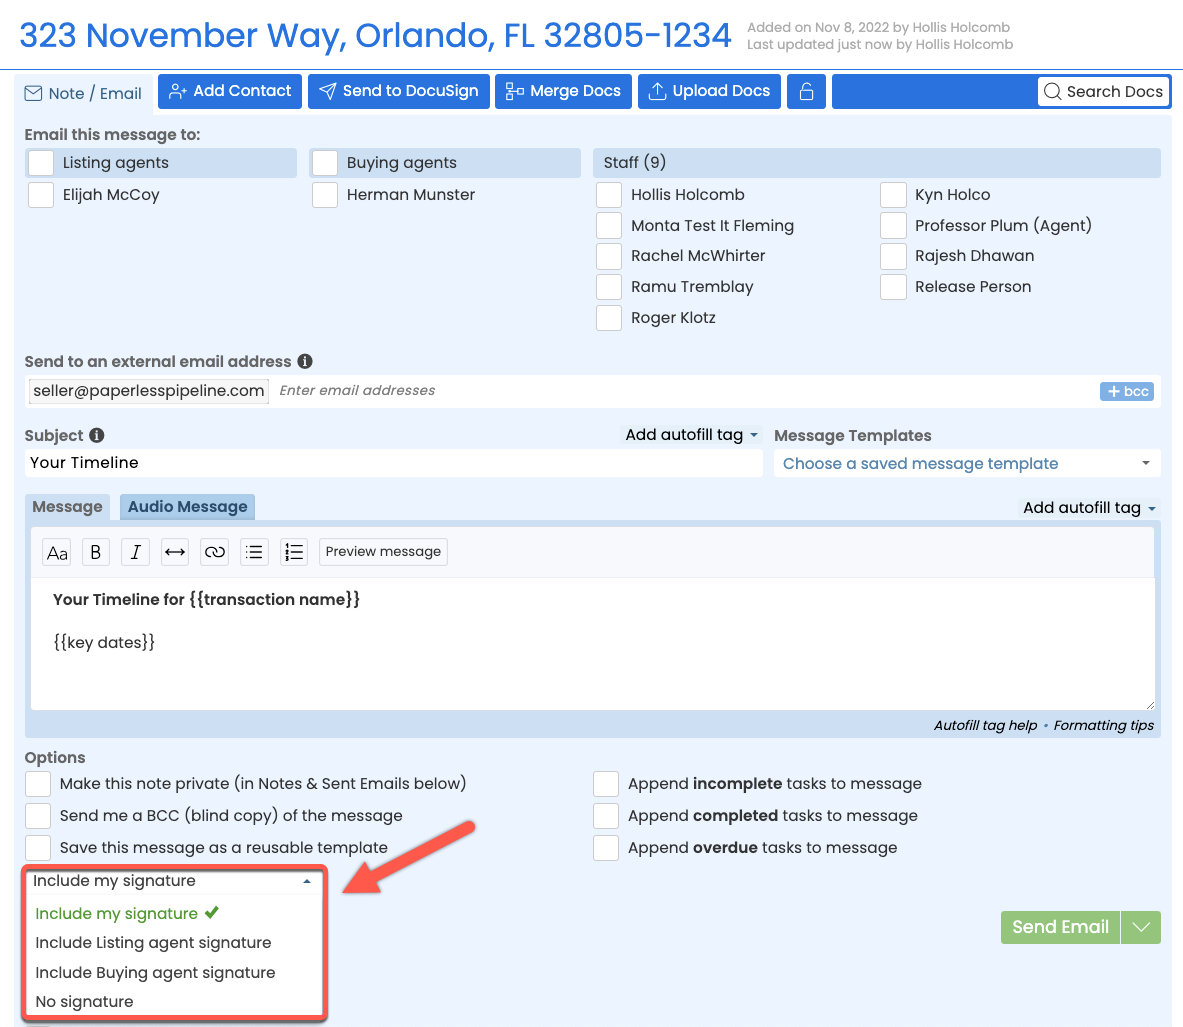
Transaction coordinators, you now have the super power of including the desired agent's signature in emails you send from Pipeline, providing recipients with a more personalized experience and appropriate contact information.
To start including agent signatures, turn on Enable alternate signatures on my messages from your Personal Profile.
Next, choose whose signature you want to include when creating a message on the transaction.
Learn how to Use Agent Signatures In Your Messages (for Transaction Coordinators) →
Break Docs Apart Faster By Pointing And Clicking
Extracting pages and breaking large docs into smaller docs is now faster, easier, and more intuitive. Preview the doc's pages in thumbnail or enlarged form, then click the scissors in between the desired pages to indicate your breaks. Dive in without a learning curve by watching this 2-minute video →
Learn more about Breaking Apart Docs →
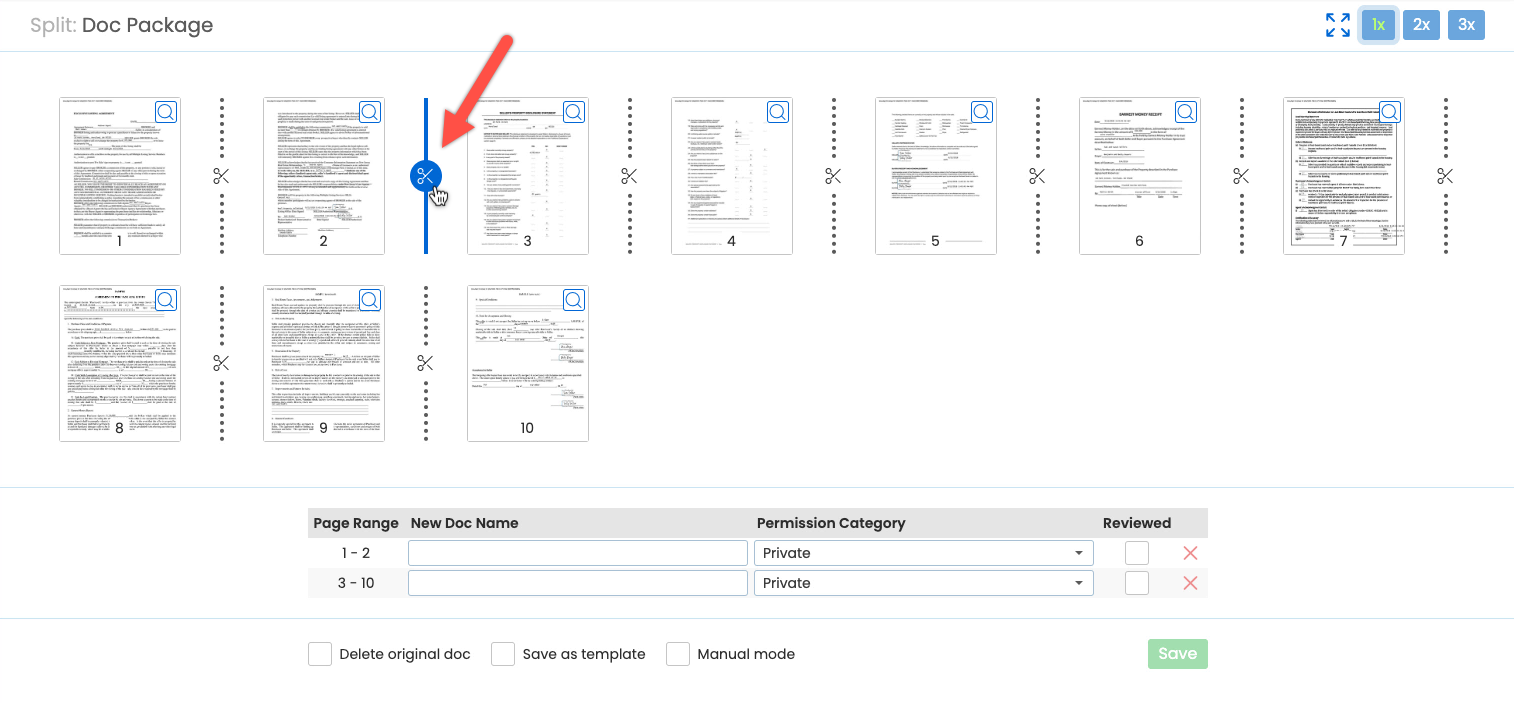
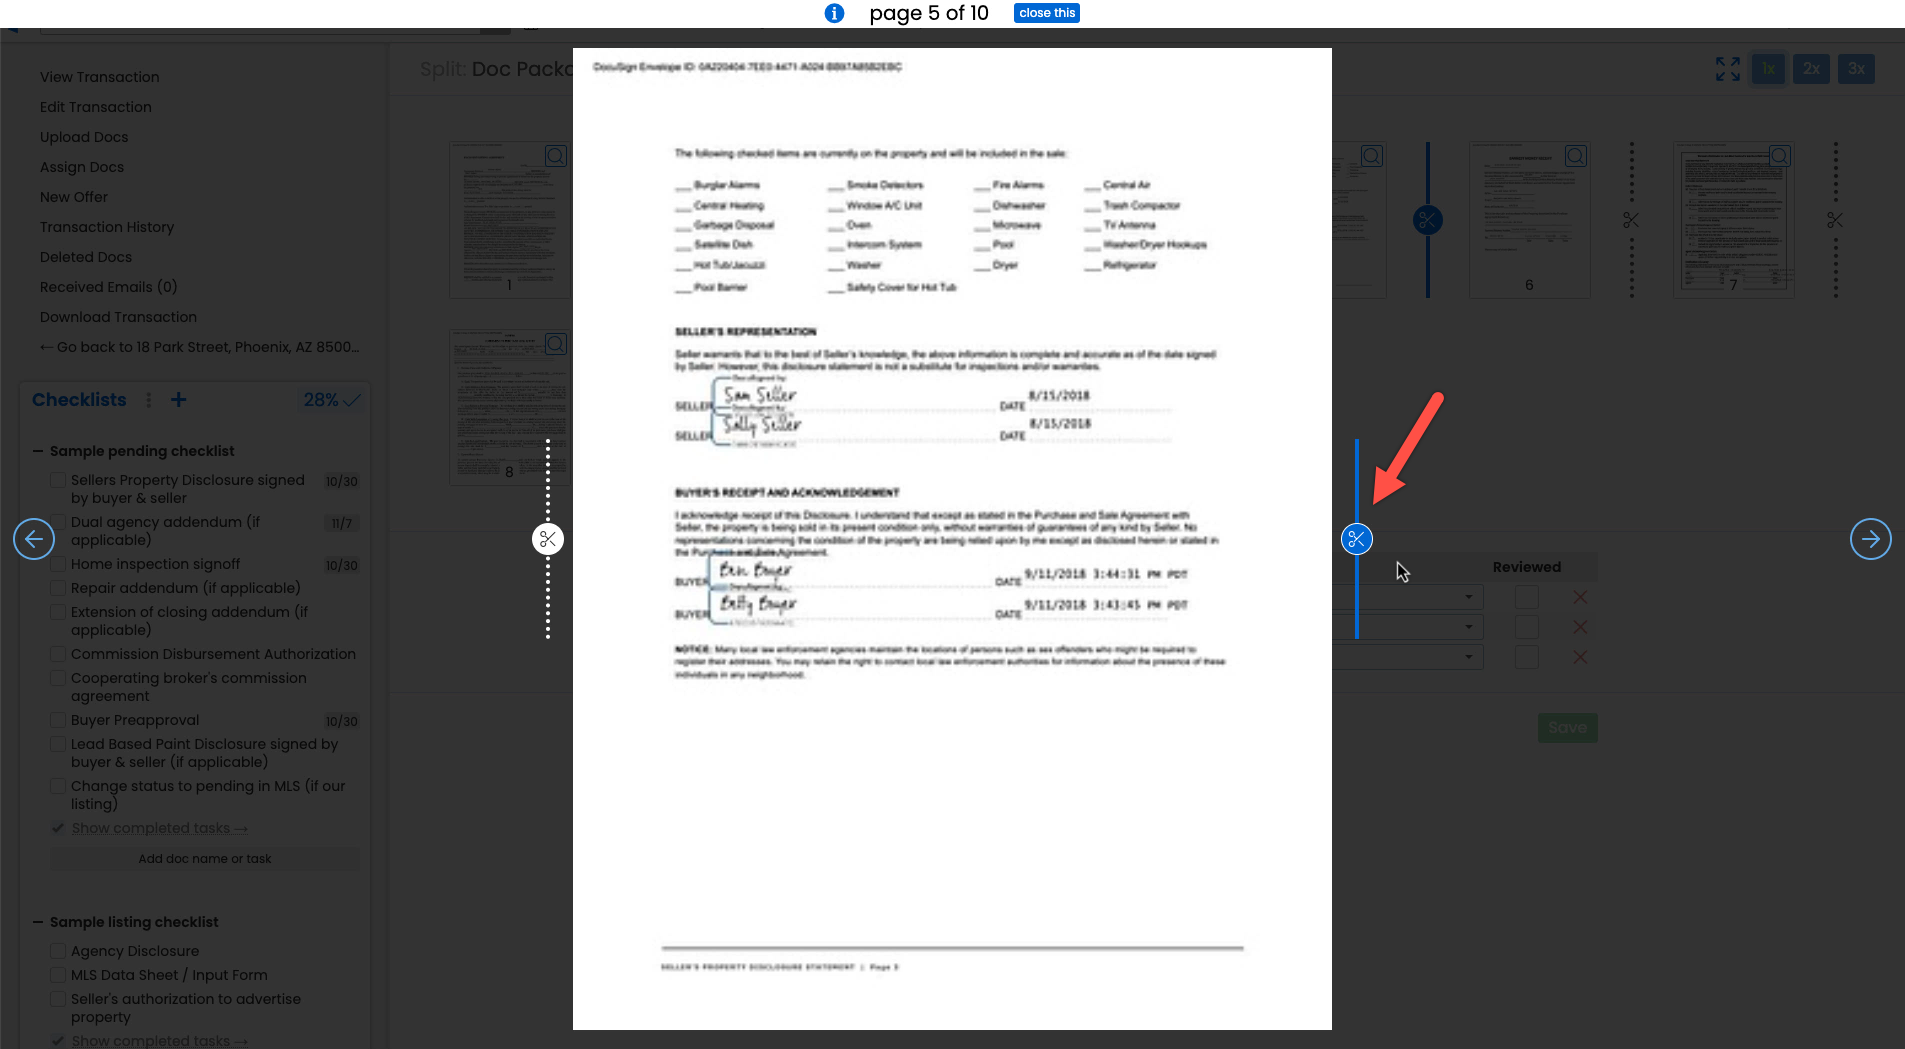
Need To Adjust What's Displayed On Your Coversheet? We've Got You "Covered" 😉
Customize the information that appears on your company's coversheet by selecting from multiple pre-set layouts. Within your selected layout, you can also control which sections appear and which do not by selecting them individually.
Master admins can visit Company Settings to customize your office's coversheet right away.
Learn more about Customizing Coversheets →
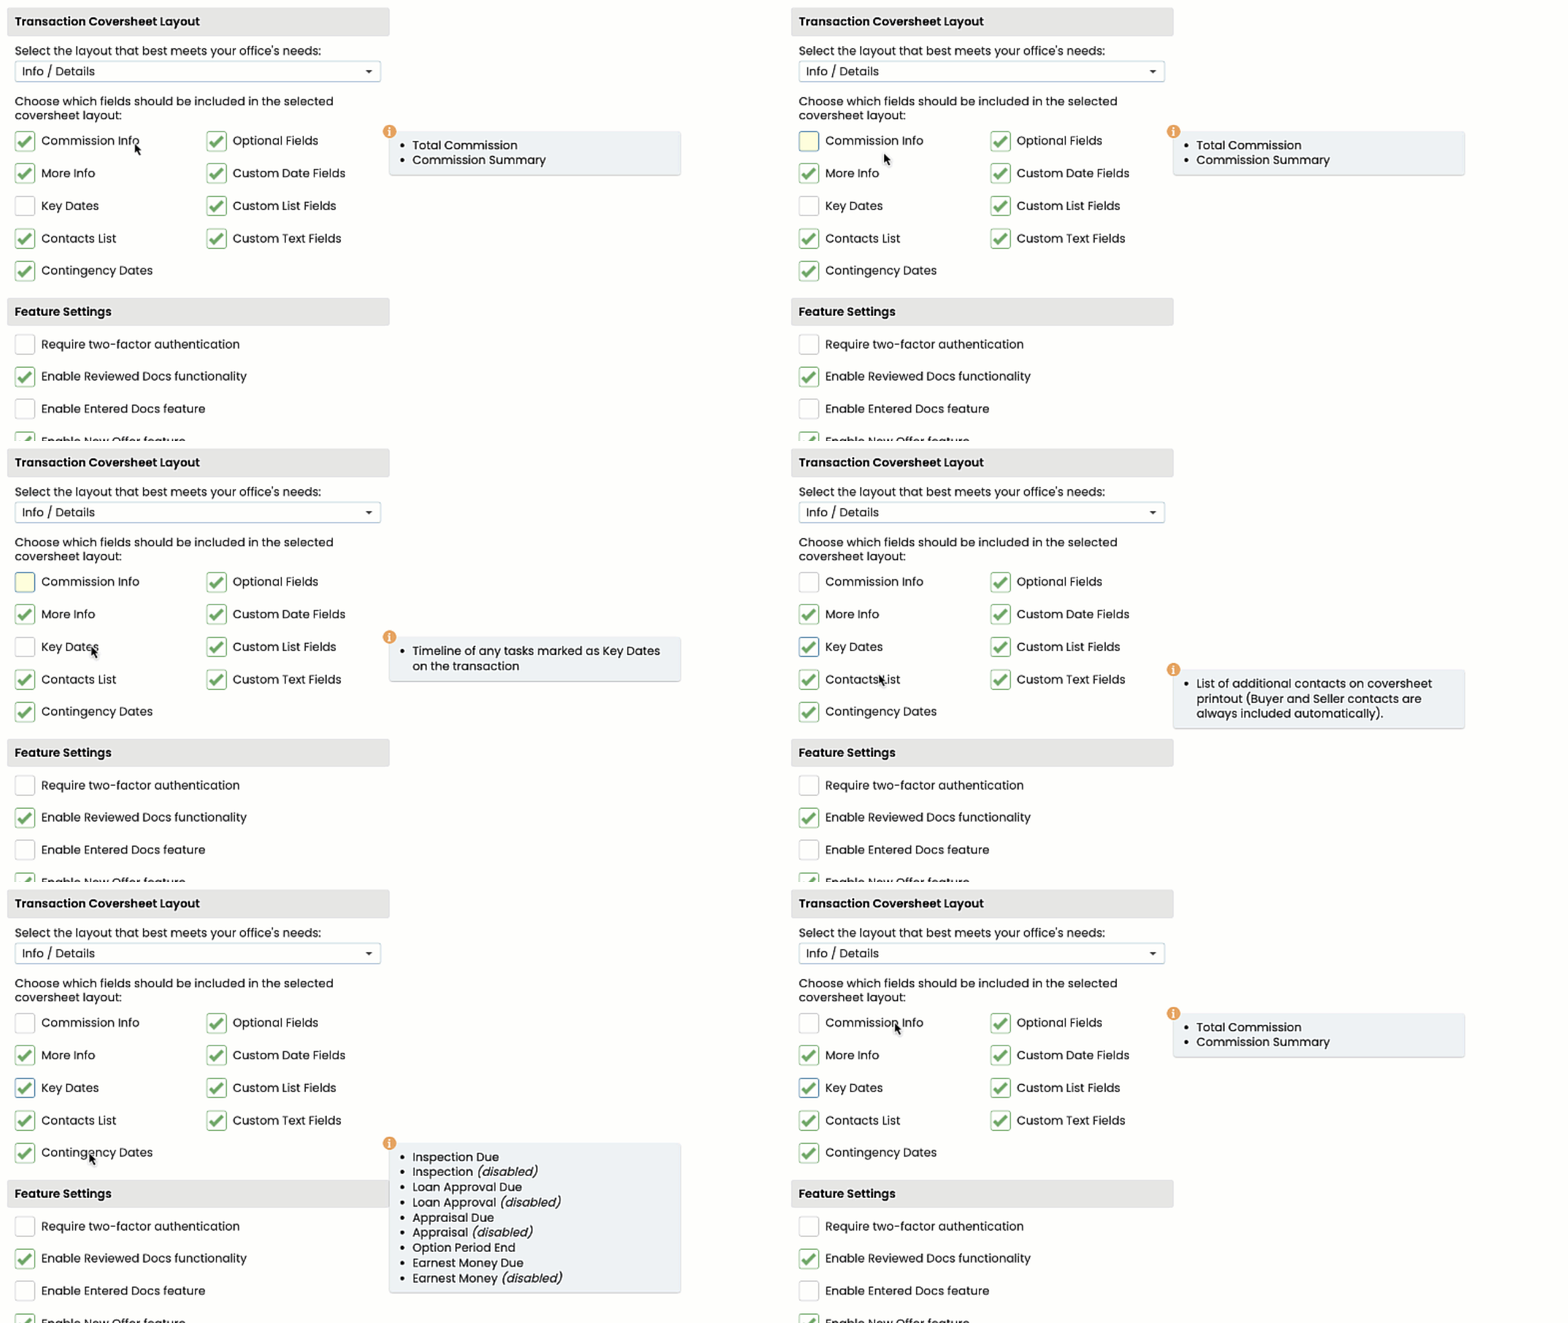
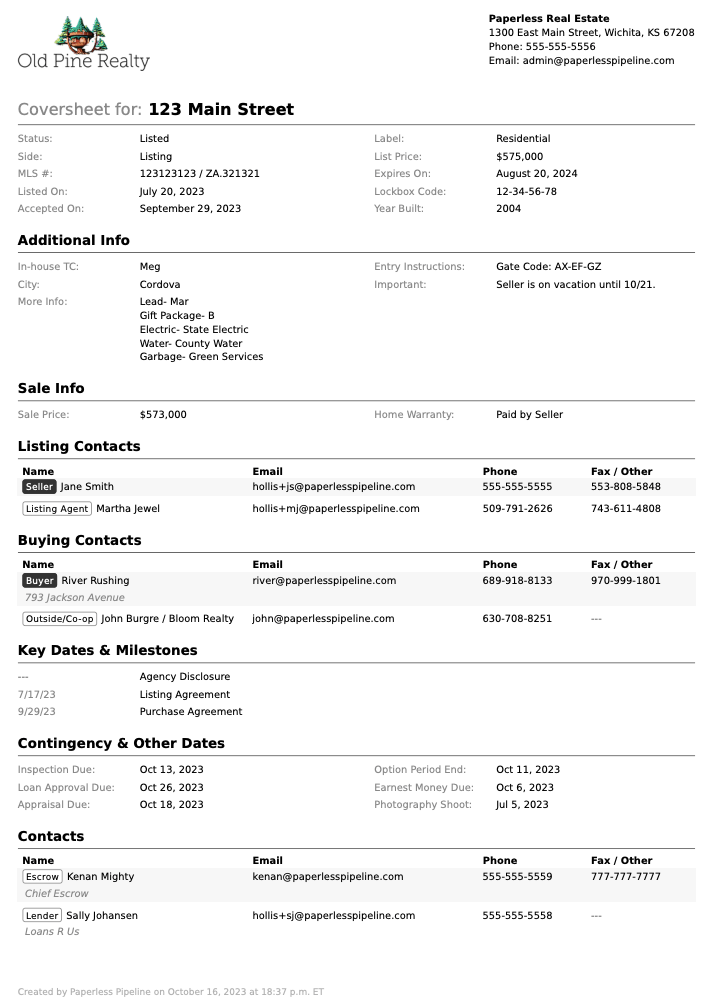
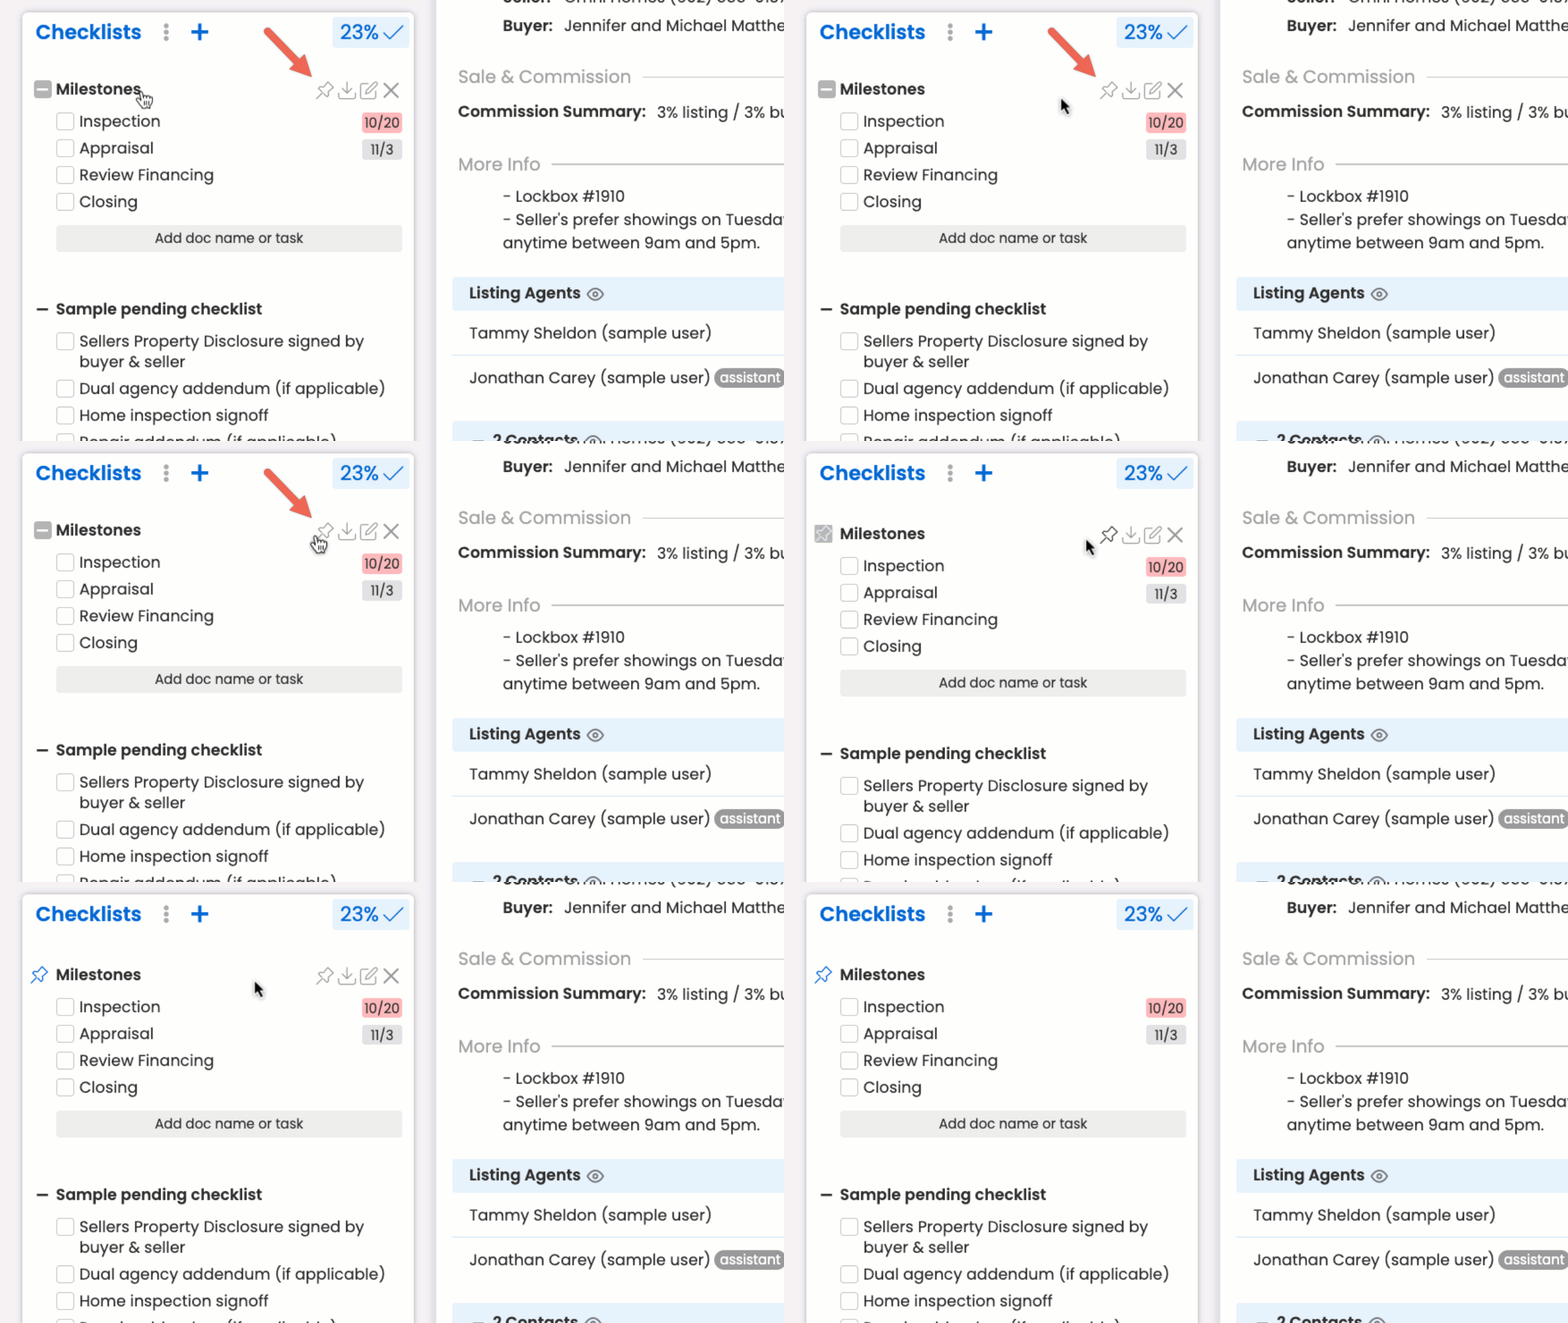
Keep Your Most Important Checklists Front And Center
Need a particular checklist to stick to the top of a transaction? Admins can pin such checklists to the top of the Checklists section by hovering over the desired checklist on the transaction, then clicking the pin. Pinned checklists will appear at the top of the Checklists section for anyone who views the transactions.
Learn more about Pinning Checklists on Transactions →
Make Your Signatures More Personal
You can now add an image to your personal signature that appears at the bottom of messages you send from Pipeline. Whether you prefer your image to be a company logo, a photo of yourself, or an image of your standard email signature, the choice is yours! Images can also be coupled with any custom text you enter (including links), supporting more consistent branding across all your Pipeline and non-Pipeline messaging.
Learn more about Customizing Your Email Signature →

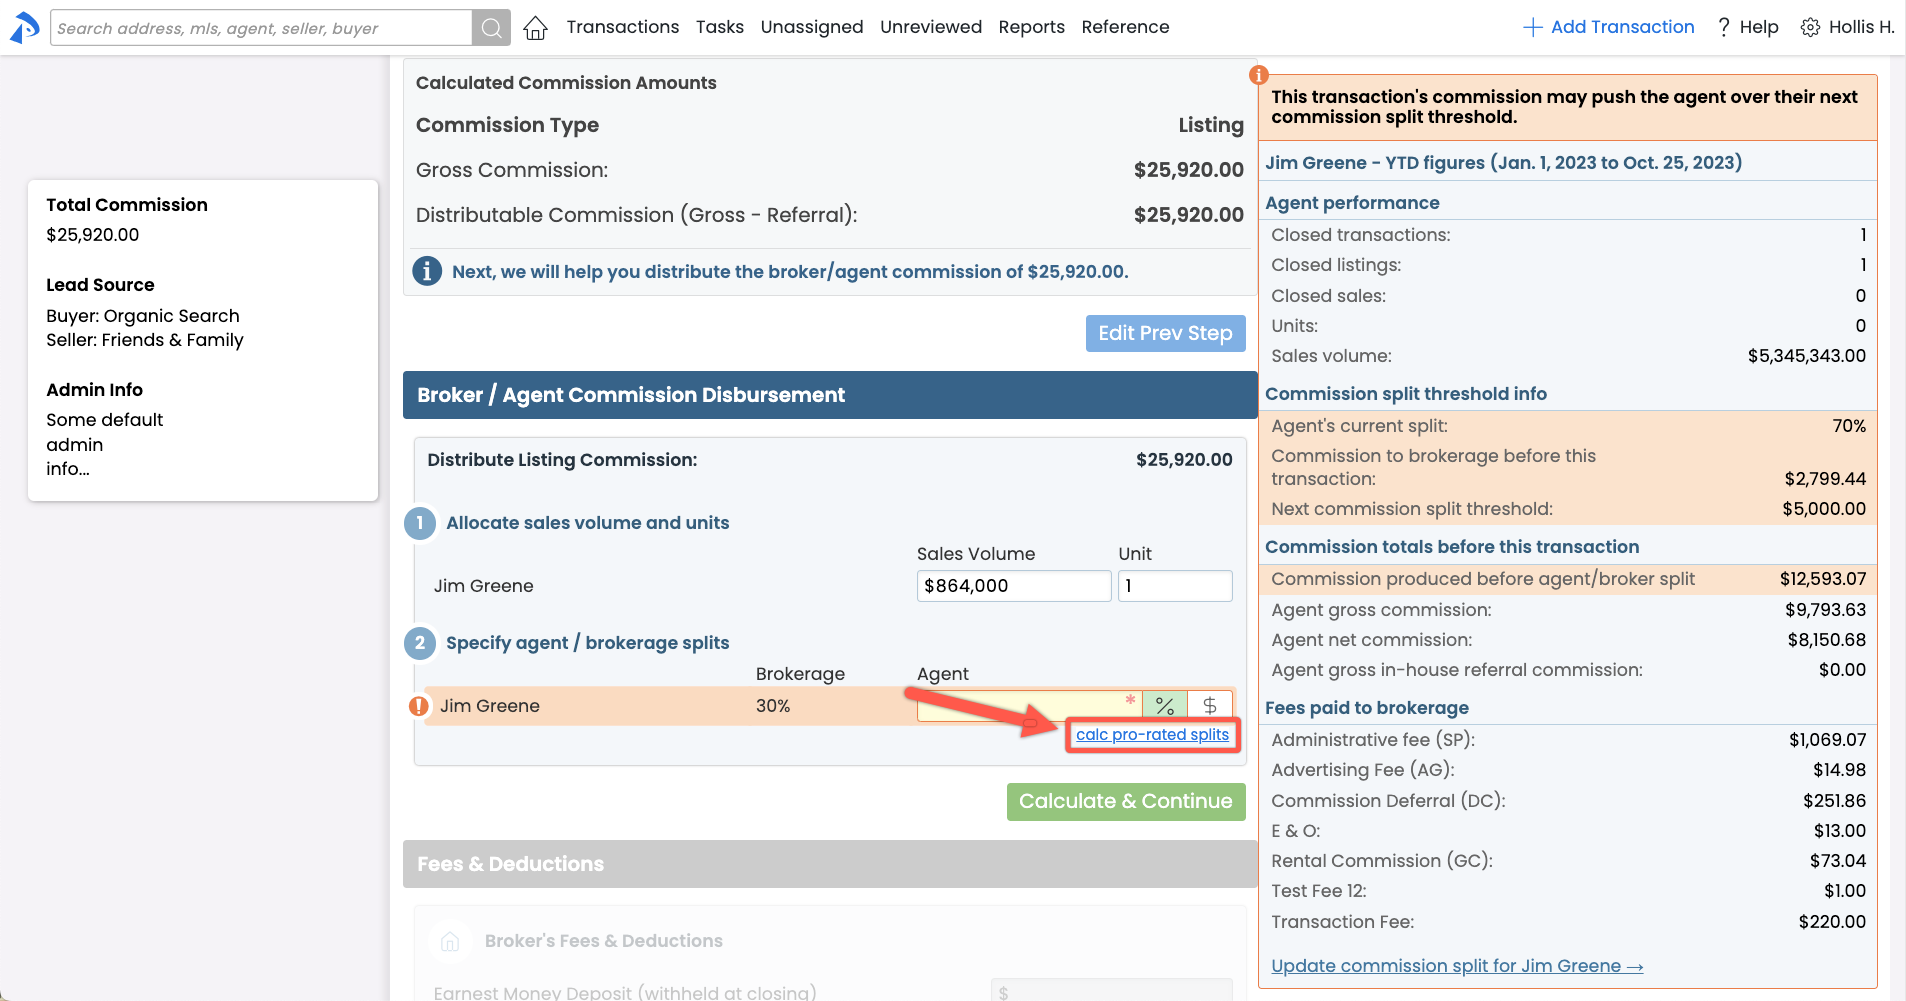
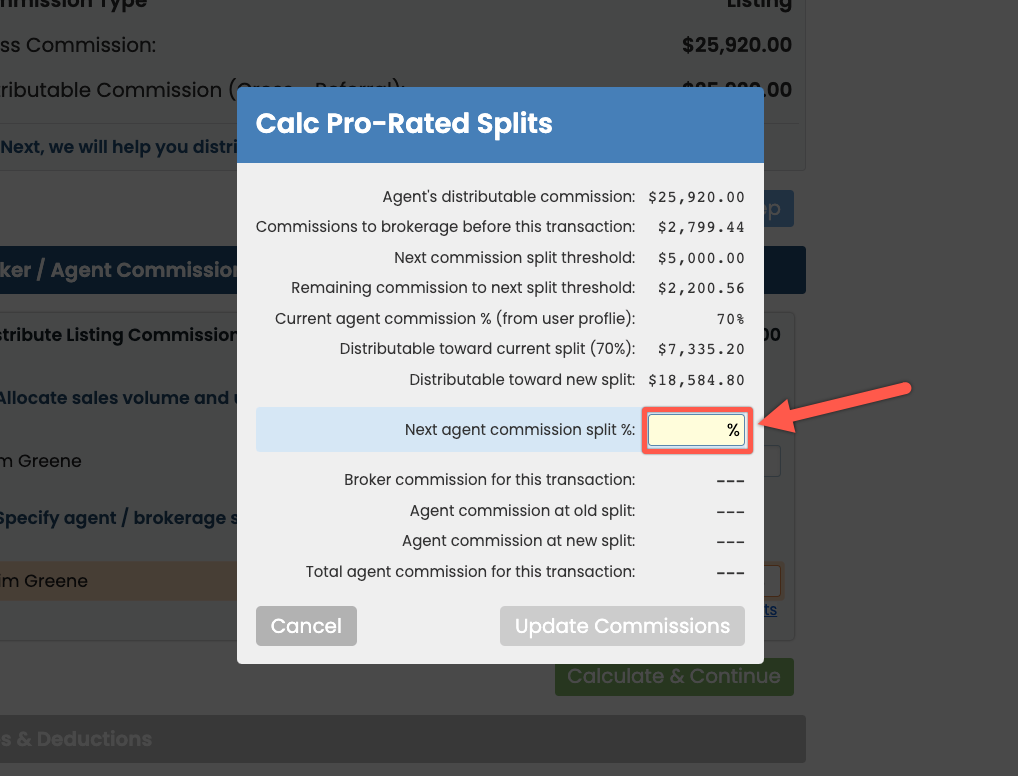
Put Your Calculators Away! Calc Pro-rated Splits With A Few Clicks When Agents Meet Their Split Threshold
When an agent is close to hitting their commission split threshold on a transaction, the system will help you calculate the pro-rated commission due for that transaction. To calculate:
- Click [Calc pro-rated splits]
- Enter the NEW split percentage
- Review the calculations and click [Update Commissions]
- Optionally: update the agent's profile with their new split information, when asked.
Learn more about Calculating An Agent's Pro-Rated Commission Amount →
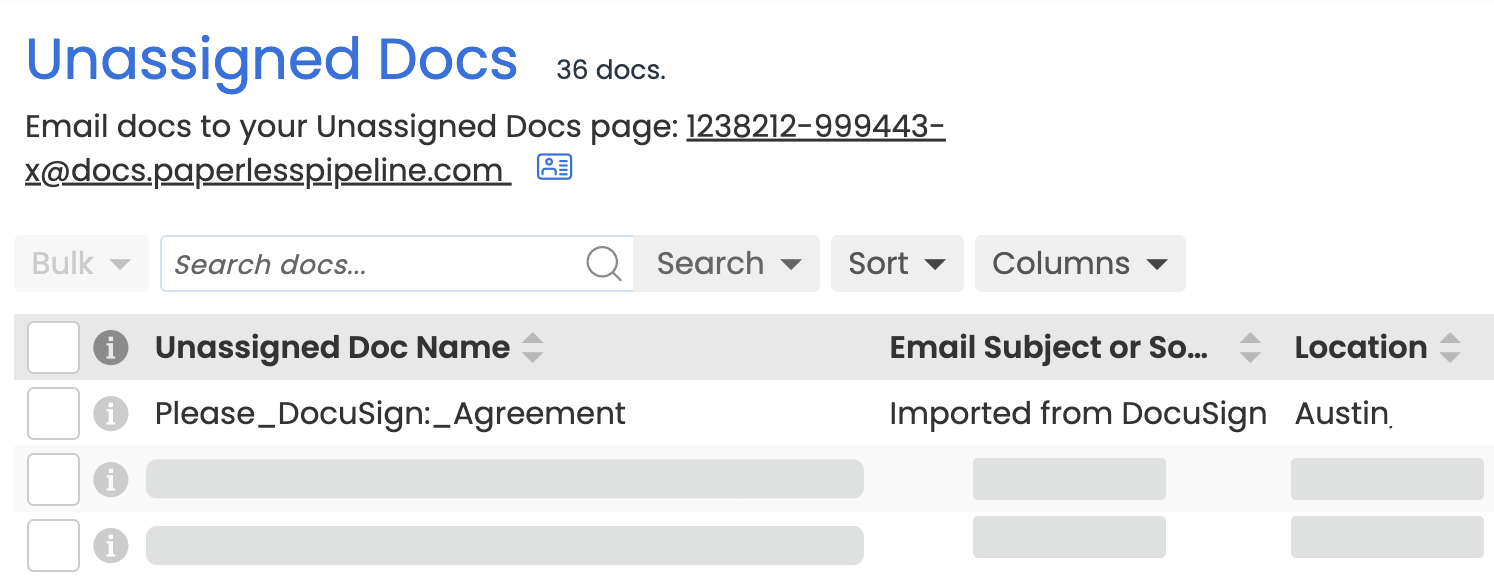
Get Signed DocuSign docs into Pipeline without lifting a finger
Docs you send for DocuSign signature from Pipeline will now be automatically imported back into Pipeline once they've been fully executed...no upload needed! Once docs are fully executed, they'll automatically arrive in Unassigned Docs where they can be assigned via the same easy workflow you're already used to. You'll continue to receive an email notification that signing has been completed, and you'll also now receive a notification on your Pipeline Home page whenever you log in.
Learn more about Receiving Signed Docs Automatically via DocuSign →
Send Reference Docs from Transactions in one step
Save time and steps by sending Reference forms and docs directly from transactions. Start the process by visiting the Reference page, selecting the doc you'd like to send, then specifying from which transaction you'd like the doc to be sent. Docs sent in that manner will have that activity tracked in the Notes & Sent Emails section of the transaction, as well as the Transaction's history.
Learn more about Sending Reference Docs & Links from a Transaction →

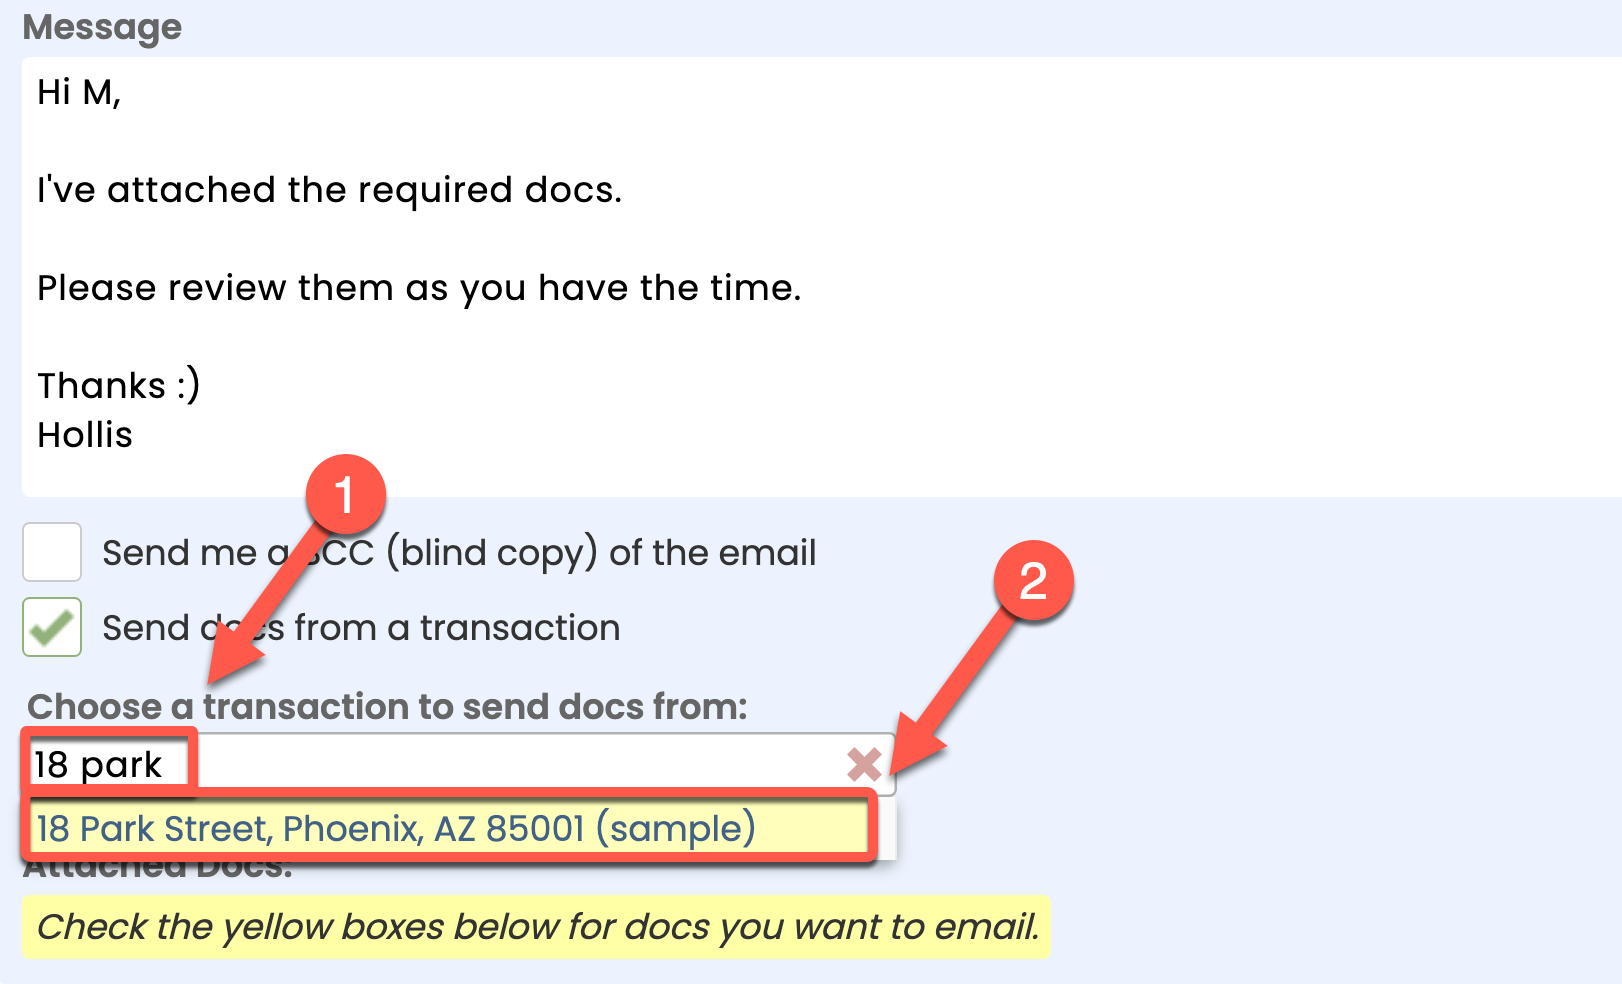
Automatically communicate important doc updates when sending task reminders
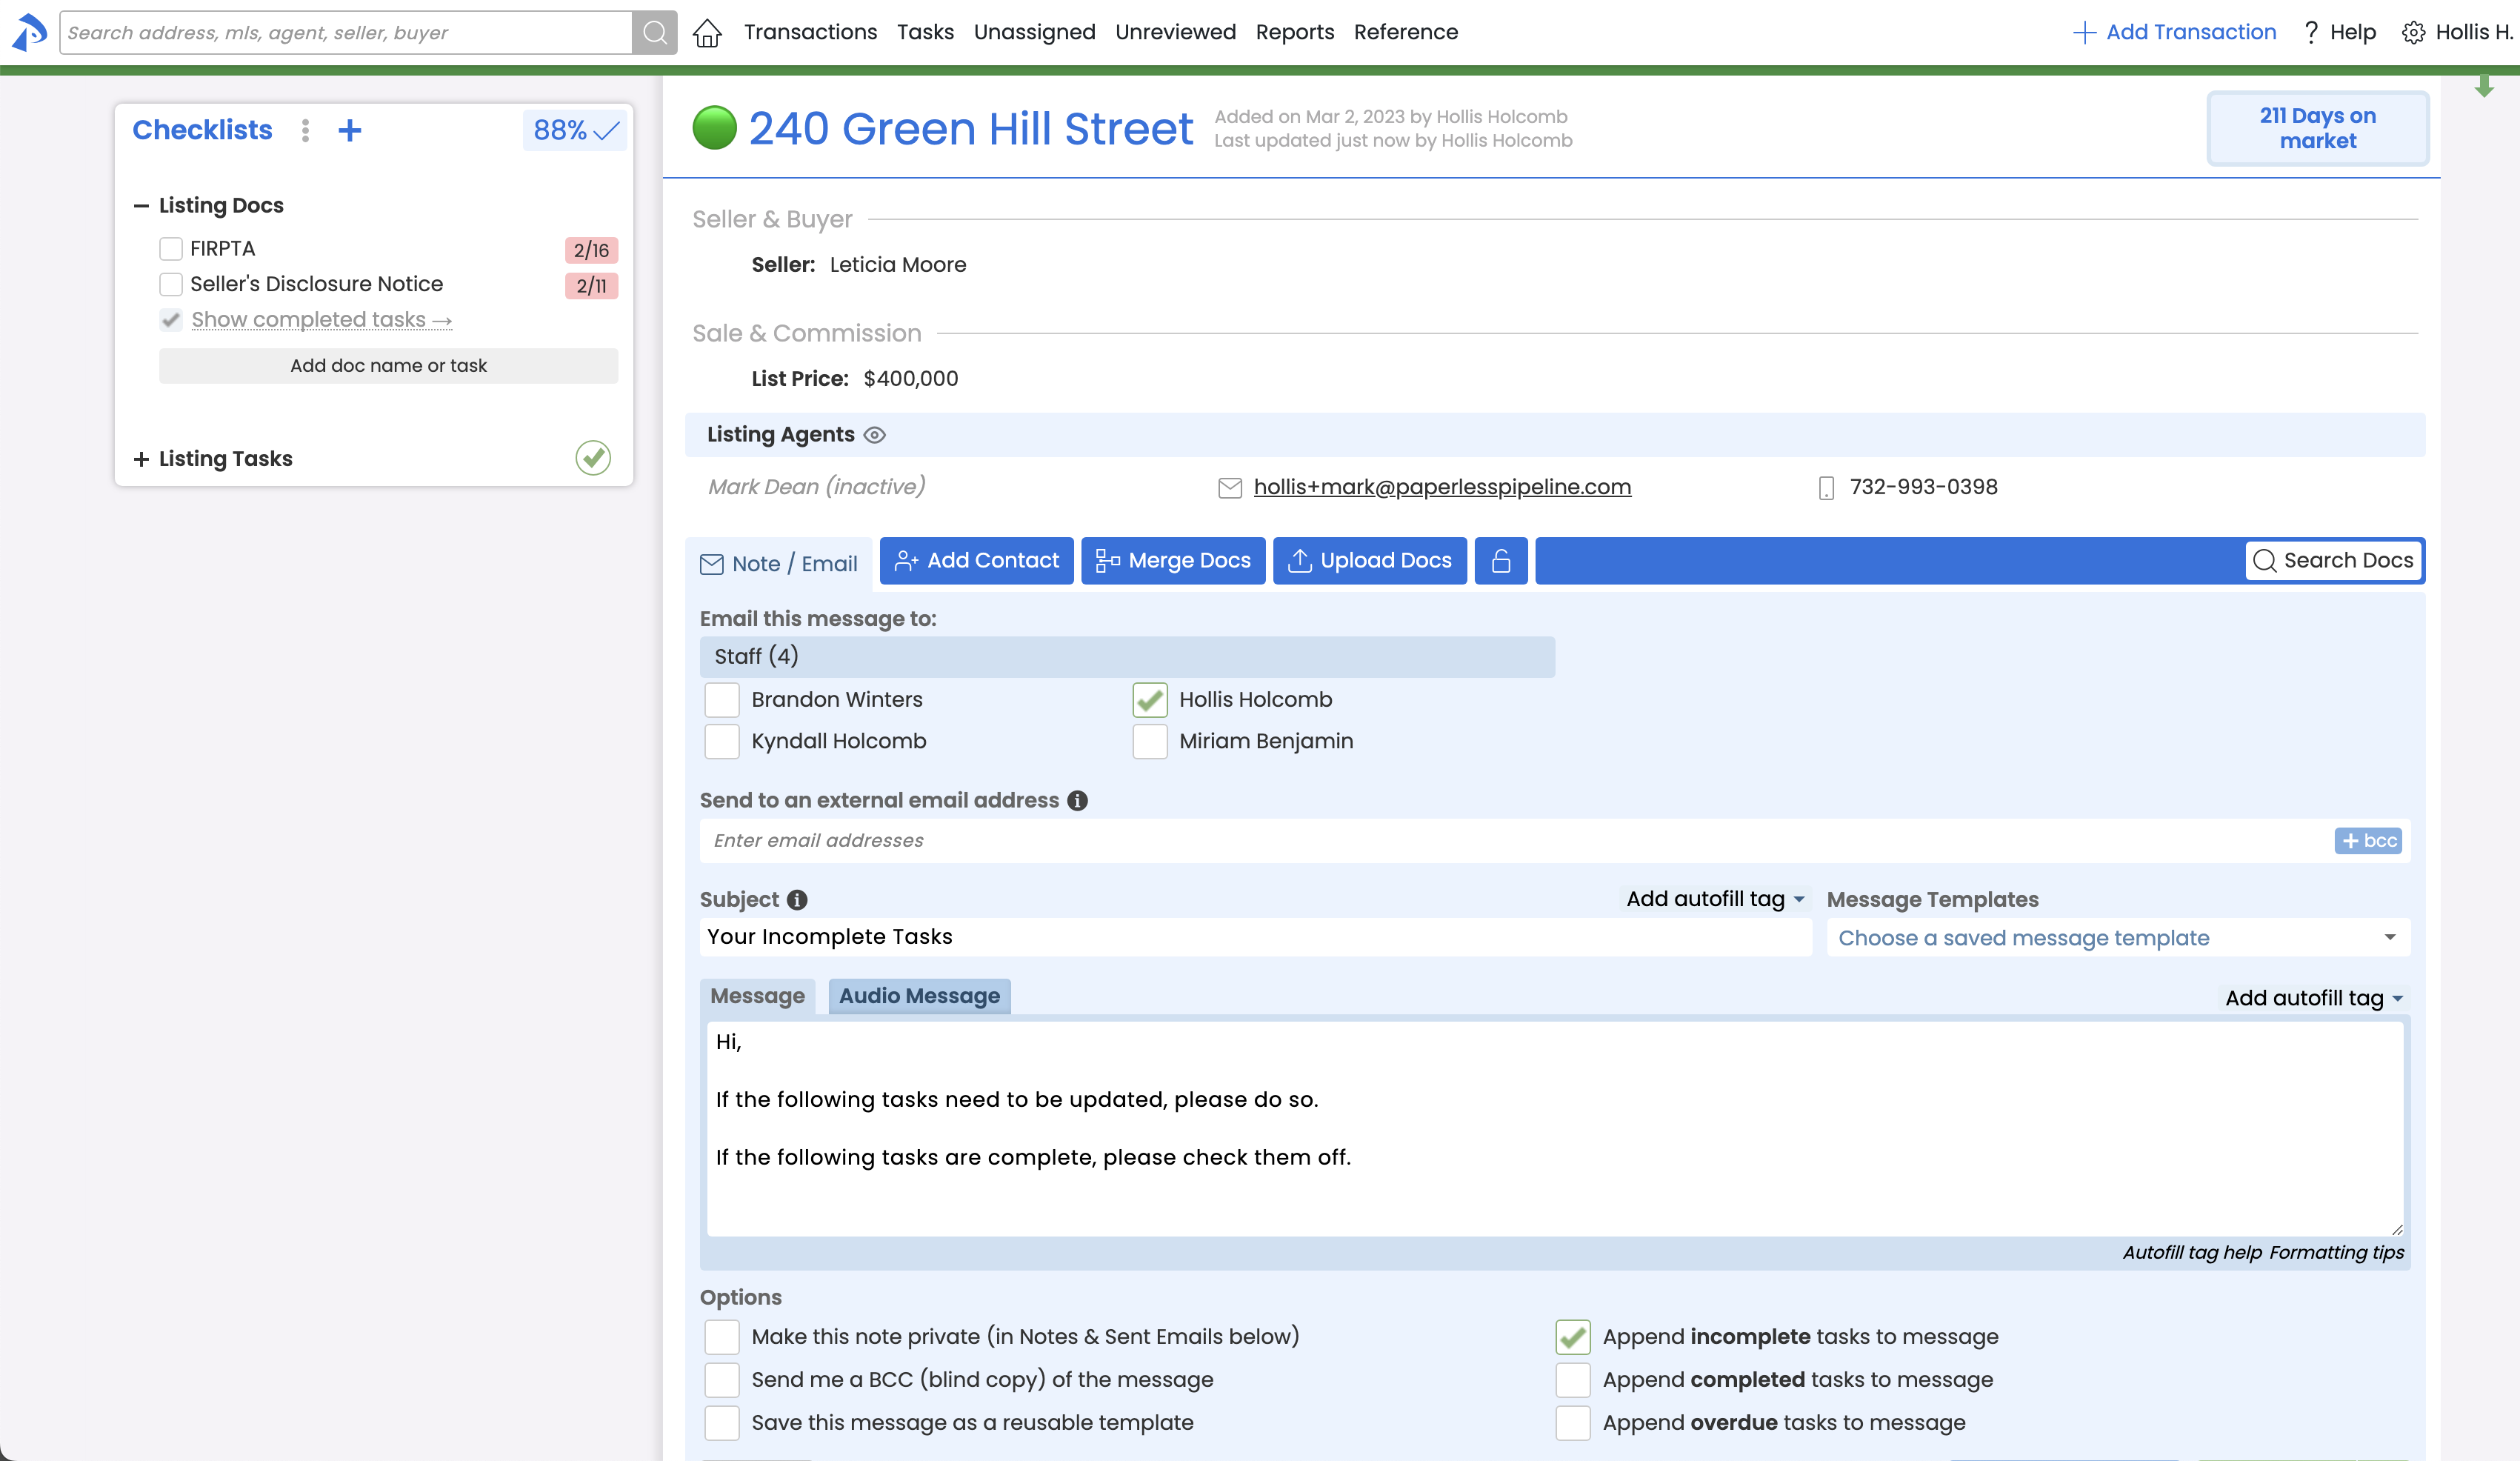
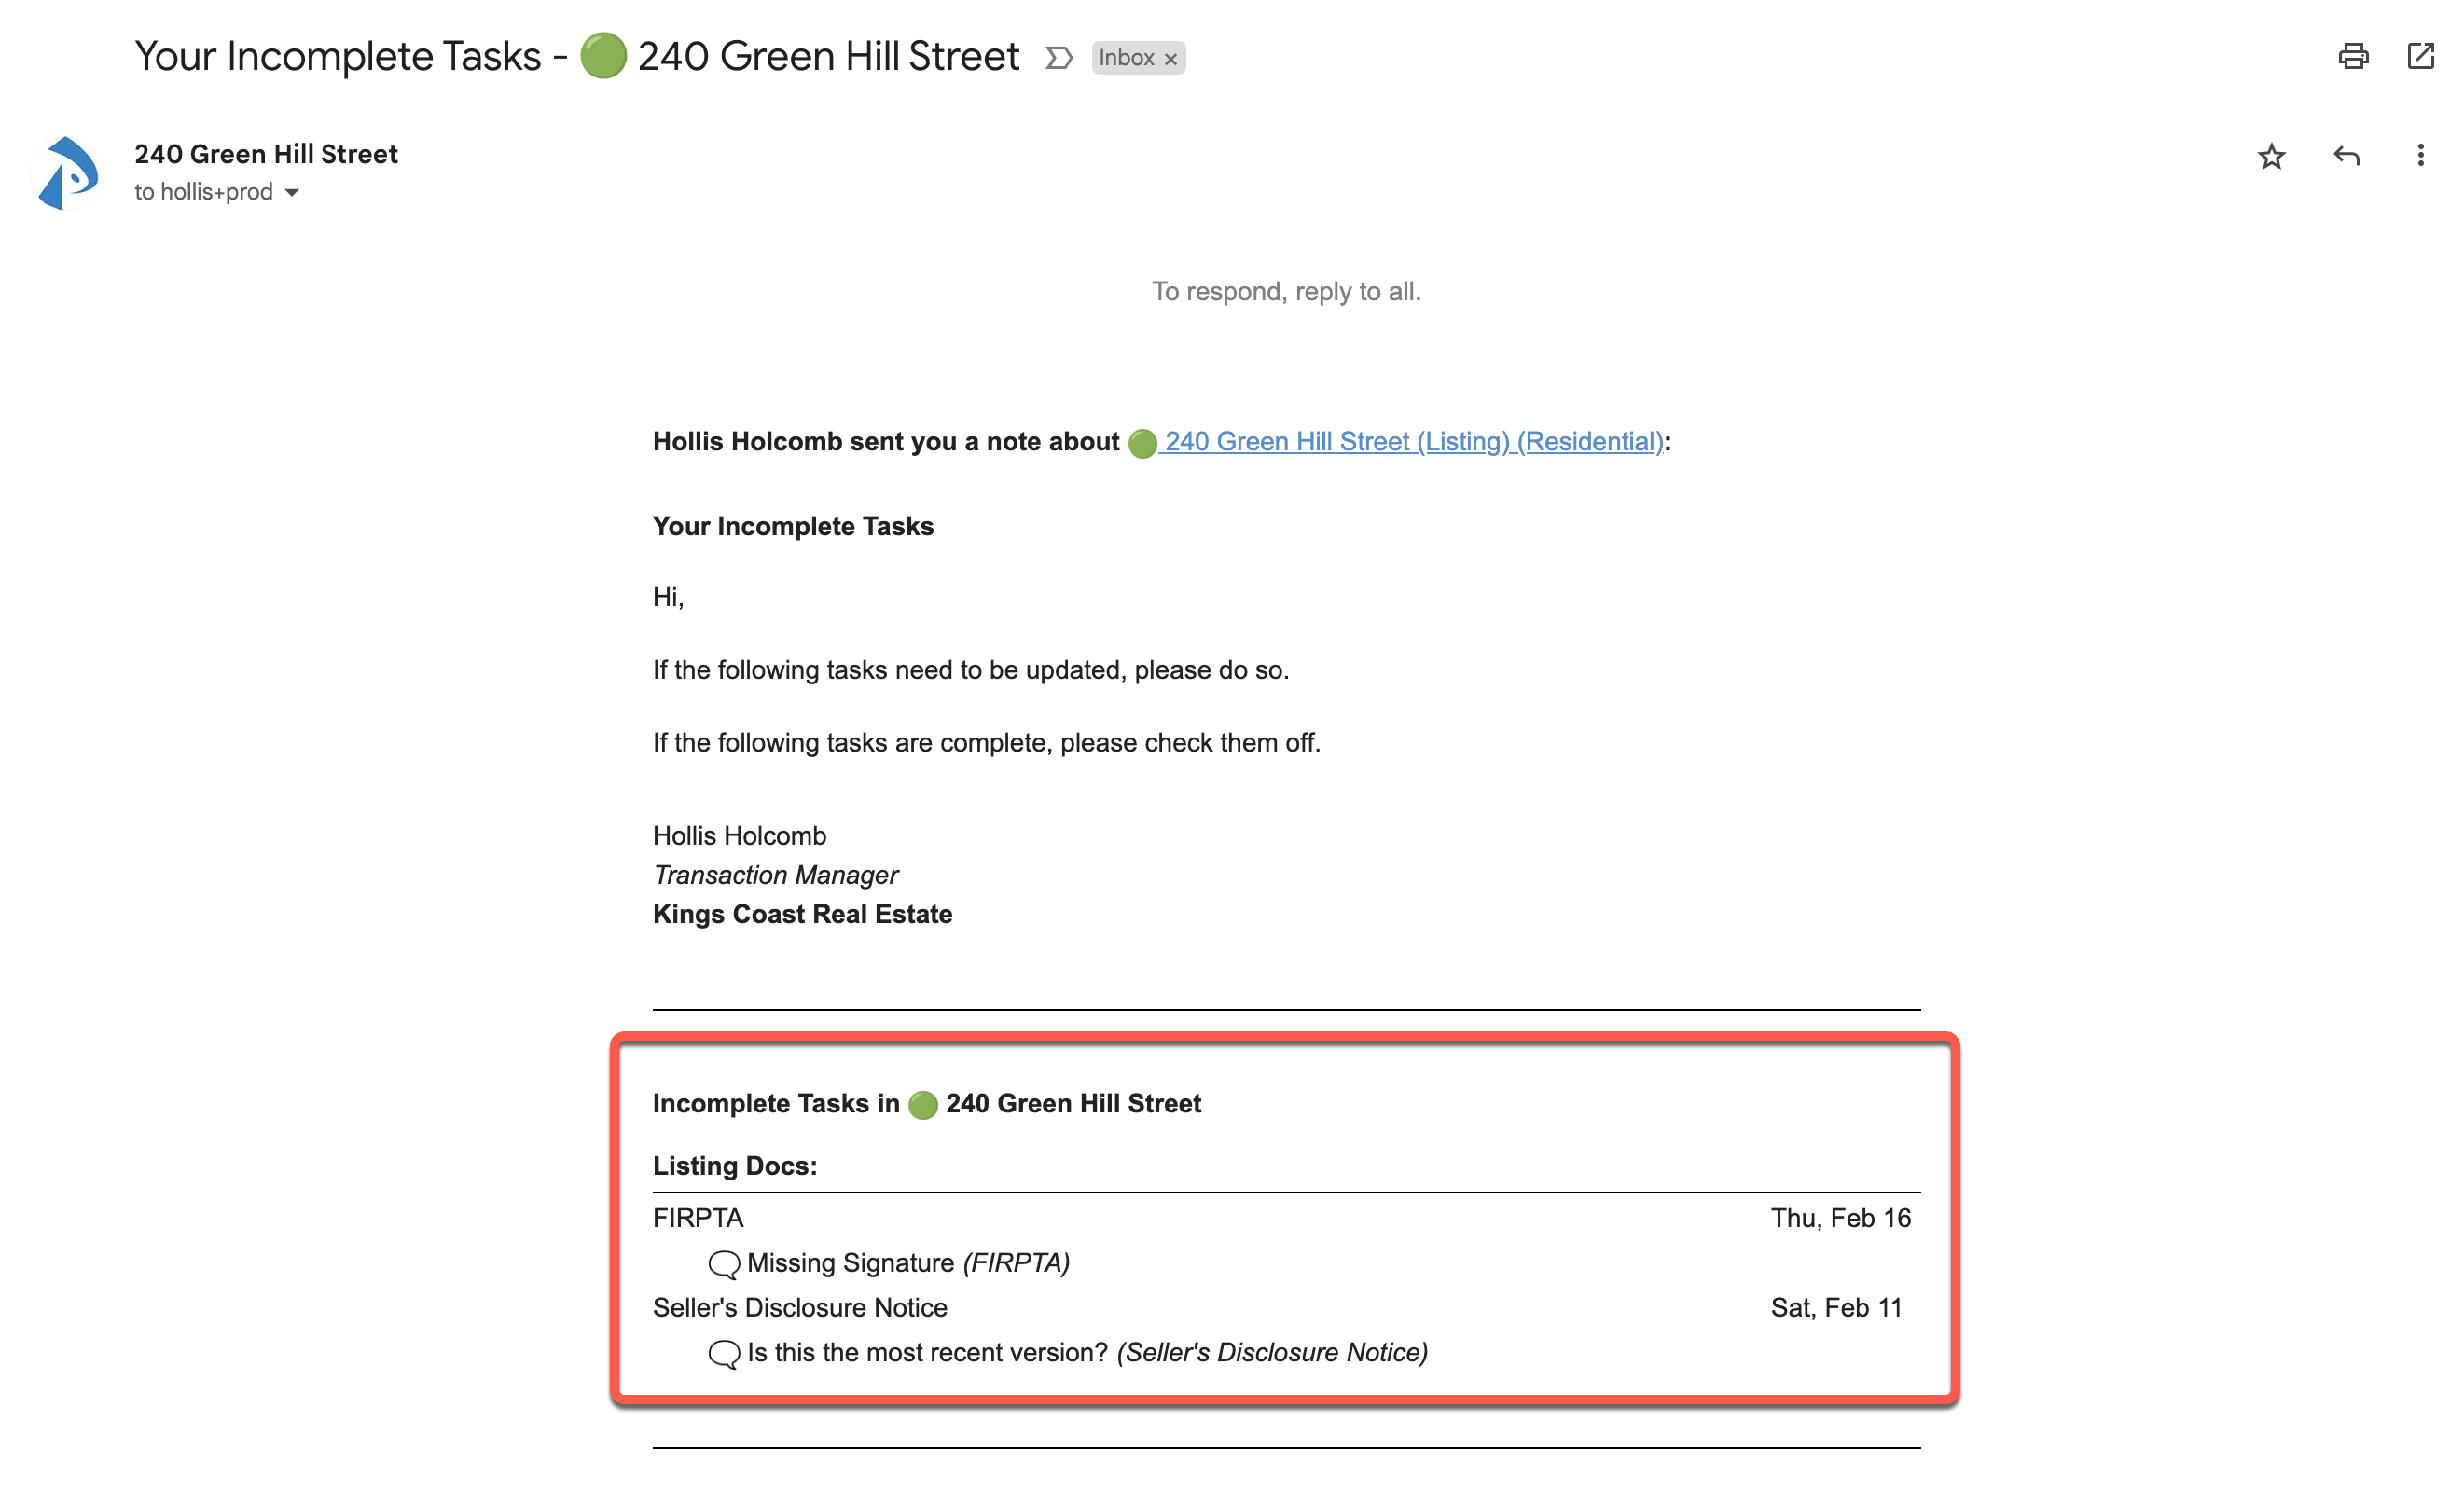
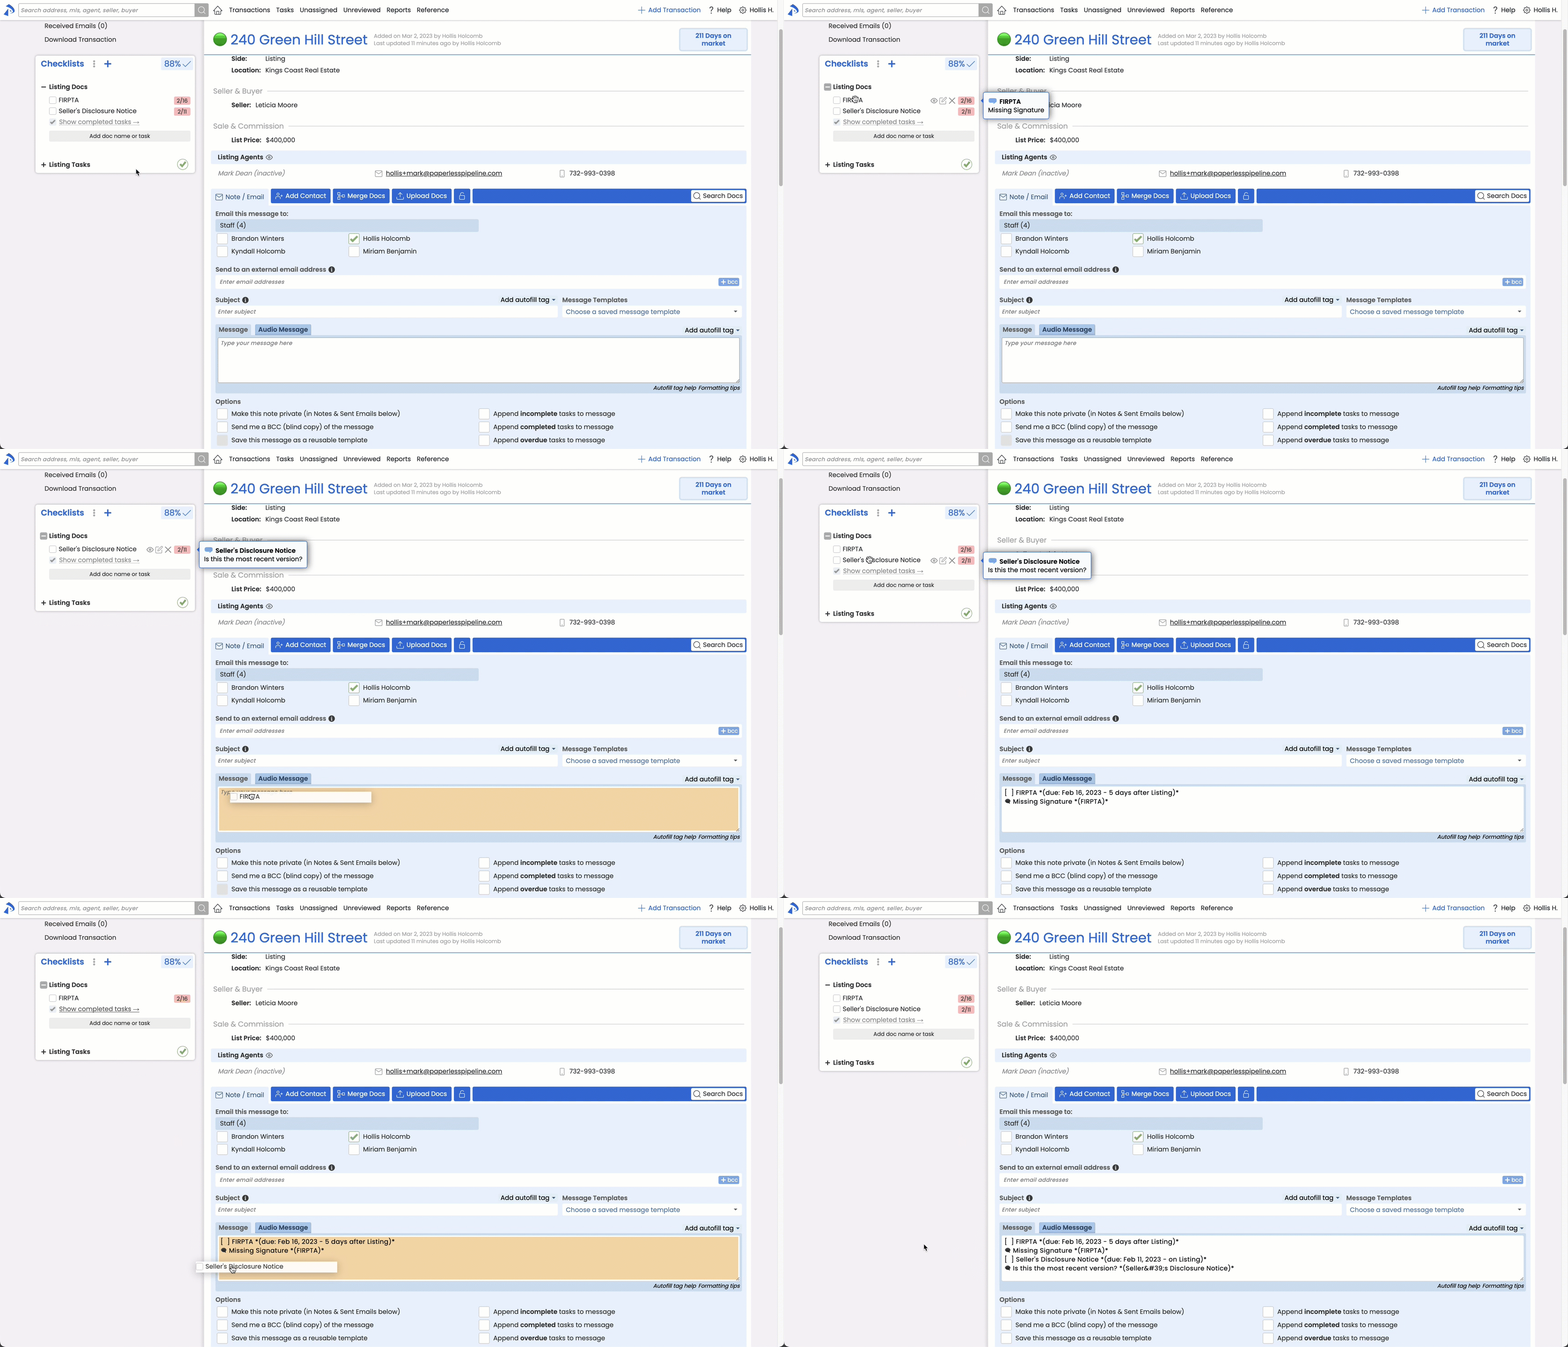
When a task is directly related to a doc, any comment made on that doc will automatically be included when the task is sent in a message. Whether dragging a task into the message field, appending tasks to a message, or a task is automatically included in a daily task reminder email, including the related doc comments will help your team conveniently identify the state of the doc.
Example 1: Append tasks to an email
Example 2: Drag Tasks to Message
Enter buyers and sellers in one place
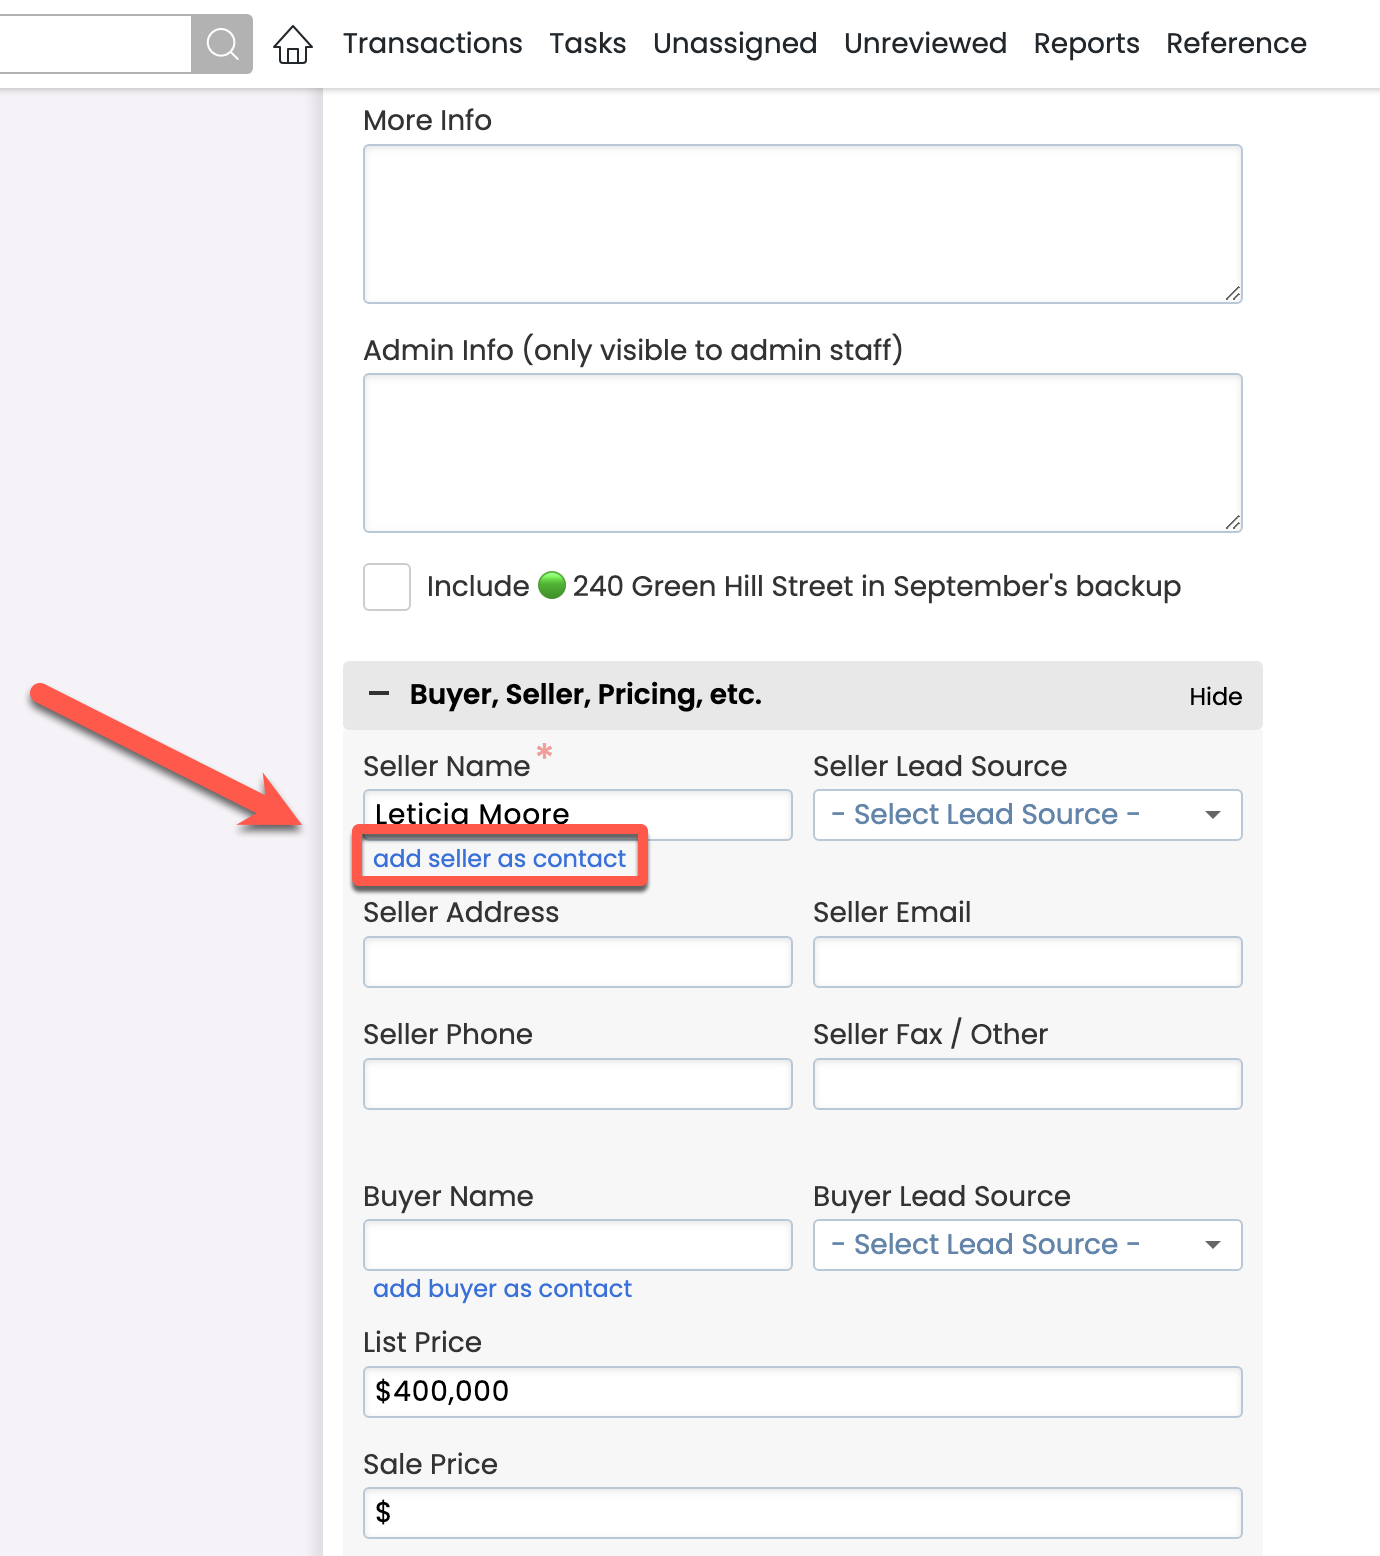
Entering the buyer and seller information directly into the transaction input page will now automatically create a contact on the transaction, saving you the time of having to enter the person's information in both places.
To add a buyer or seller, from the Add or Edit Transaction page, click [add seller / buyer as contact], then enter their information (address, email, phone, etc.). When the transaction is saved, a new contact will automatically be created based on the information you entered.
Learn more about Adding Buyers & Sellers →
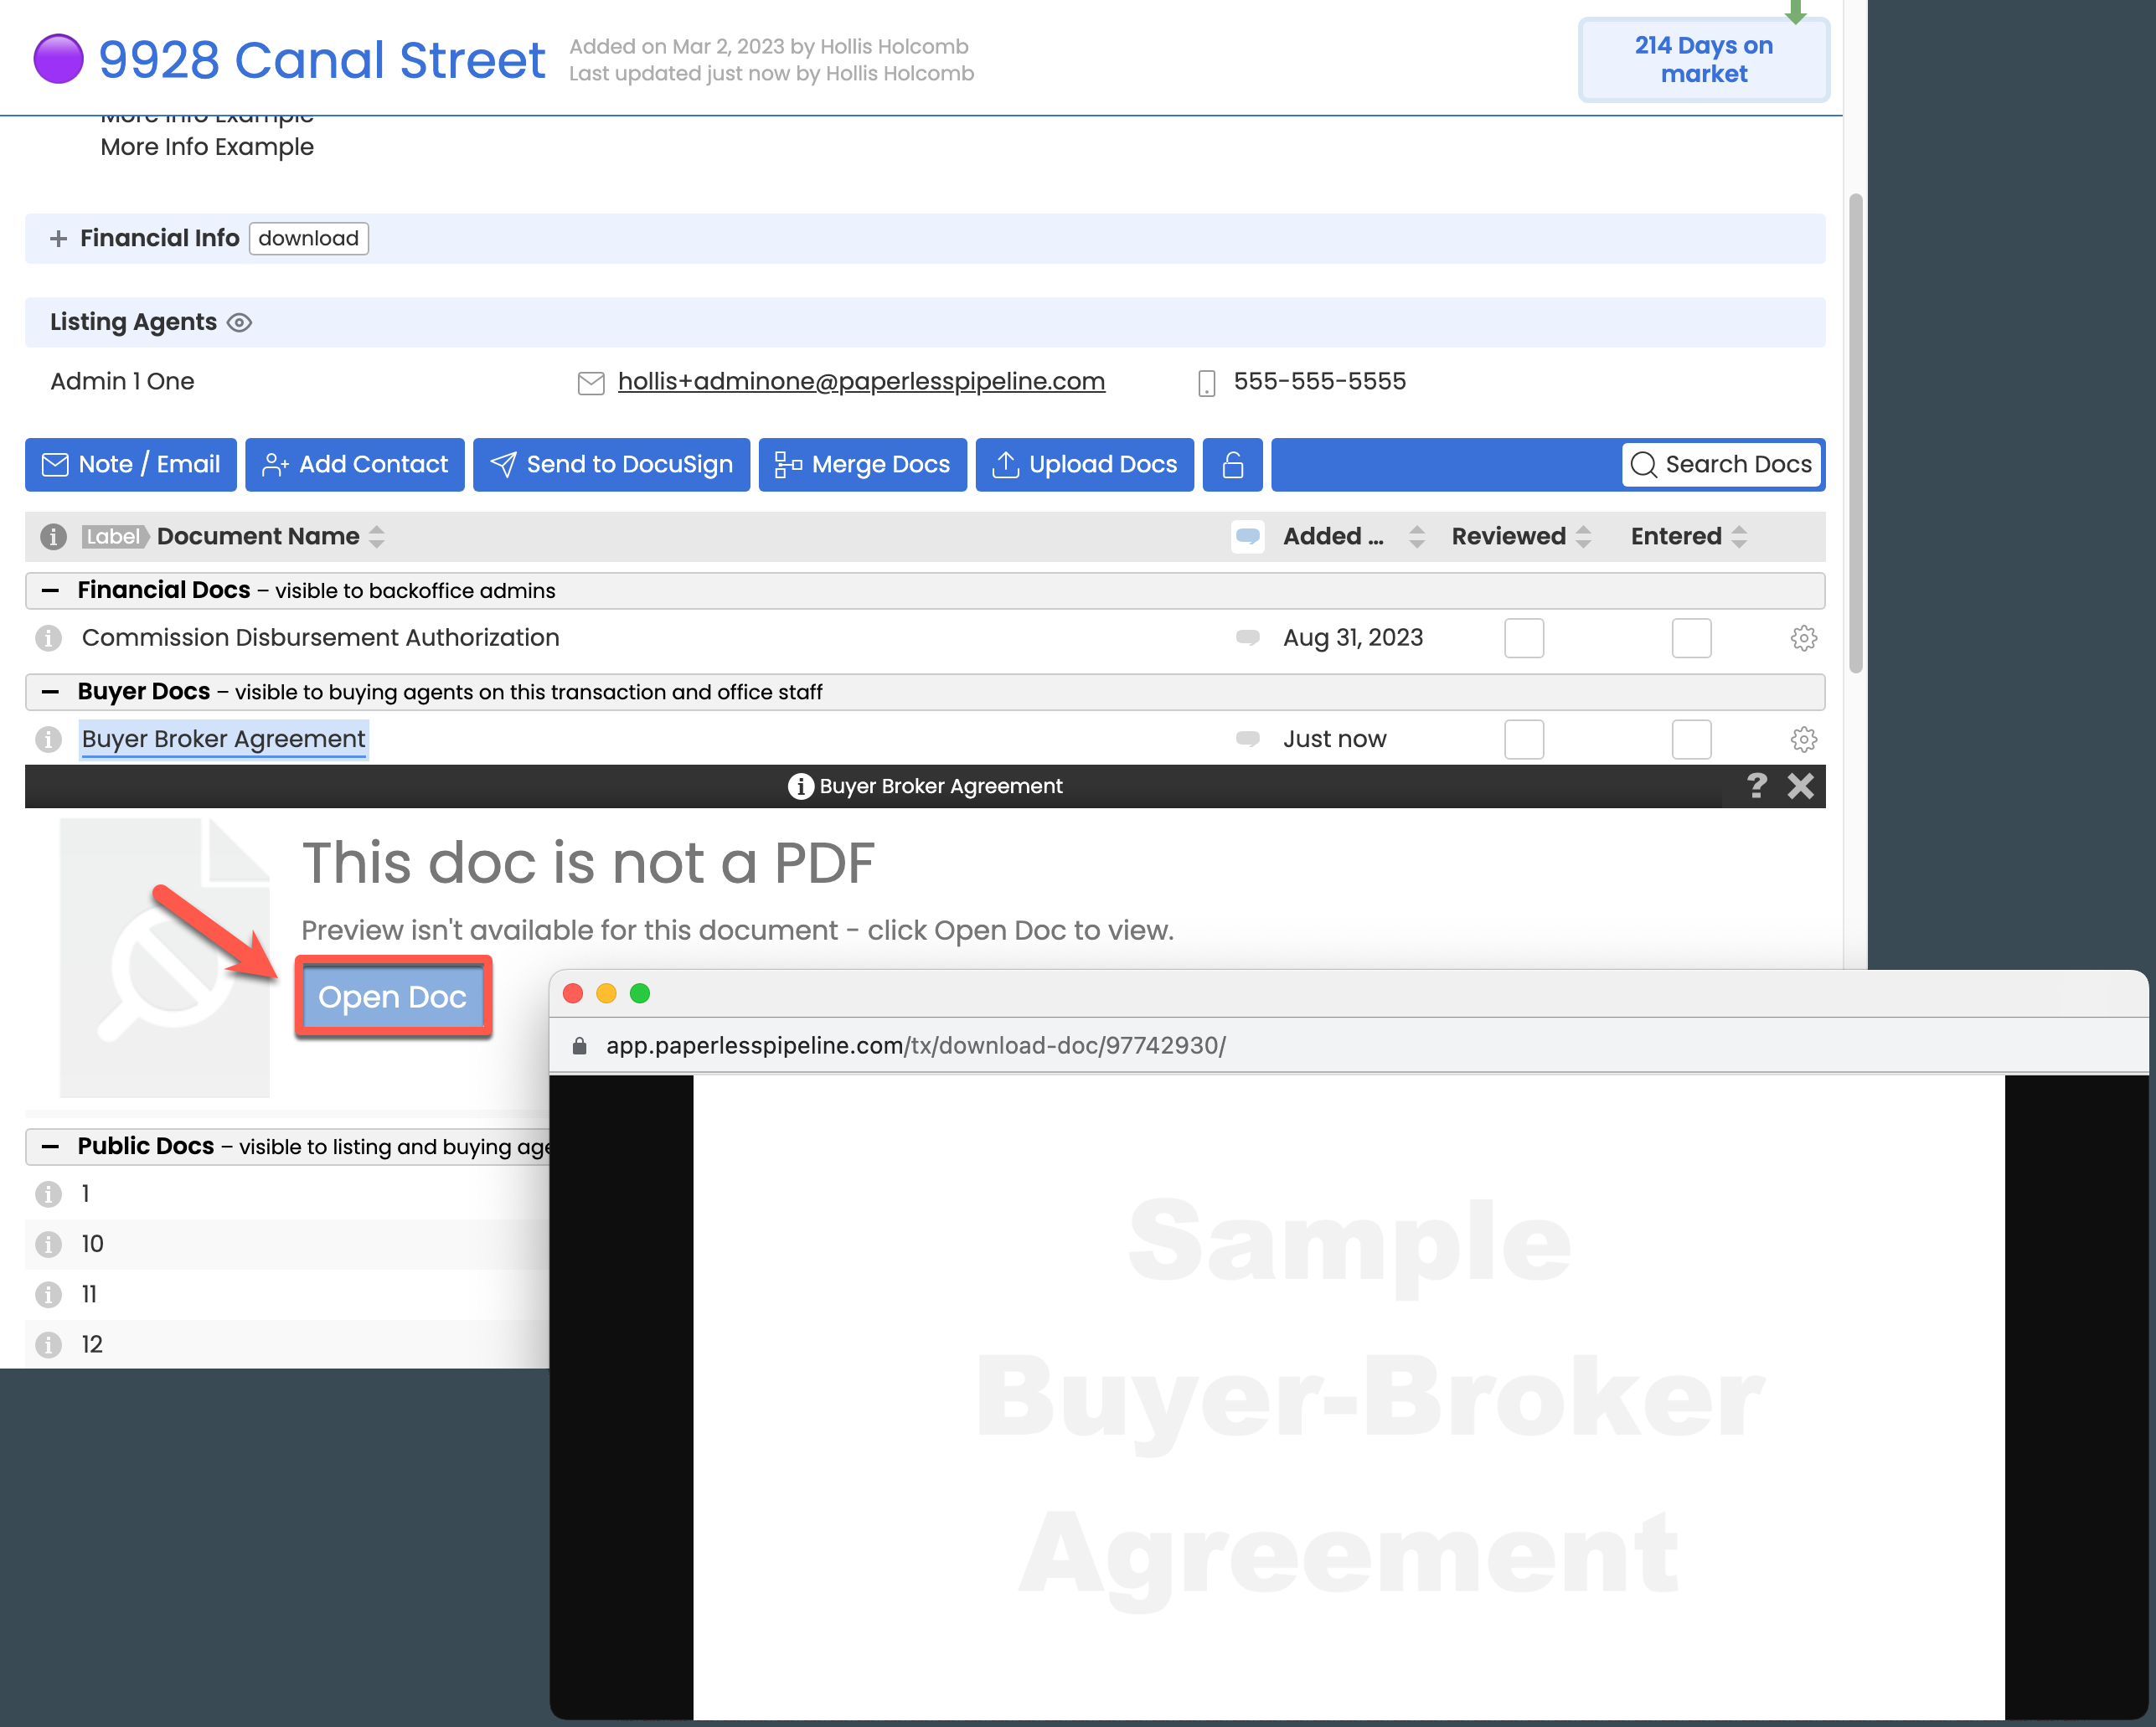
Save time by viewing images with a single click
If your office allows images to be uploaded to your account, you no longer have to download them to view them. To quickly view an image doc from any doc list, click the doc name, then [Open doc].
Final Commission Summary Notes are preserved to ensure accuracy
Once commissions have been managed and finalized on a transaction, the Commission Summary can no longer be edited by agents. This helps preserve the state of those notes at the time commissions were run to ensures their accuracy.
Learn more about transaction fields that cannot be updated by agents →
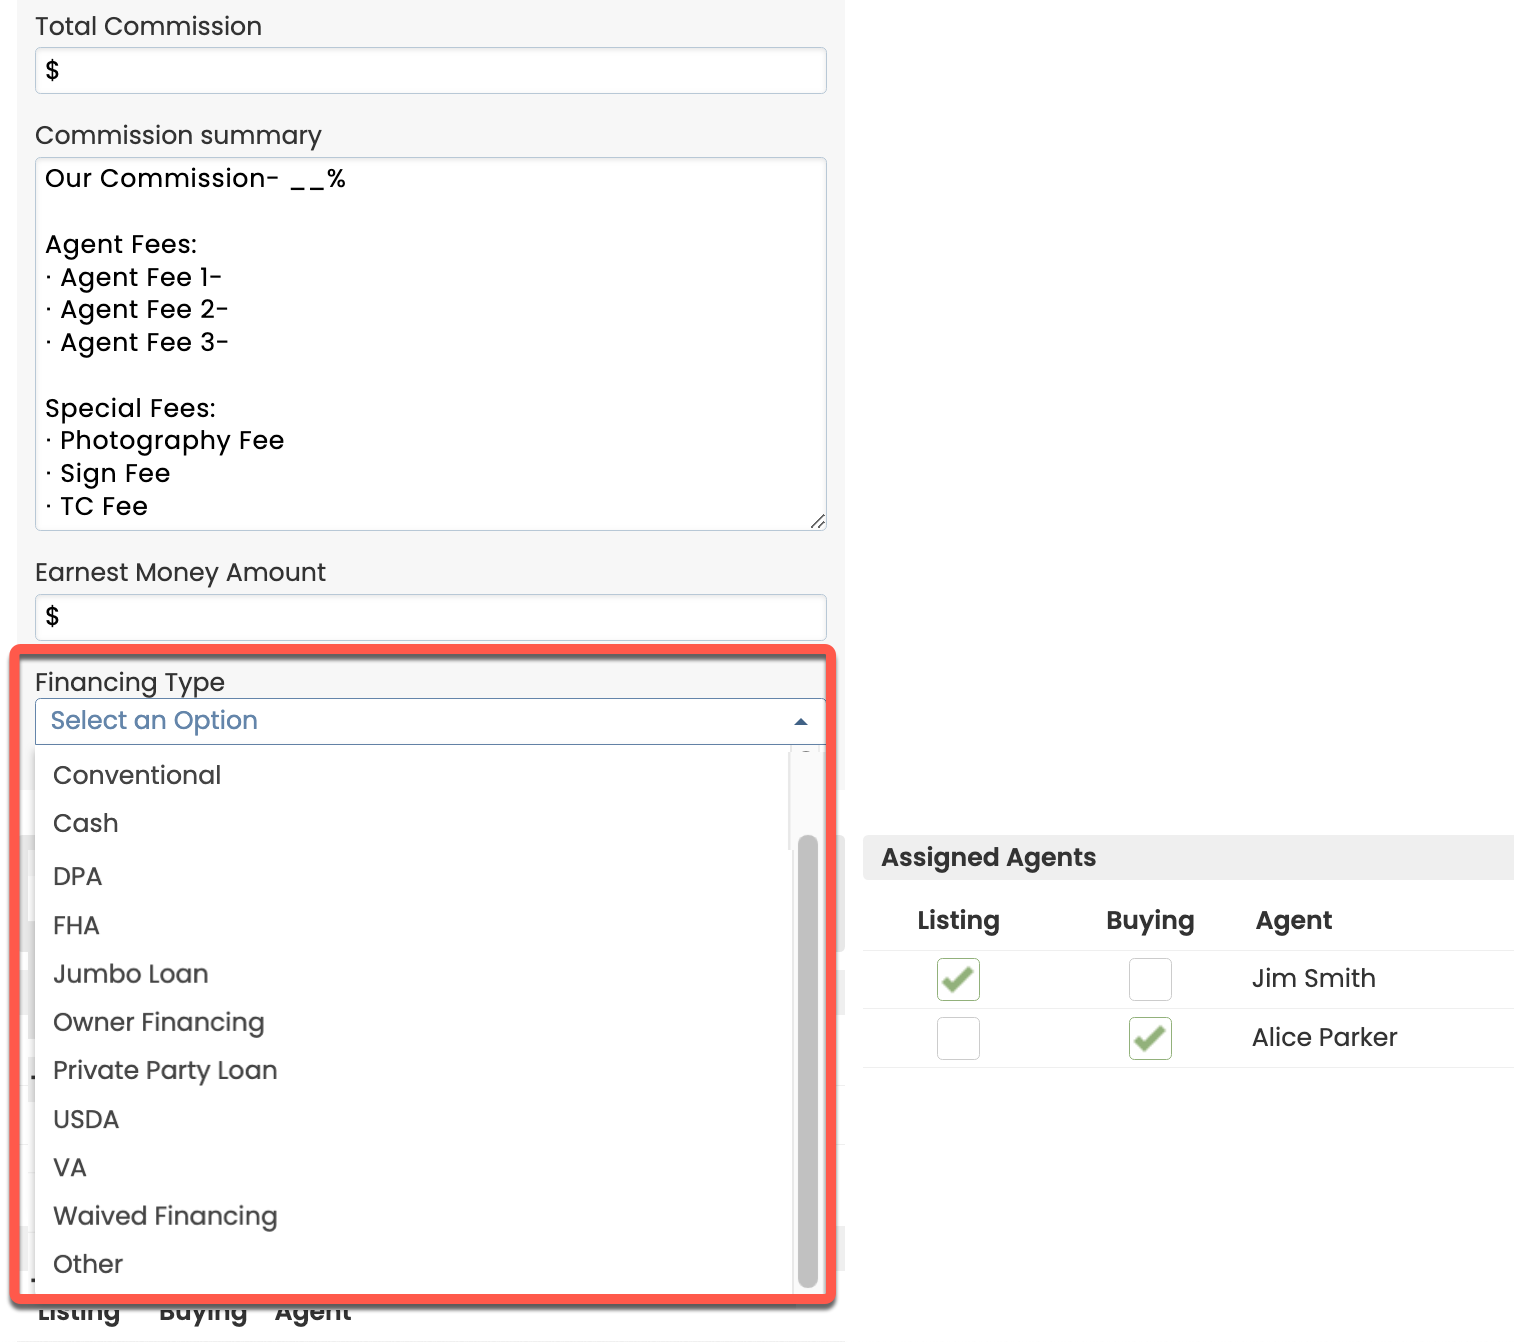
Assign accurate Financing Types
You asked for more Financing Type options and now they're yours.
The optional Financing Type field helps your team cleanly keep track of each deal's financing method. Master admins can visit Company Settings to turn the field on, if needed.
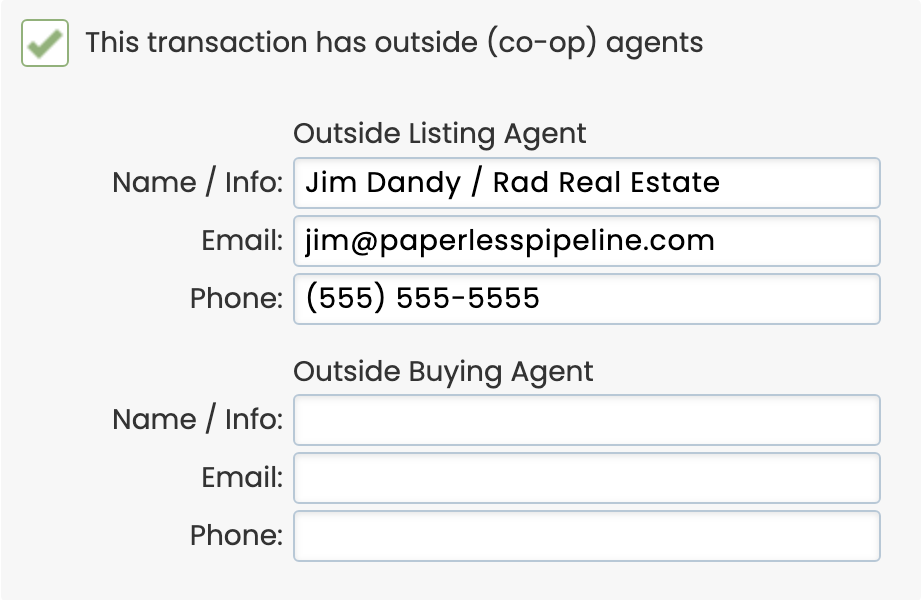
Easily track and access co-op agent phone numbers
You can now conveniently store co-op agents' phone numbers along with their other information on transactions. Add an agent's phone number while creating or editing transactions, and it will be viewable along with the agent's other info on transactions.
Learn more about Adding Co-op Agents →
Definitively indicate when there is no Home Warranty OR that an agent is responsible
Two new Home Warranty options allow you to more accurately report home warranty responsibility.
- None: Select "None" to communicate that the field has been completed, but that a home warranty will not be included.
- Agent: Select "Agent" to indicate agent responsibility.
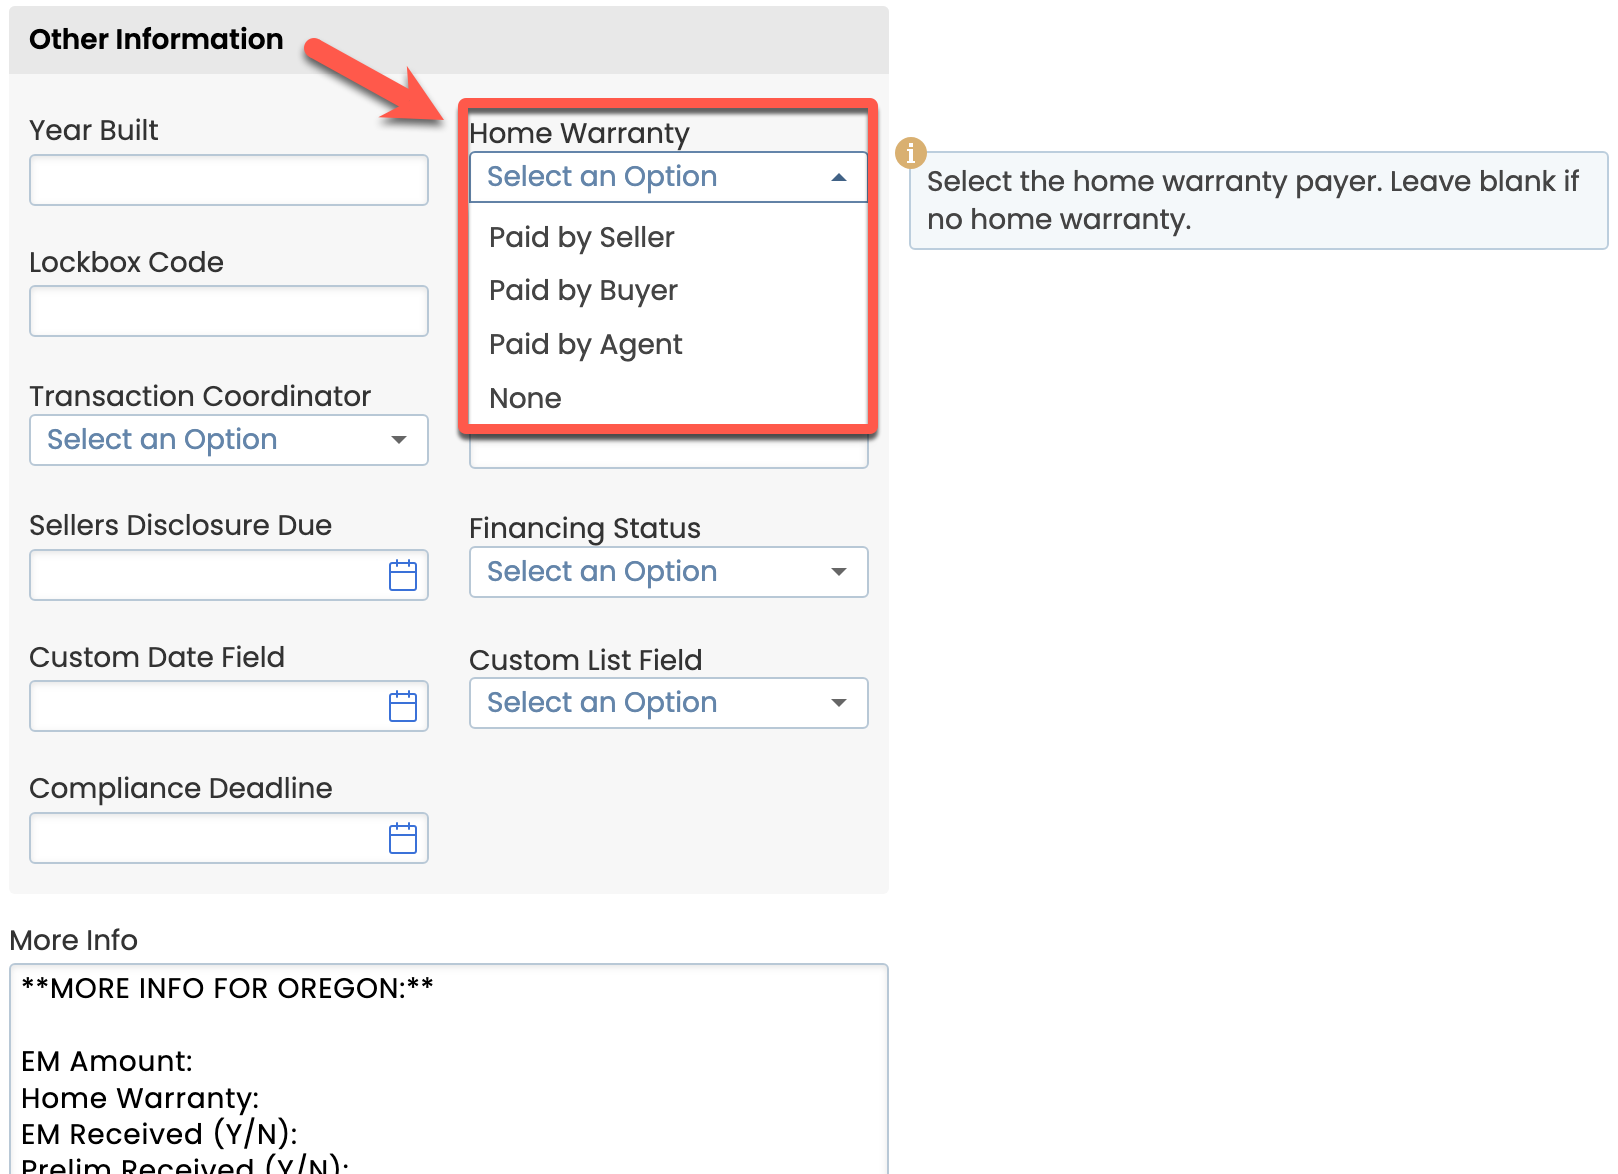
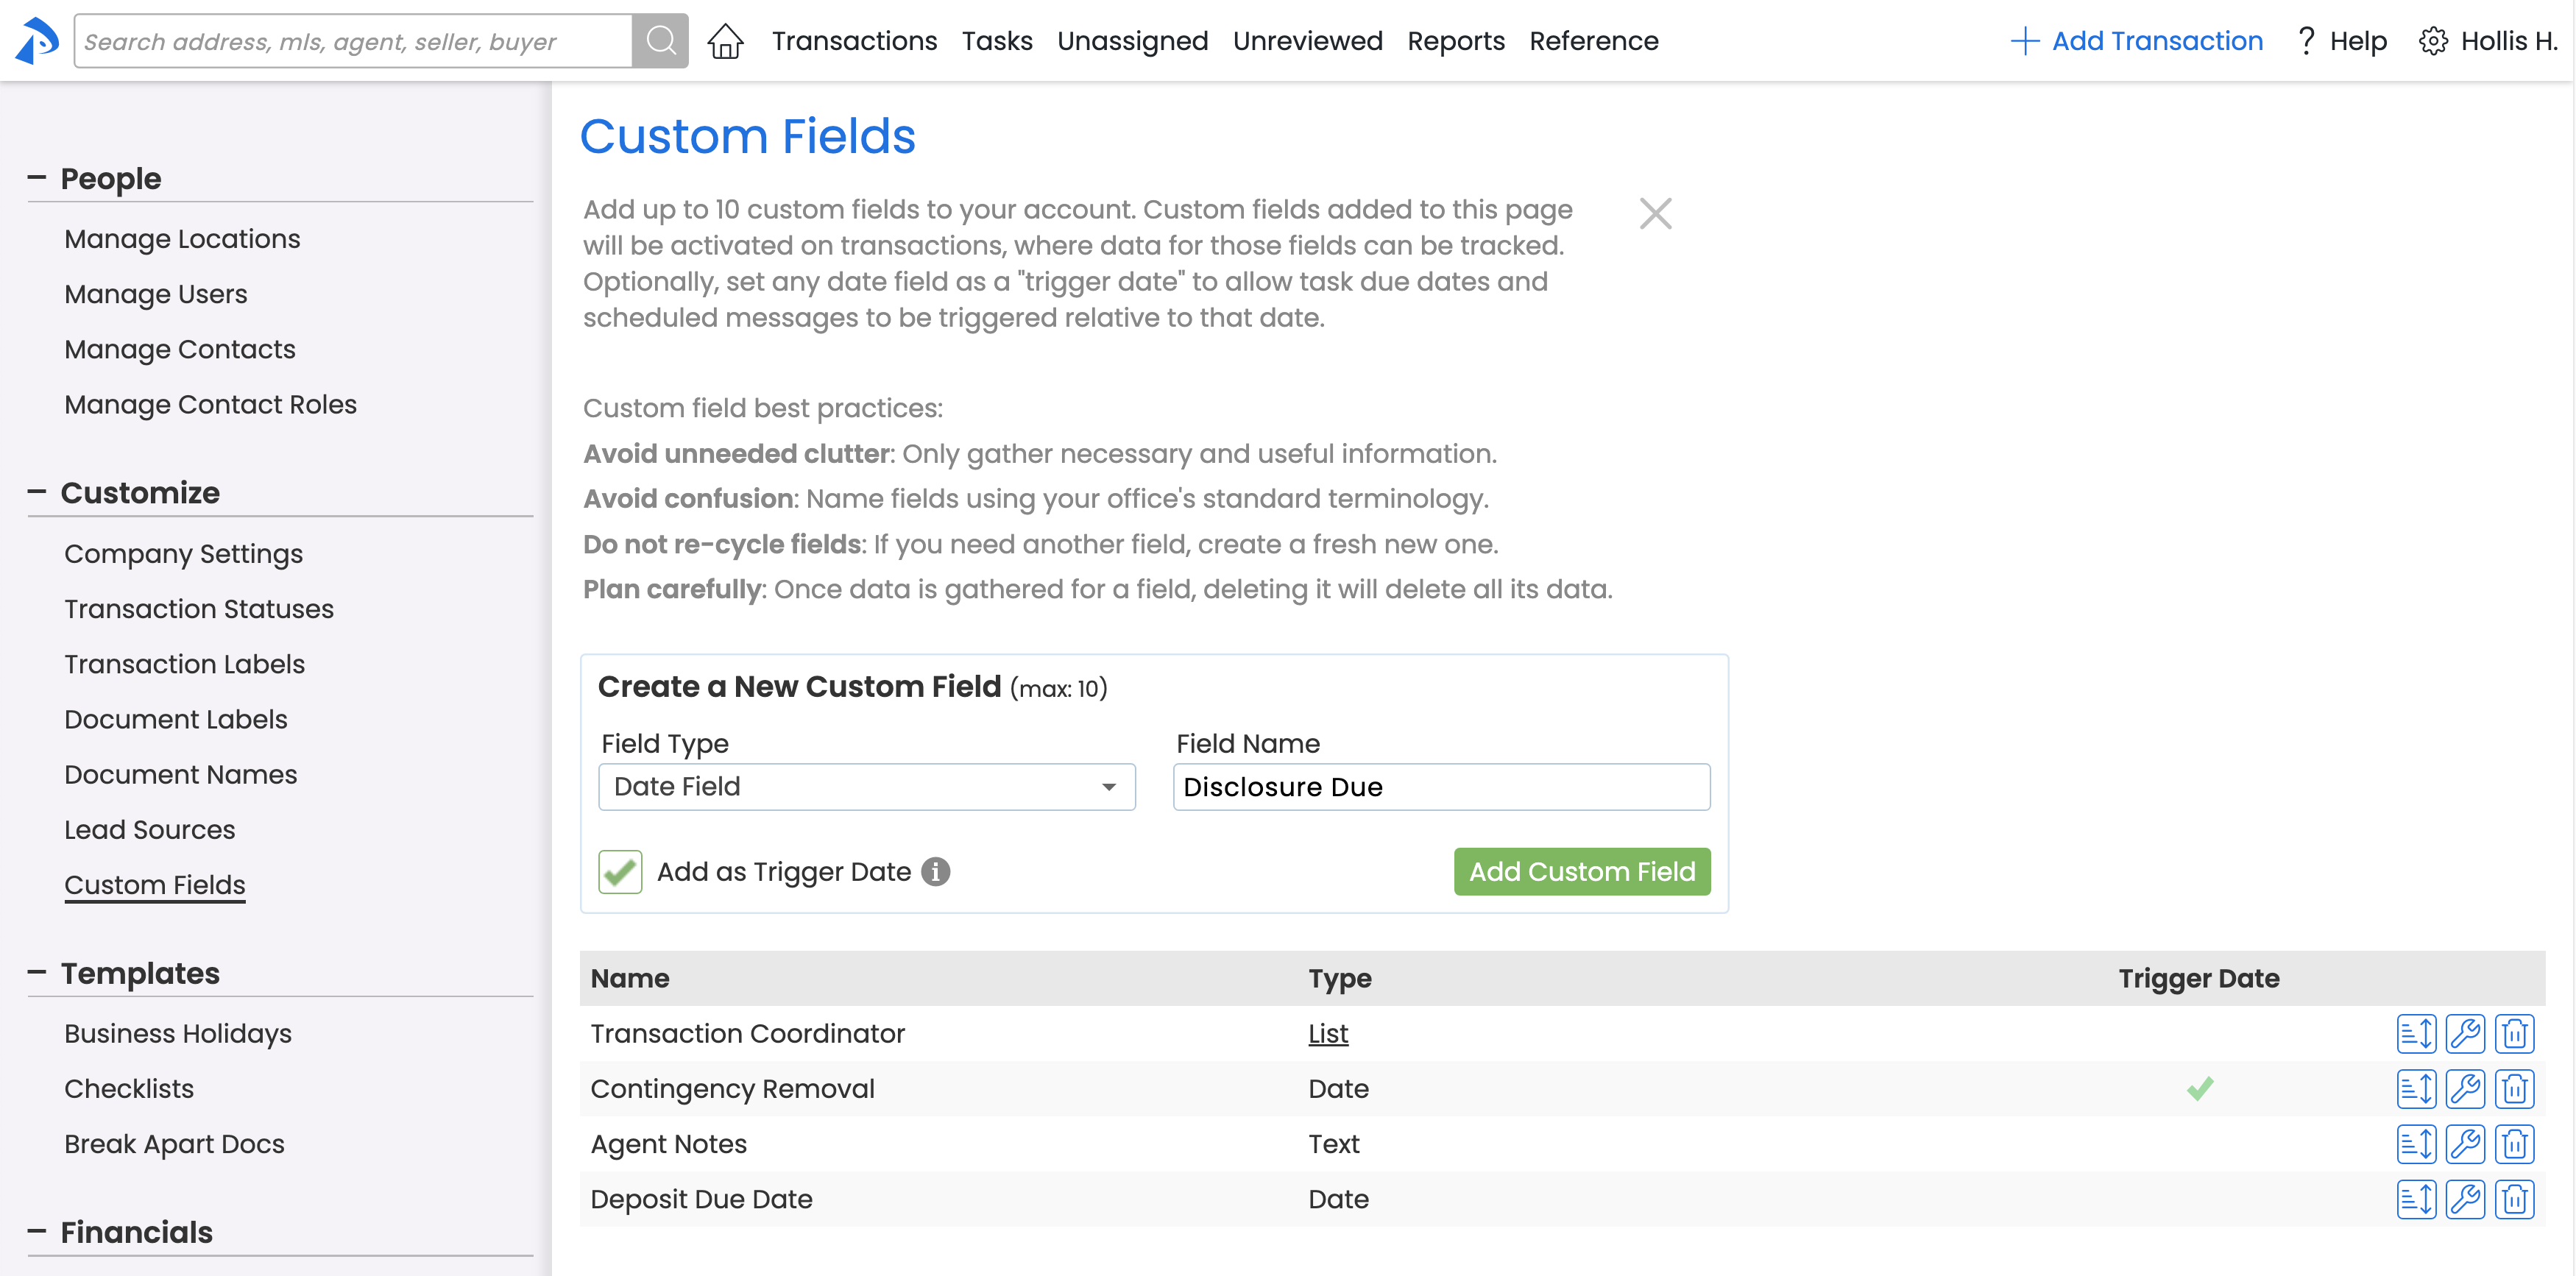
Easily track custom information important to your team with optional pre-set and custom fields
Optional Pre-set Fields
From Company Settings, click to turn on any of the following fields your office needs to track on transactions.
- Earnest Money Amount
- Lockbox Code
- Home Warranty
- Year Built
- Financing Type
Custom Fields
Master admins can now add up to 10 Custom Fields to help their team track custom information that doesn't already have a field on transactions. From dates to lists to text fields, use these new fields to cleanly gather and track information that helps your team drive transactions to completion. Any custom date-type field can optionally be set as a Trigger Date to allow Task Due Dates and Scheduled Messages to be triggered relative to that date.
Custom Fields will appear in all places that regular transaction fields appear, including on Coversheets, as Autofill Tags, and in downloads. They'll also be searchable in either the Transaction Date Range Search or Global Search areas.
Master admins can create new Custom Fields by going to Admin / Settings, then clicking [Custom Fields] from the left menu.
Learn more about Custom Fields →
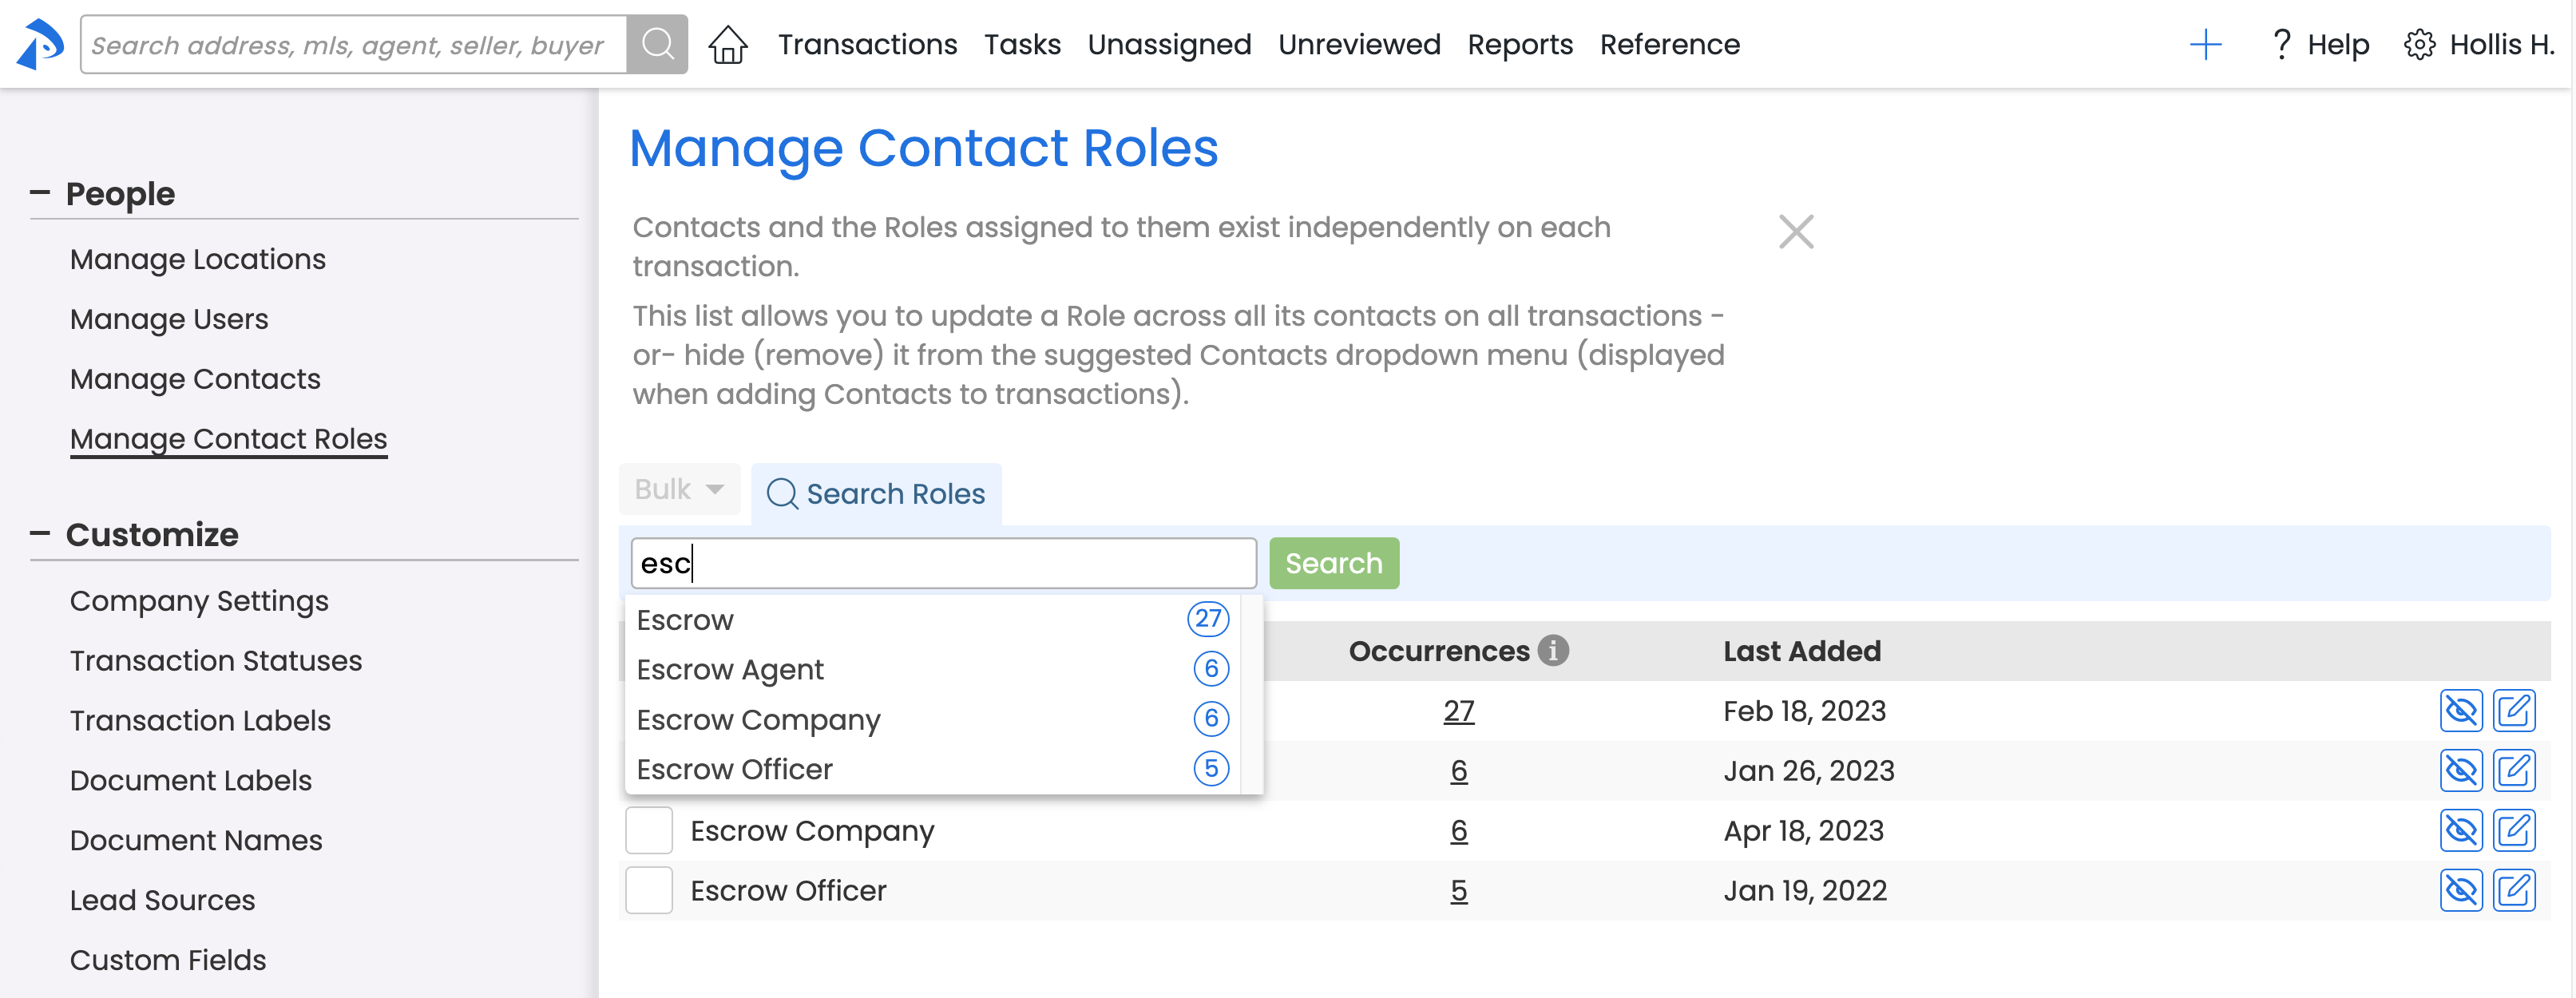
Keep Contact Roles on transactions accurate and up to date
Keeping a clean list of suggested Contact Roles helps your team quickly and accurately categorize Contacts they add to transactions. The Manage Contact Roles page allows master admins to update or hide inaccurate Roles to clean them up on existing transactions and prevent them from being suggested in the future.
Learn how to Manage Contact Roles →
Keyboard Hot Keys updated
If you're not using keyboard hot keys to perform frequent actions in Pipeline, you should give them a try! Using hot keys allows you to quickly navigate to the areas in Pipeline you access frequently. A few of the key-combinations for hot keys have been updated, so take a moment to review the updates or learn new ones you didn't know about.
Ensure contact info on transactions is clean and up-to-date
Adding contacts to transactions gives your team at-a-glance access to contacts' information, and allows for effortless single-click messaging and contact sharing.
The new Contact Management tool helps you ensure those contacts are both seamless to add and error-free. Here's how:
Prevent inaccurate contacts from being recommended
Make sure your team is adding the correct and most up-to-date information for contacts by ensuring the list they're pulling from is clean and updated.
You can now hide contact information that has been added incorrectly in the past or that is outdated. Hiding inaccurate contacts will ensure those contacts are not recommended to your team when they're adding contacts to transactions in the future, leading to more error-free contacts on transactions.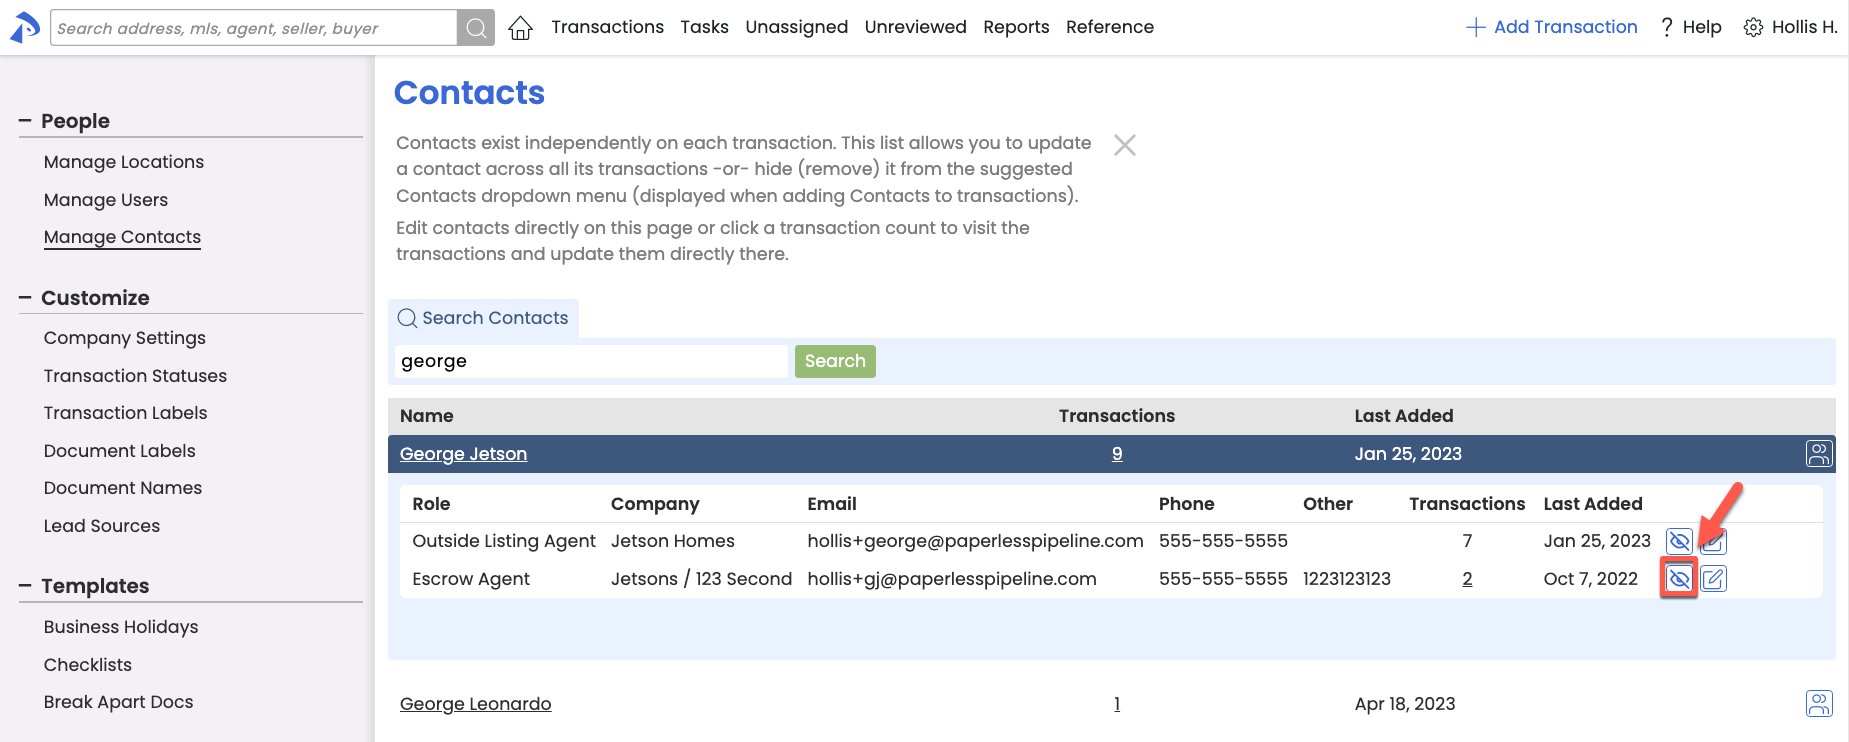
Update incorrect contacts across transactions
In cases where it's important for incorrect contact information to be updated on the transactions where that inaccurate contact information exists, you can now correct the error across all transactions at once.
Learn more about Managing Contacts →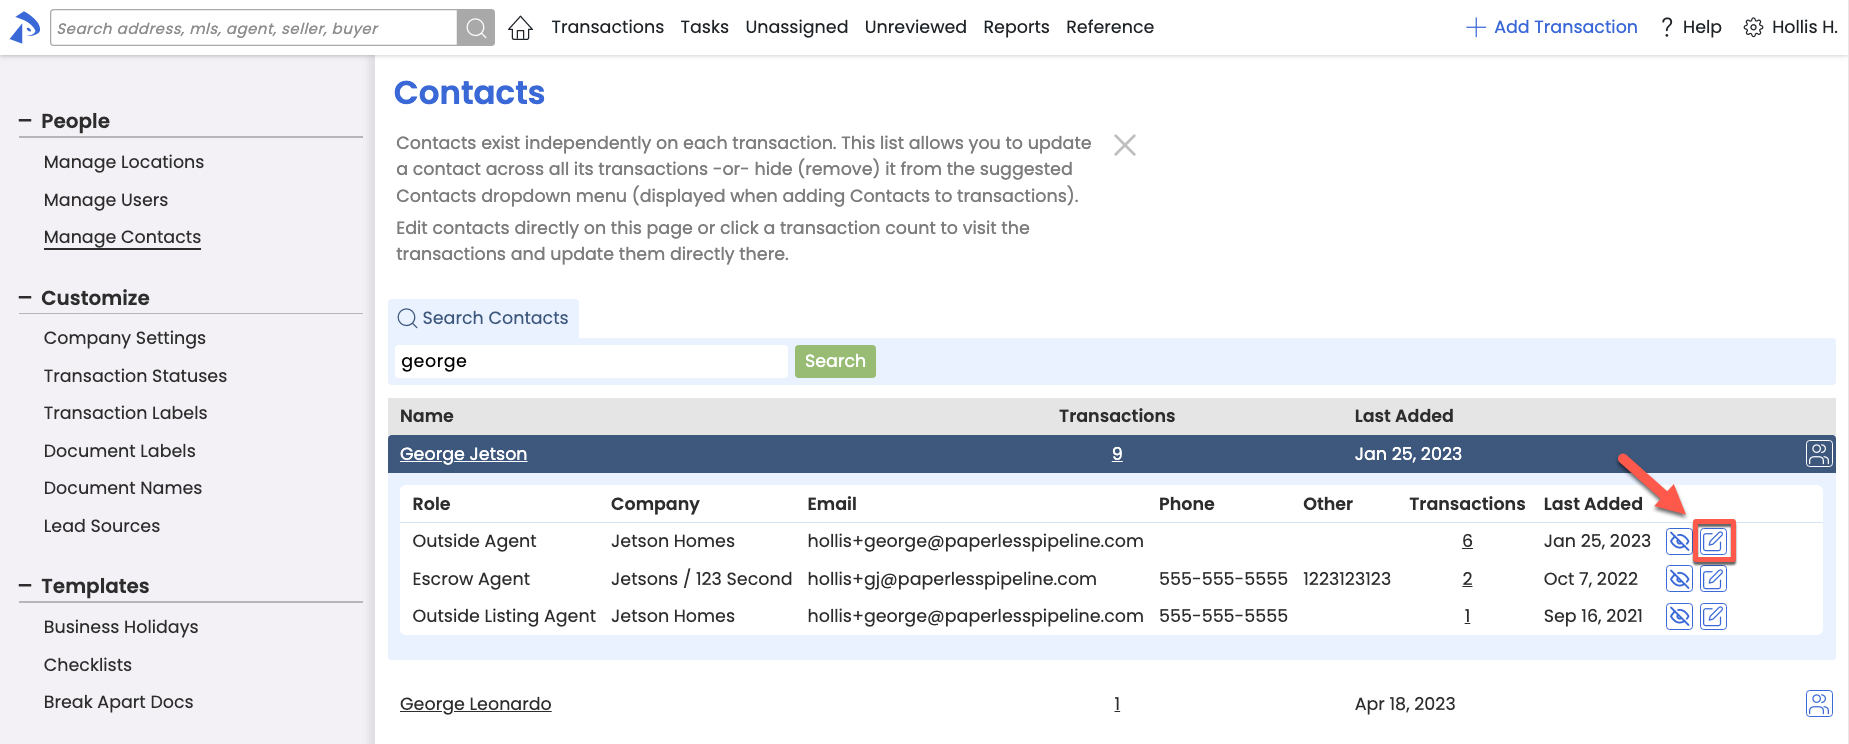
Start updating with just a click
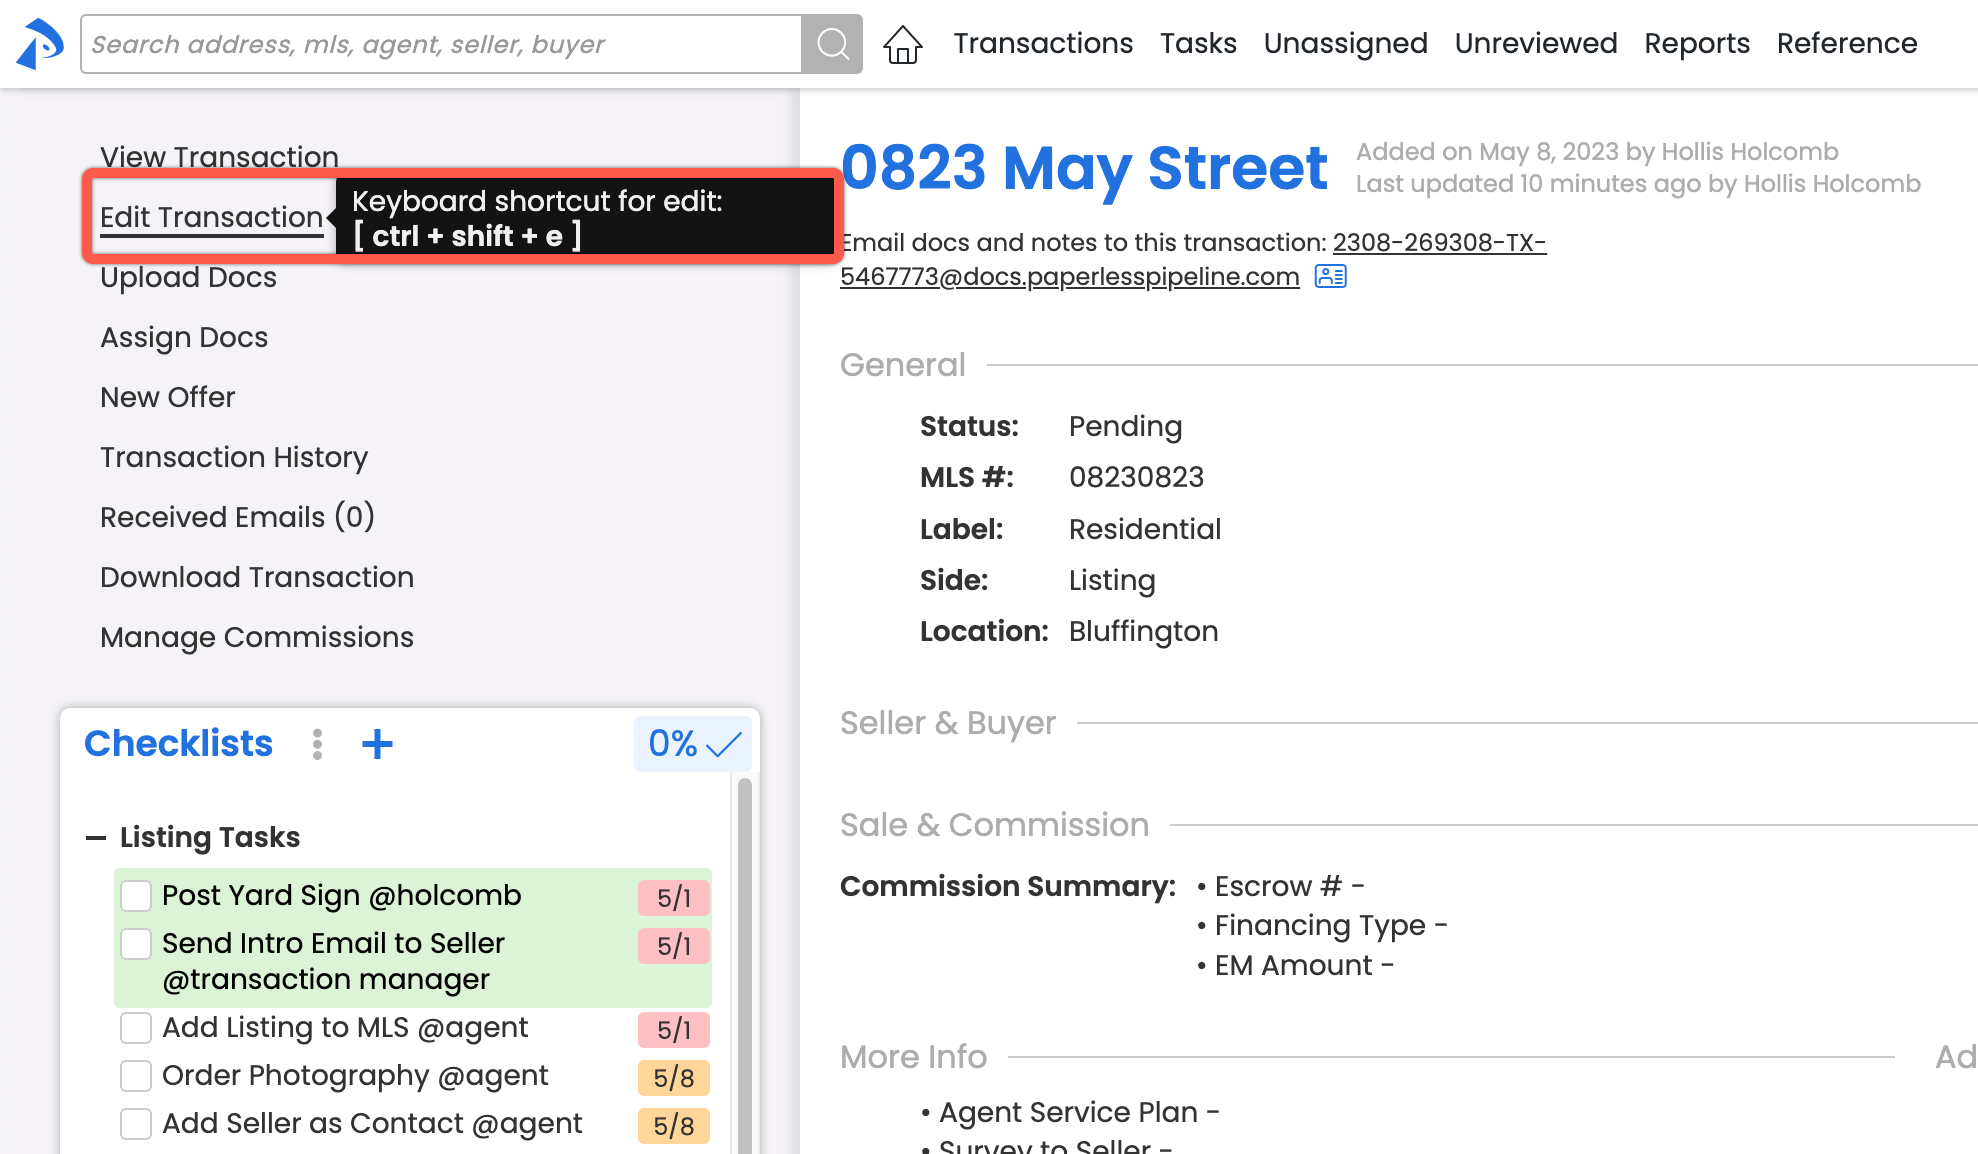
Just a friendly reminder (here and on hover of the Edit Transaction link) that you can get to the Edit Transaction page mouse-free by clicking Ctrl+Shift+E while viewing the transaction you'd like to edit.
Instantly know when a date rule has been set
Task that have had a due date rule applied, but whose trigger date has not yet been entered, will now have a visual placeholder in place of the missing date. That placeholder will instantly let you know that a rule has been set, but not activated by its trigger date yet.

Message template scheduling
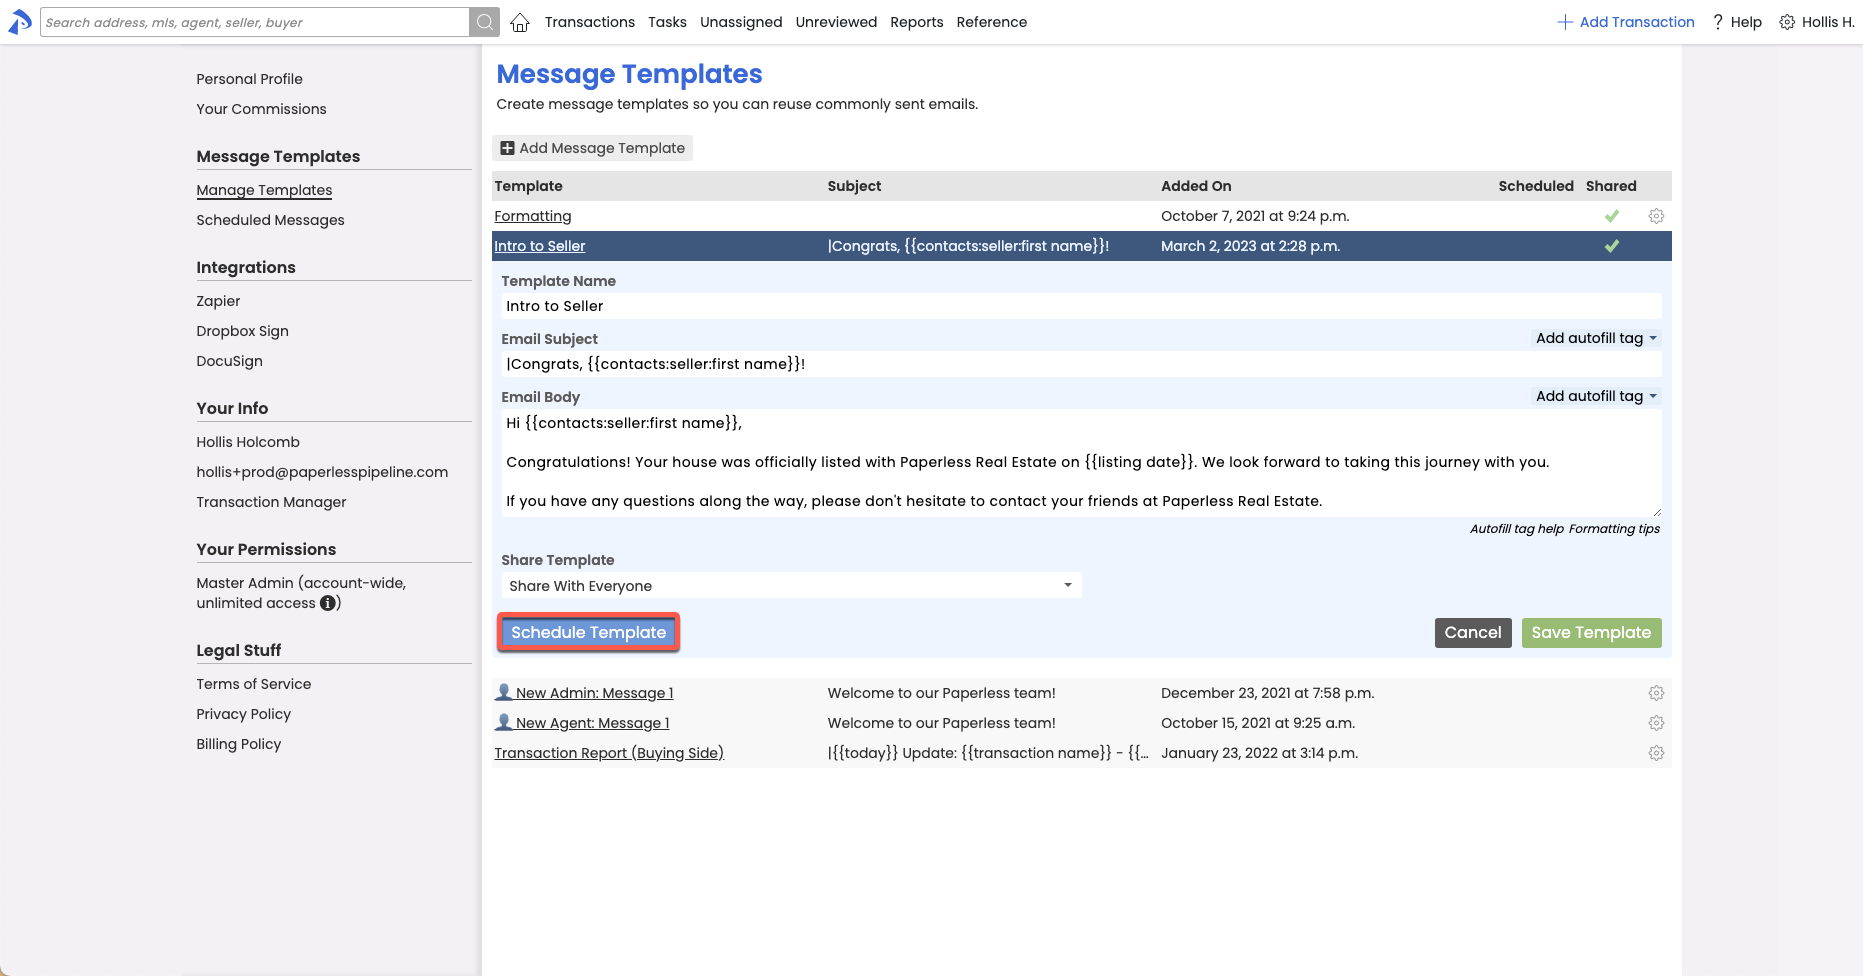
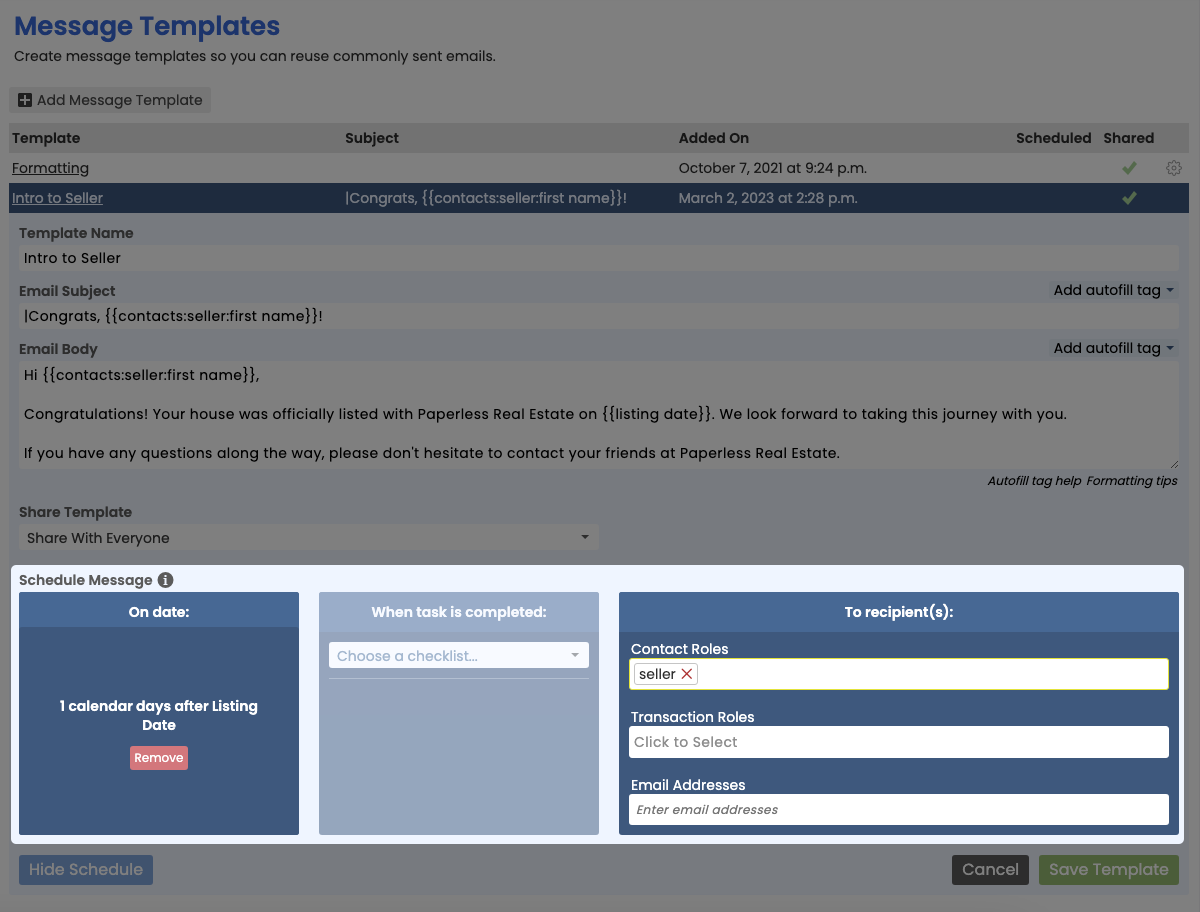
Save time and avoid oversights by auto-generating custom scheduled messages when transaction milestones are met.
You no longer need to track when messages need to be sent based on activity on a transaction. The system will now do that for you.
You can now set your Message Templates to automatically generate scheduled messages whenever the criteria you specify is met on a transaction. Trigger messages based on transaction dates being met or checklists tasks being completed. Once the milestone you specify has been met on a transaction, you’ll be notified via email that a message has been generated for that transaction, and that it’s waiting for you to review and send in your Scheduled Messages queue.
Learn how to Schedule Messages Using Message Templates →
Transaction message scheduling
Draft now. Automatically send later.
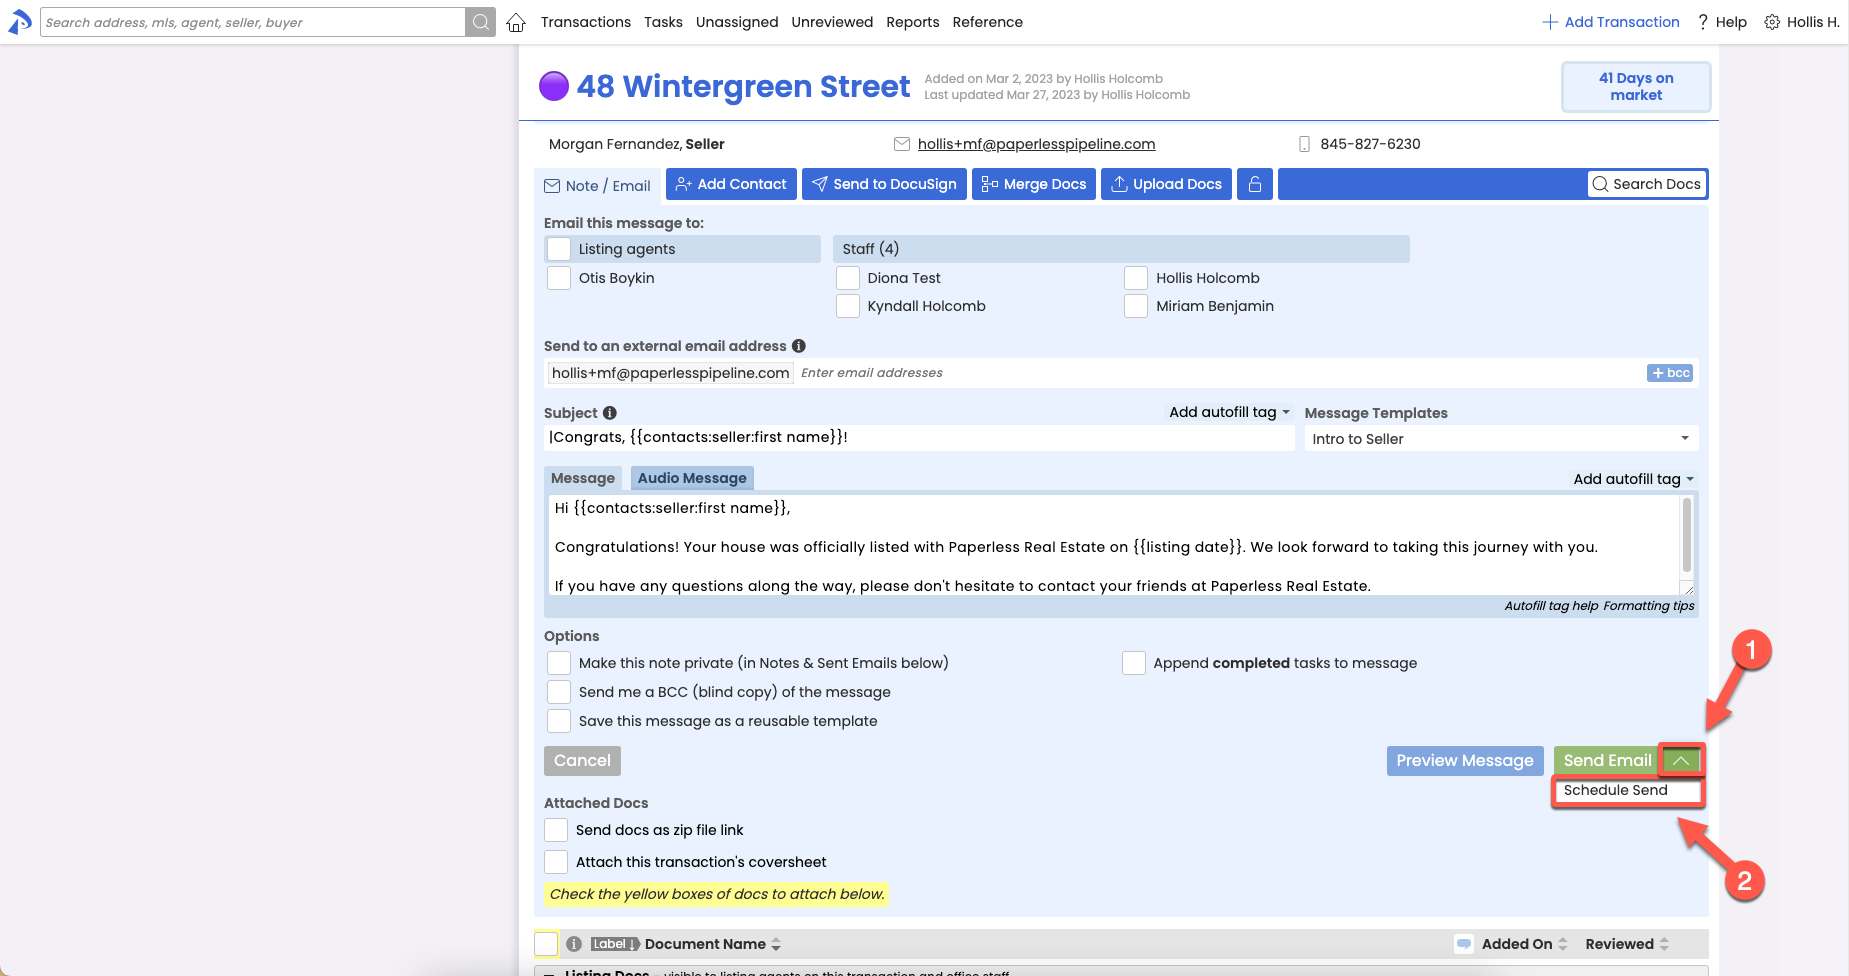
When drafting a message on a transaction, you now have the option to schedule that message to be automatically sent at a later date and time.
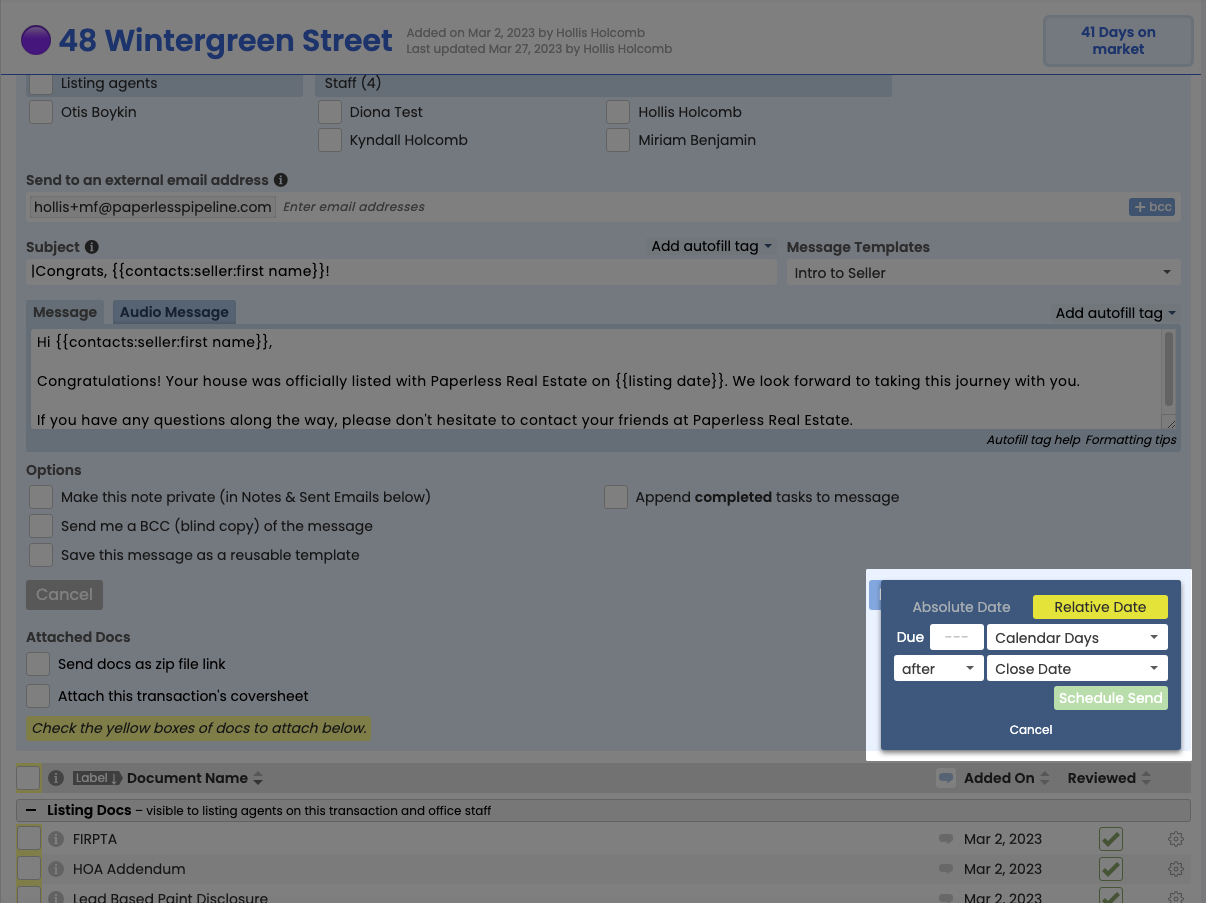
To schedule a message, draft your message as you normally would, click [the down arrow] attached to the Send button, then select [Schedule Send]. Messages can be scheduled for an absolute date and time (e.g., April 22nd at 2pm ET), or they can be scheduled relative to a date on the transaction (e.g., 2 days after Close Date). Messages will automatically be sent when the schedule criteria is met, then appear on the transaction in the Notes & Sent Emails section, as usual. Note that all send times are in Eastern Time.
Learn how to Schedule a Transaction Message to Send Later →
Learn how each property type is performing in an instant
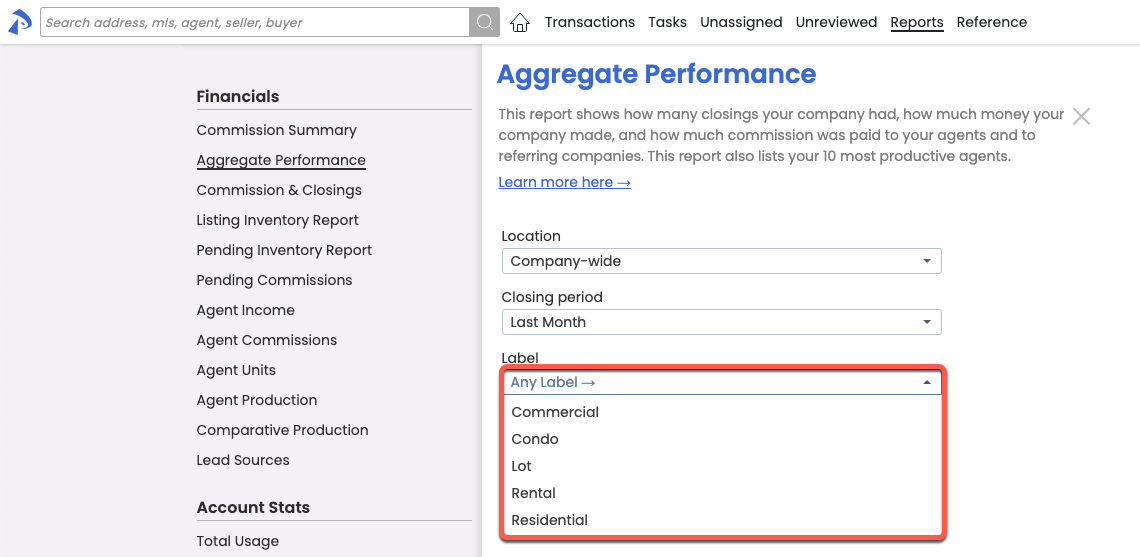
You can now run the Aggregate Performance report by Transaction Label to instantly assess how any property type is performing.
Fine-tune precisely which tasks to send to your external calendar
Whether you need to keep an eye on tasks that contain a certain phrase in the task name, tasks that are related to a particular transaction, or tasks where a specific agent has been @Mentioned, you can now sync tasks to your calendar based on any custom search you run on the Tasks Page. Enter your search criteria in the Search section, click [Search], then click your desired calendar link.
And keep in mind that you can set up more than one sync. If you do, set each synced calendar as a different color for easy recognition.

Include location details in your message templates automatically
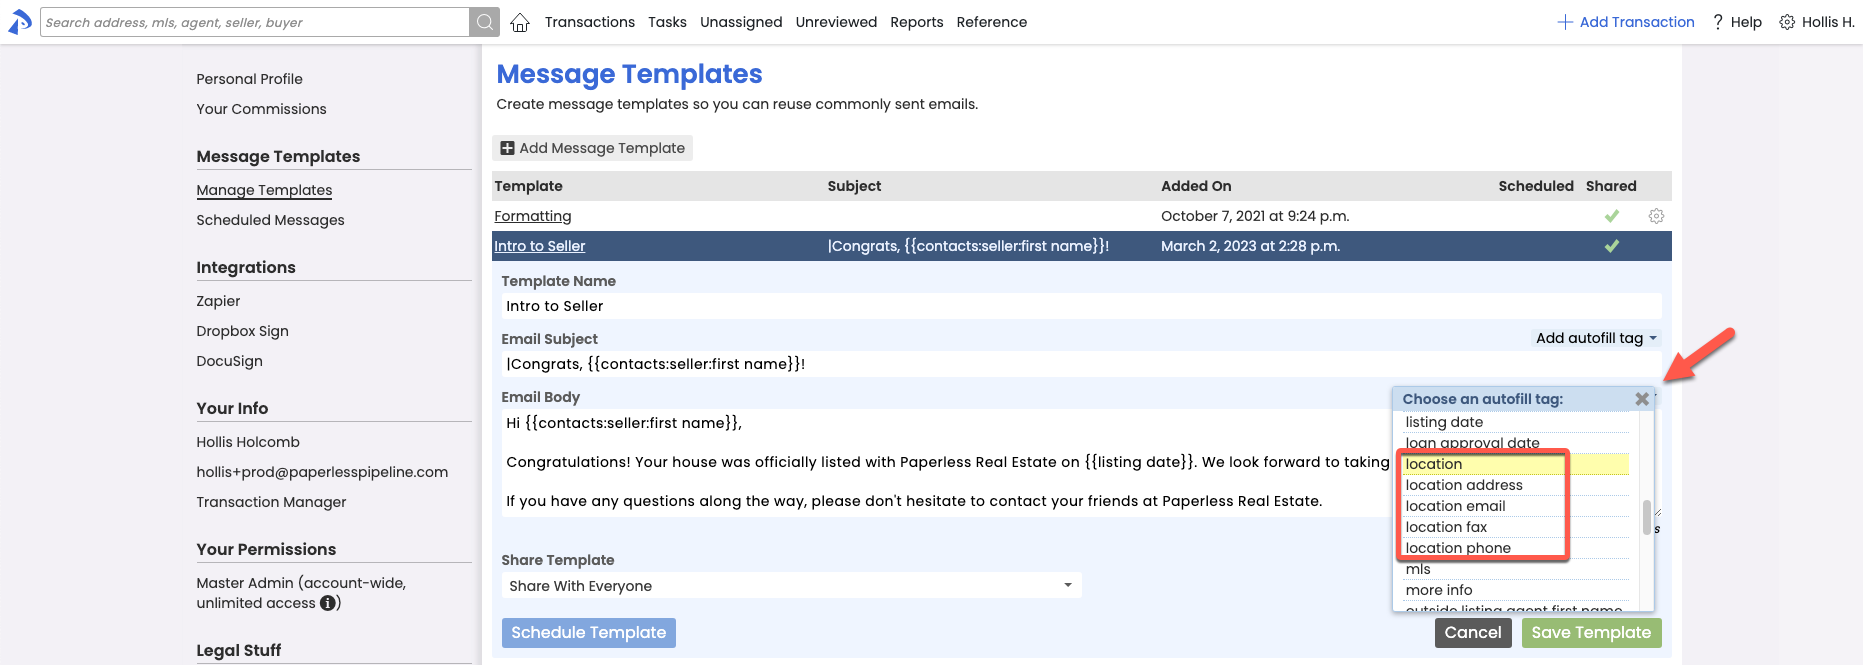
Location detail Autofill Tags allow you to automatically reference a transaction location’s details in your pre-defined message templates. The new Autofill Tags reference:
- Location address
- Location email
- Location phone number
- Location fax number
Sends docs out for DocuSign signature faster and easier
Short version:
You can now send docs out for DocuSign signature directly from within Paperless Pipeline. Re-connect to DocuSign from your Personal Profile page, then when you send docs for signature from Reference or transactions, you'll do so without leaving Pipeline. Continue to view executed docs in DocuSign or import them back into Pipeline from Unassigned Docs.
Details:
You can now send docs out for DocuSign signature directly from within Paperless Pipeline, saving you the time and effort of having to send them to DocuSign, then visit DocuSign to send them from there.
To get started, you'll need to login to DocuSign from within Pipeline to re-establish the connection between Pipeline and DocuSign. Here's how:
- Click your name in the upper right corner of Pipeline, then [Personal Profile].
- Click [DocuSign] from the Integrations section of the left menu.
- Click [Get Started], then follow the prompts to connect to DocuSign.
- Then, when it's time to send a doc for signature, click [Send to Docusign] from transactions or from the Reference page, as you always have.
You'll be directed to specify your signers and signature fields, directly from within Pipeline. Once your sent docs are fully executed, as before, you can either view them in DocuSign, or import them back into Pipeline from the Unassigned Docs page. In the near future, those docs will be drawn back into Pipeline automatically.

Copy recipients privately when sending messages from within Pipeline
You can now add BCC (blind copy) recipients when sending message from within Pipeline. Click the BCC option to the right of the Recipients section to activate the field for any message.

Download a custom list of users
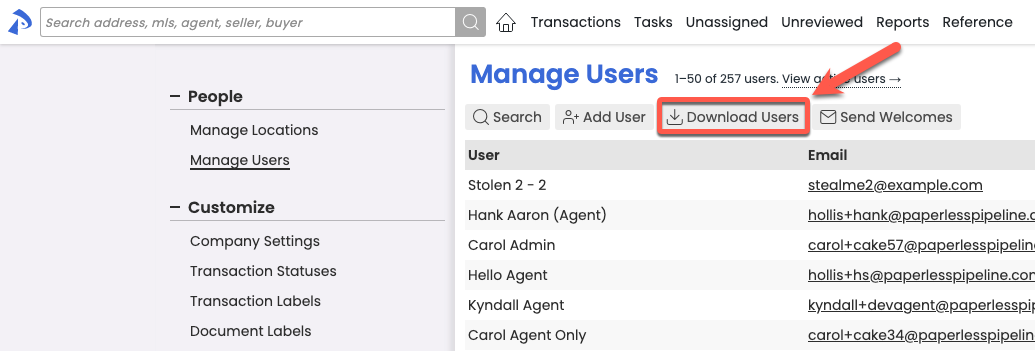
The download option on the Manage Users page will now download whichever users are included in your current set of results. This will allow you to include or exclude inactive users or download a list of specific users, saving you from any filtering after-the-fact. To download, from Manage Users, Search, filter, or use the existing list of users, then click [Download Users] and follow the prompts.
Assess agent Pending performance in a single report
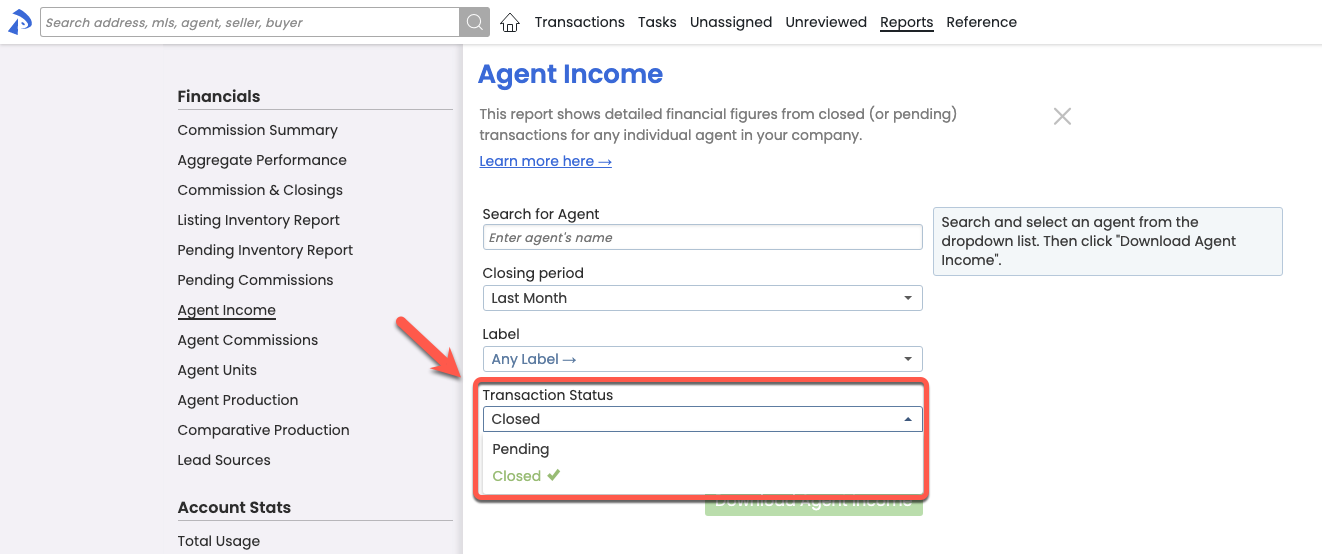
You can now report on an agent's Pending commission totals when you need to assess their productivity based on Pending transactions. With the new Transaction Status option on the Agent Income report, you can run the report based on Closed or Pending transactions. From the Reports left menu, select [Agent Income], then select whether you'd like to view Closed or Pending transactions.
Find your task instantly when clicking from the Tasks page
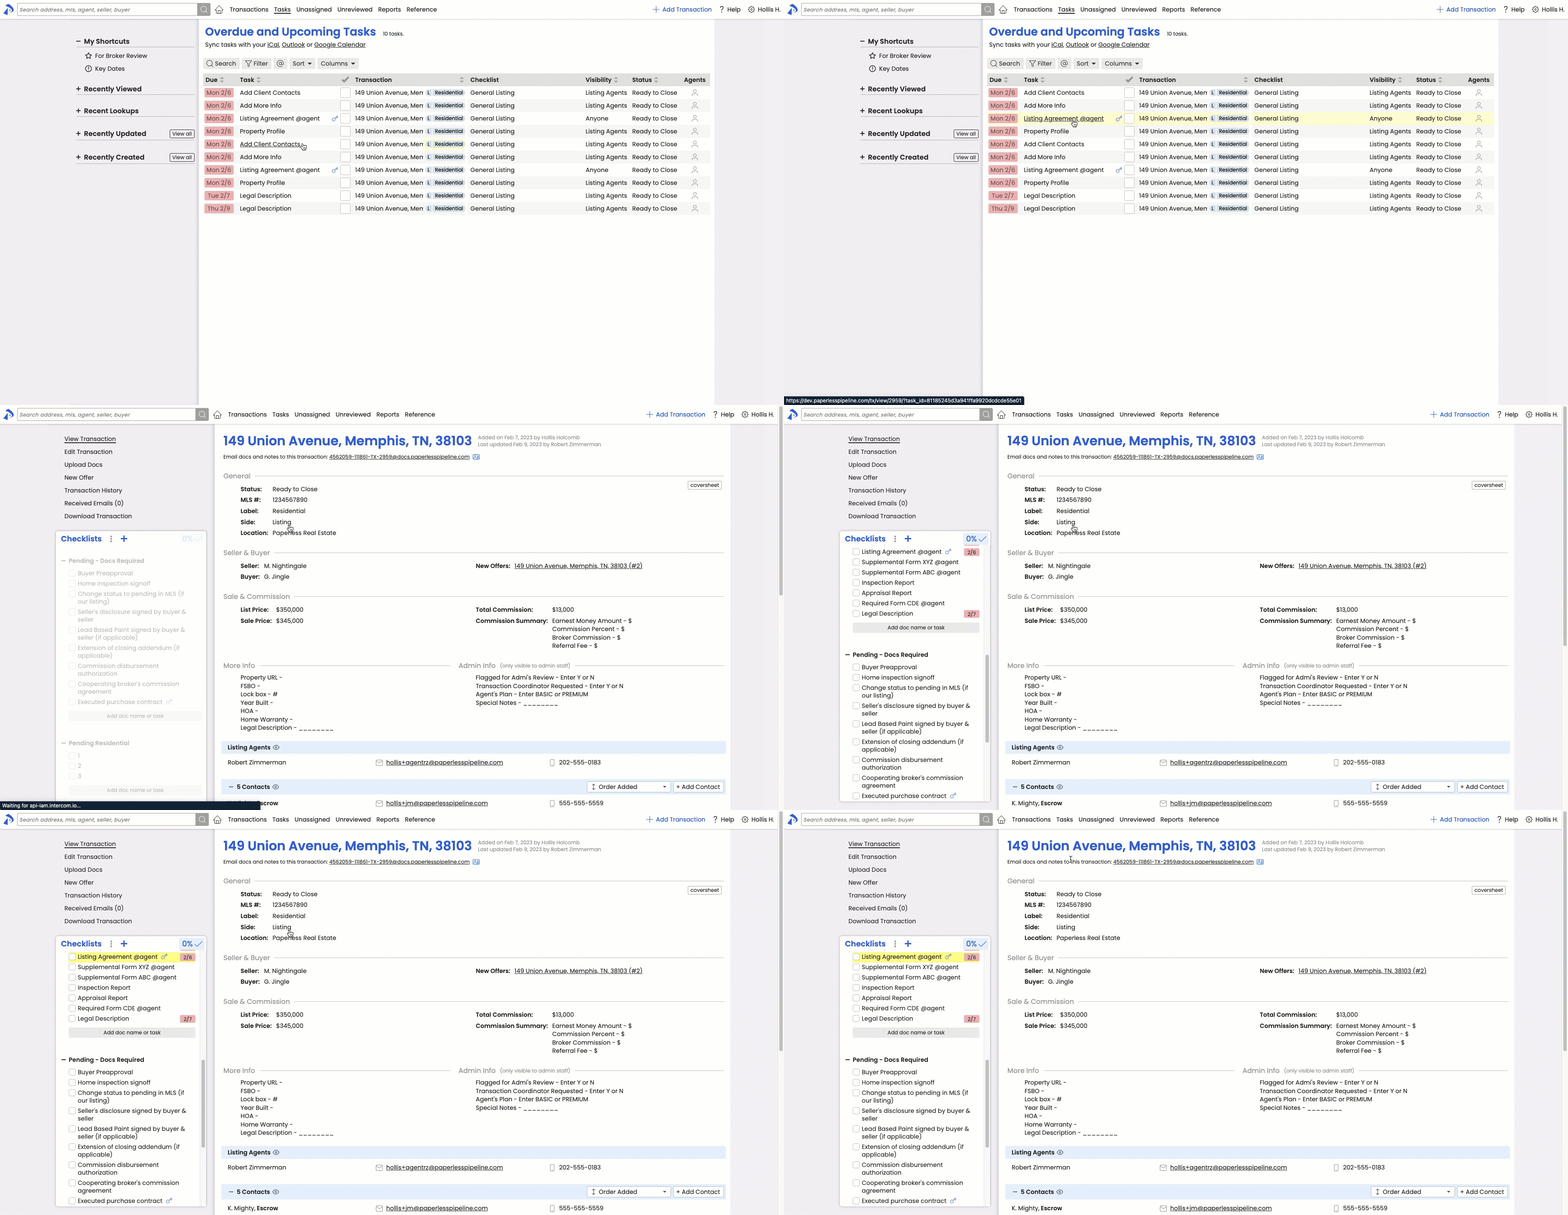
When clicking a task on the Tasks page, the system will now scroll straight to the task on the transaction, and highlight it so you don't have to search for it.
Note that you need to have Checklist Scrolling turned on for the scrolling part of this feature to work.
Save time by bulk deleting obsolete library items
Have obsolete material on your Reference page that needs to be removed or updated? You can now bulk delete multiple Reference Docs in a single action. Select multiple docs by checking each doc individually or by checking a category of docs. Then click [Delete Docs].

Save time by managing master admin access directly in Pipeline
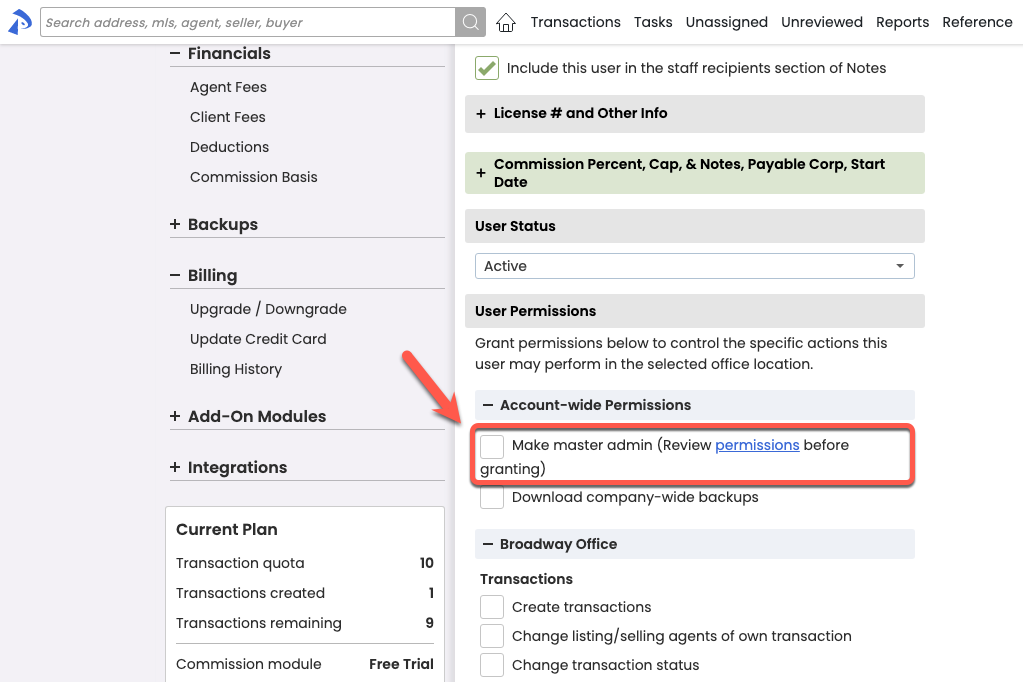
Master admins may now fully manage the addition or removal of other master admins directly from Manage Users. Who is authorized to make such changes has not changed, only the ability to perform the changes directly from within Pipeline, has.
To add a master admin, an existing master admin can visit the desired user's profile, then check "Make master admin" from the "Account-wide Permissions" section.
To remove a master admin, an existing master admin can select the desired user's gear icon from the Manage Users list, then "Remove master admin"
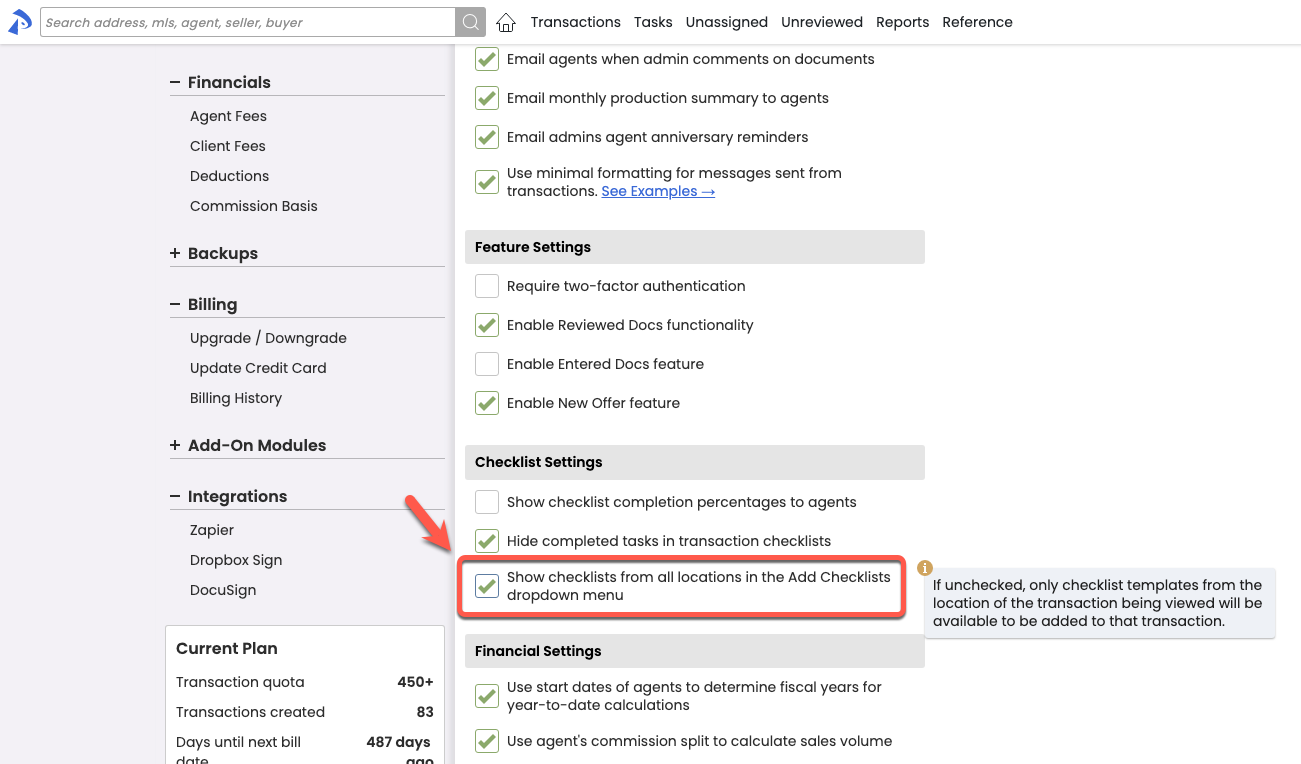
Make adding checklists to transactions easier by filtering out unneeded location-specific checklists
If your office has a need to only allow checklists that belong to a transcation's location to be added to that transaction, you can set your account accordingly.
This limitation is typically useful when you:
- Have more than one location
- Your checklists differ based on which location(s) they belong to
- You want to reduce the clutter of OR visibility to the checklists in the other location(s).
By default, all checklists are add-able to all transactions, regardless of the checklists' location. If you need to restrict that to only allow checklists from the transaction's location to be added, from Company Settings, uncheck "Show checklists from all locations in the Add Checklists dropdown menu" then Save. The setting can be changed at any time if your needs change in the future.
As always, feel free to setup a call→ if you ever have any questions about the setup of your checklists or feel they might benefit from a tune-up.
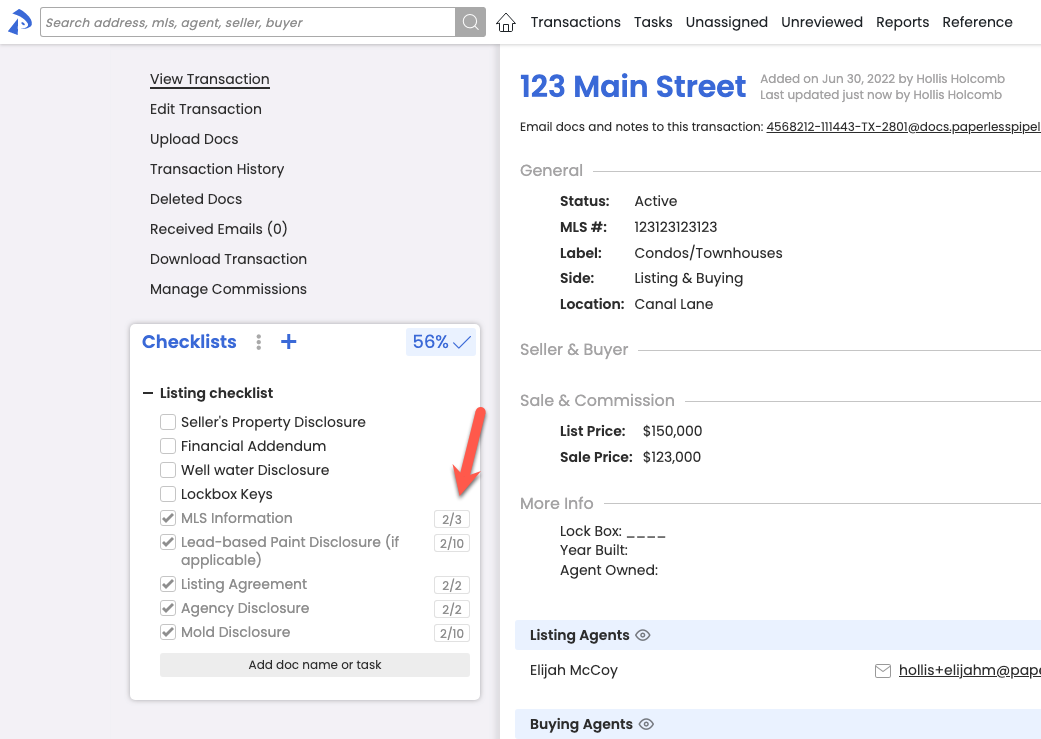
Know a completed task's original due date at-a-glance
The due dates of tasks will now continue to be displayed even after they have been marked as complete, saving time from hovering.
COMMISSION MODULE
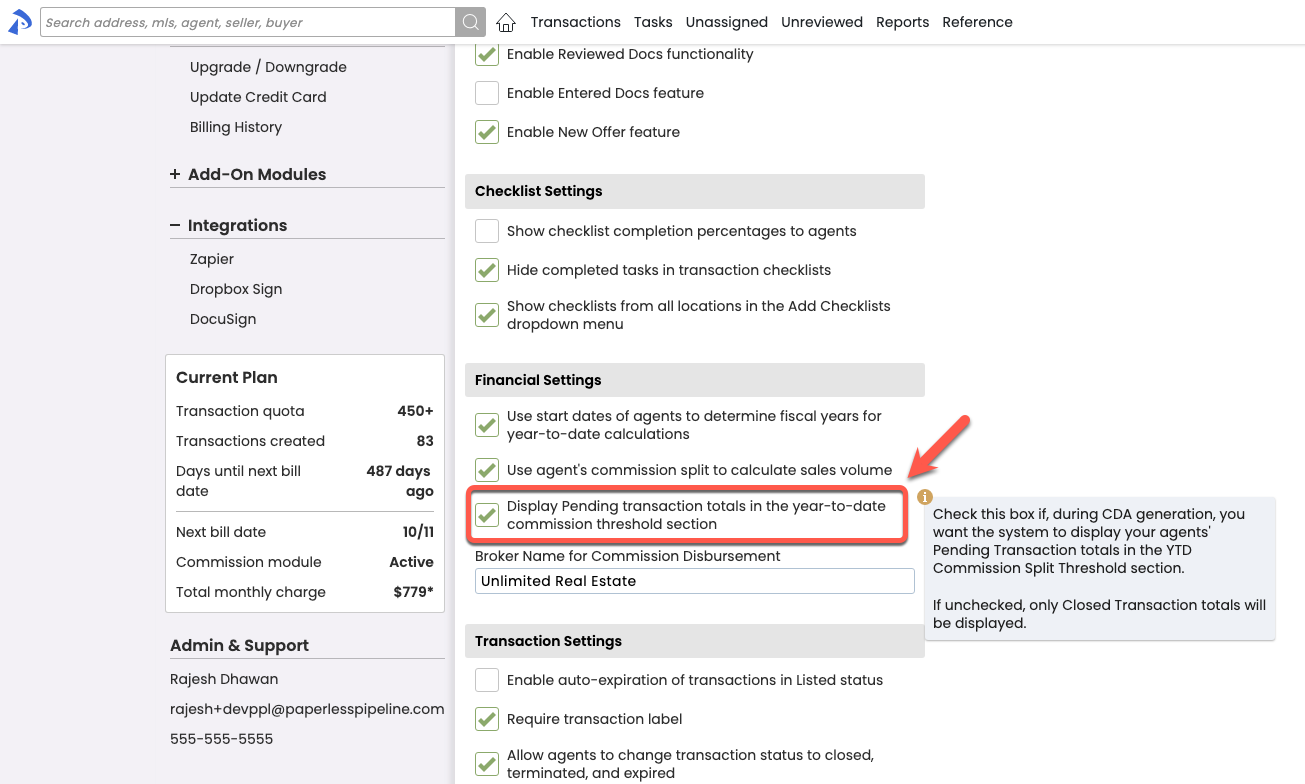
Determine whether agents have met their cap at-a-glance when pending transactions need to be considered
If processed Pending transactions should be considered when determining whether agents have reached their commission cap, you can now set your account to consider them. On the Company Settings page, check Display Pending transaction totals in the year-to-date commission threshold section, then Save.
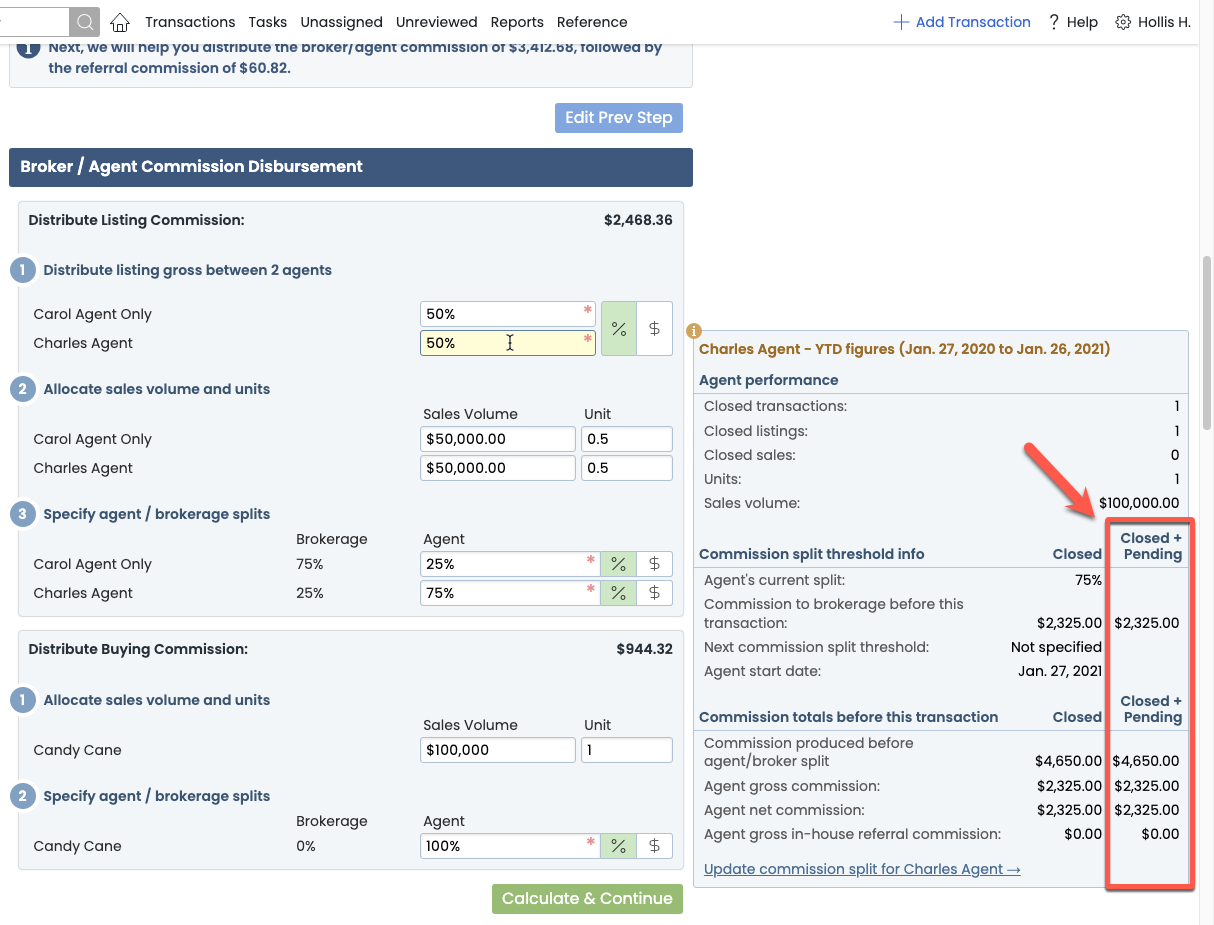
If enabled, when you're managing commissions, you'll see both Closed totals and Closed+Pending totals to help you determine whether a cap has been met.
Top performer spots now exclusively for active users
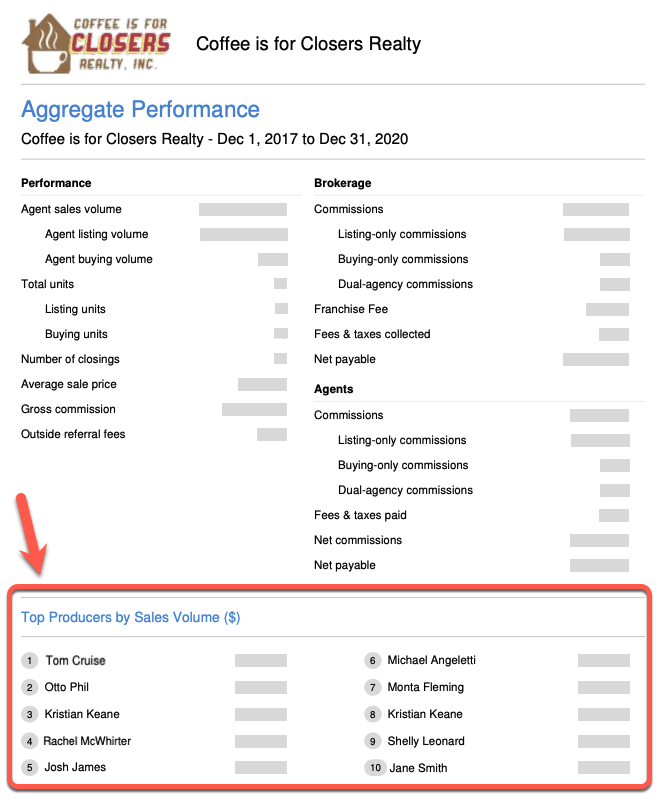
The Top Performers section of the Aggregate Performance report will now exclude any inactive users, giving you a cleaner picture of who your active performers are.
Fully integrated document signing is here!
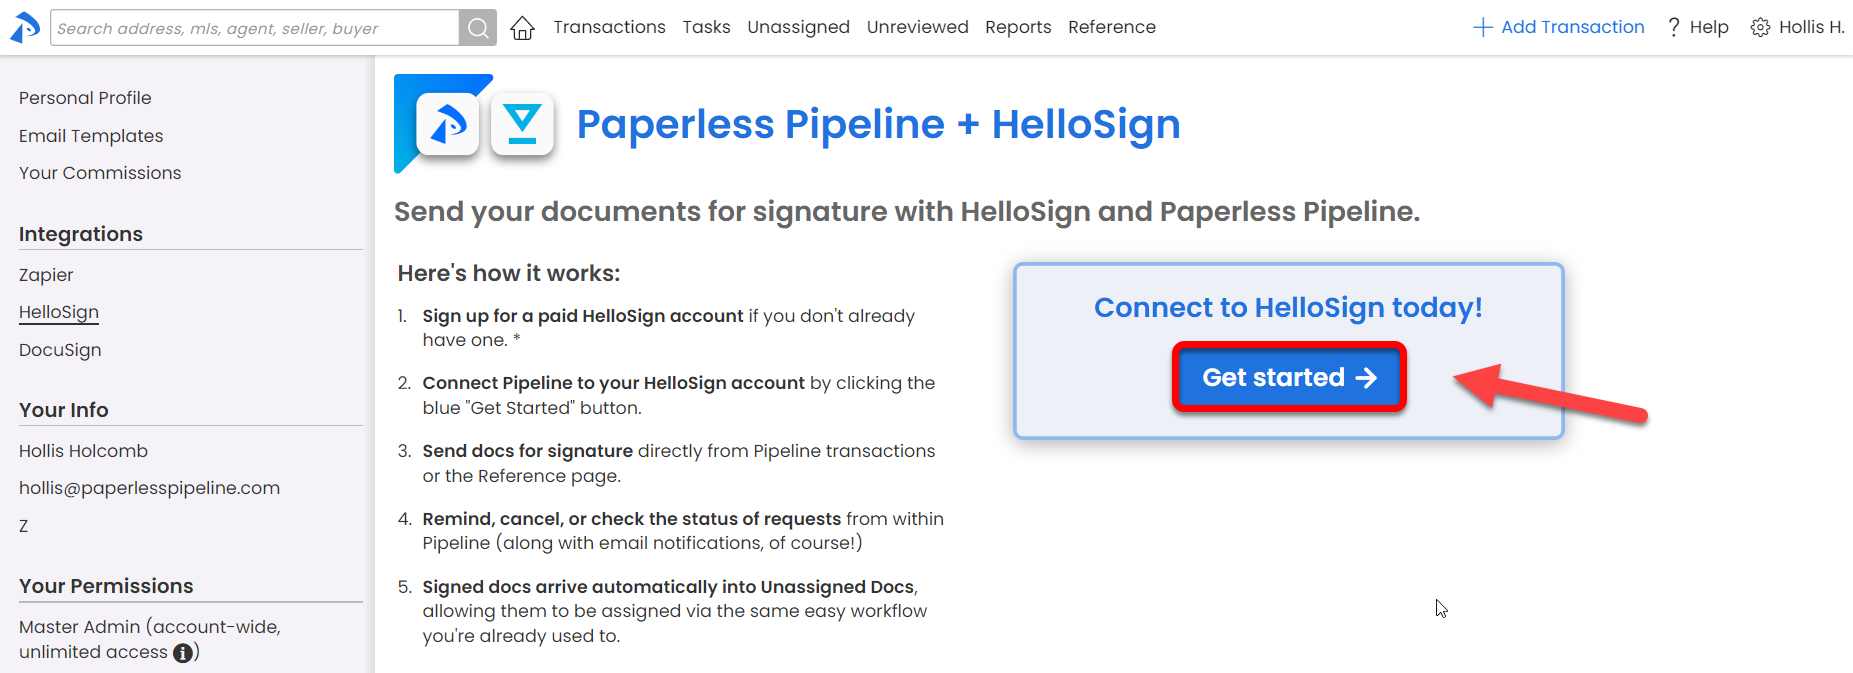
Pipeline is now integrated with HelloSign providing you a smooth, simple process for requesting signatures directly from Pipeline transactions and the Reference page. Once your Pipeline account is connected to your paid HelloSign account, you'll see options to send docs for signature, send reminders, cancel, and check the status of any requests you've sent from Pipeline. Once docs are fully executed, they'll automatically arrive in Unassigned Docs where they can be assigned via the same easy workflow you're already used to.
Watch a 1-minute video about how it works 🎥 →
Sign up / learn more about Paperless Pipeline & HelloSign →
View full Paperless Pipeline & HelloSign help article here →
Get a quick count of agents' closed transactions
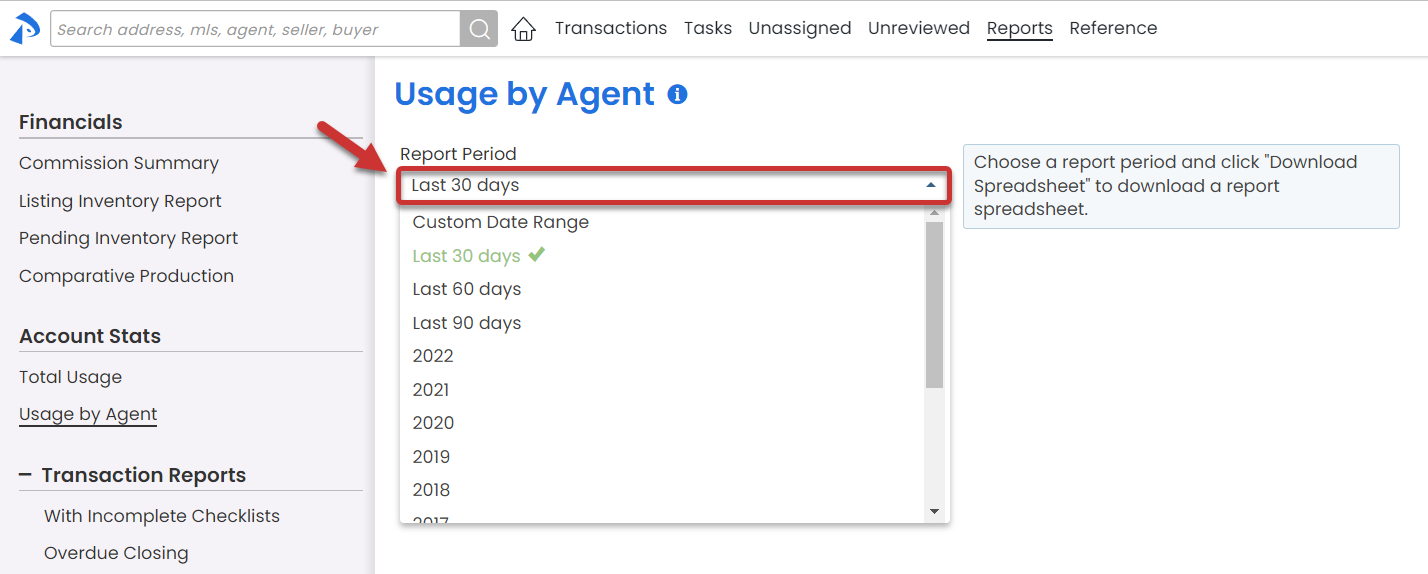
The Usage by Agent report now includes a column for Transactions Closed, allowing you to quickly view the number of transactions closed for each agent during your specified report period. For offices subscribed to the Commission Module, this report does not consider whether commissions have been entered.
Learn more about the Usage by Agent Report →
Save time by bulk-changing the permission category of mis-categorized docs
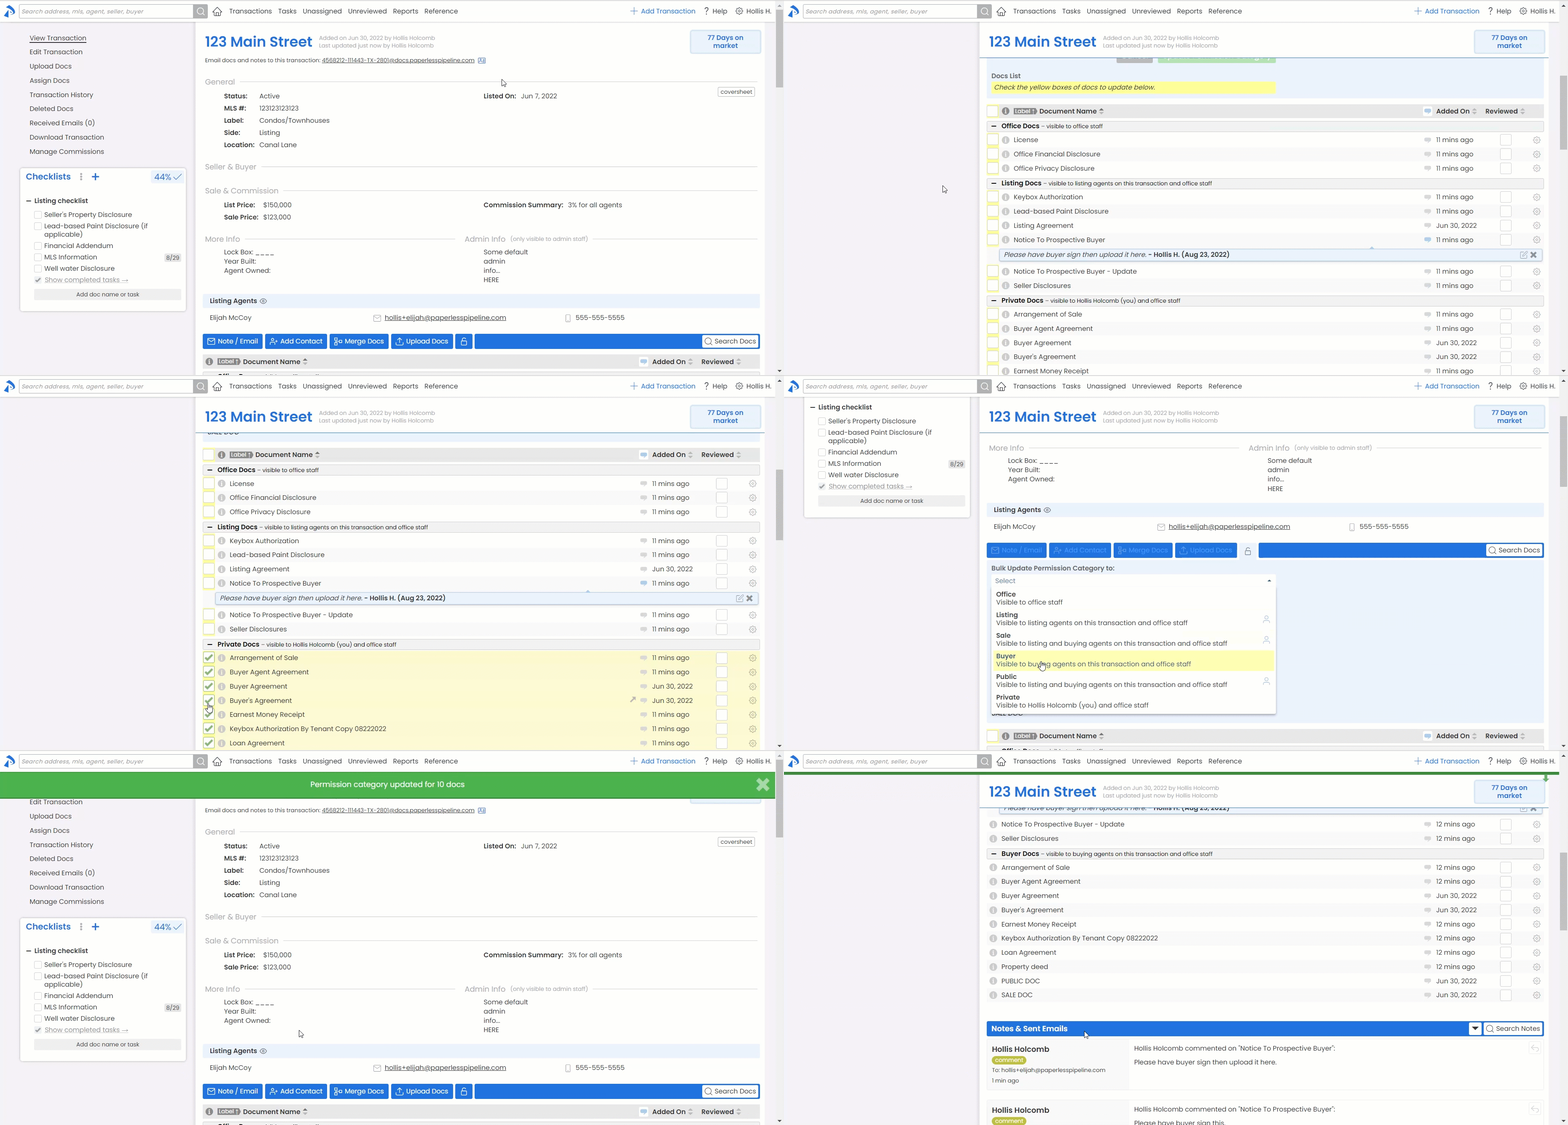
Docs get assigned to the wrong Permission Category? Change them to the correct Permission Category all at once. Click the 🔓 at the top of the documents section of transactions to start the process for any docs on that transaction.
Learn more about Bulk Changing Permission Category here →
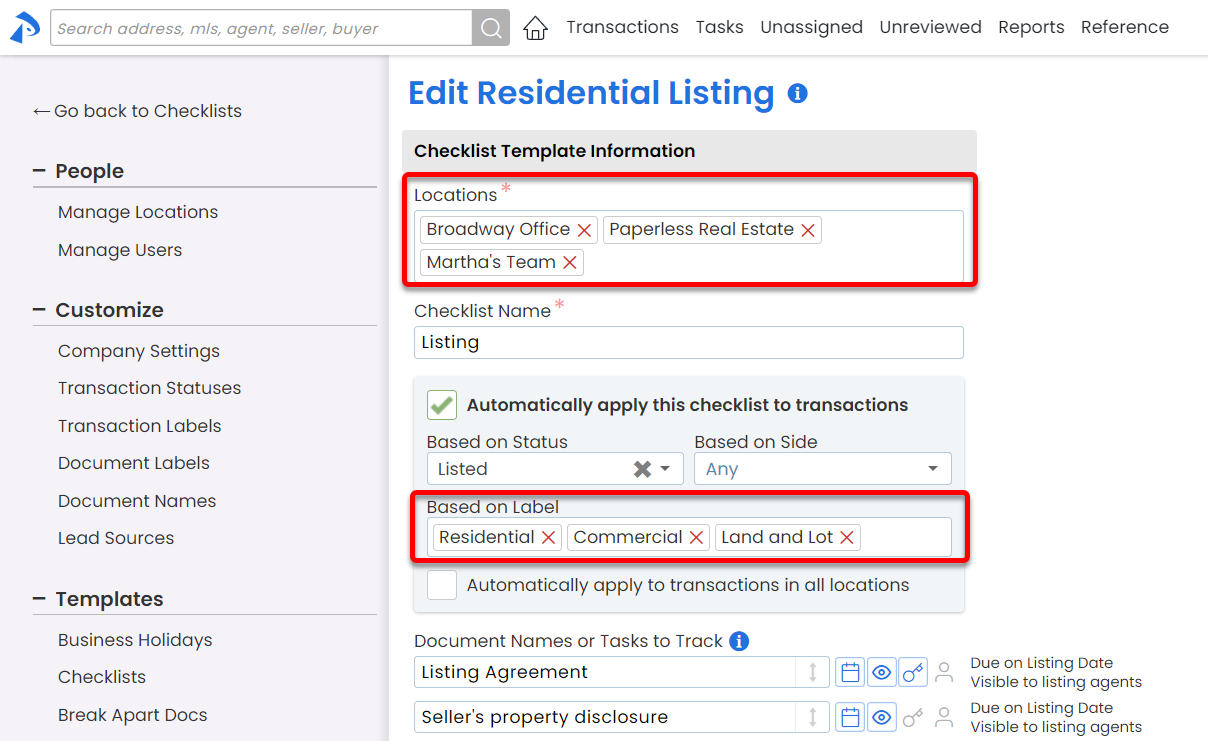
Relate a single checklist to multiple Locations and Transaction Labels
Instead of relating a checklist to either one or all Locations and Transaction Labels, you can now relate a single checklist to multiple Locations and multiple Labels. This new option:
- Allows you to set a single checklists to be automatically added to transactions in multiple Locations and with multiple Labels
- Allows you to give checklist-related permissions to a single checklist for admins in different Locations
- Helps organize and streamline your checklist setup (since you no longer need multiple checklists to represent multiple Locations and Labels).
If you previously created multiple checklists to represent multiple Locations or multiple Labels and would like to combine those into single checklists, learn how here →.
Learn more about Managing Checklists here →
Selling Agent is now Buying Agent
For consistency and accuracy, we've updated all instances of the term "Selling Agent" to "Buying Agent" throughout the system. If you used any "Selling Agent" auto-fill tags in any of your message templates, they'll still be honored.
Email formats have been enhanced (and un-enhanced😉)!
You've asked for minimally-styled emails that look like they've come from a standard email system and now you've got the option! Set your account to either send simple, minimally-styled messages from transactions OR send a more styled version. All system messages have received an overhaul, as well, so they're more modern, cleaner, and easier-to-read than ever. Learn more here →
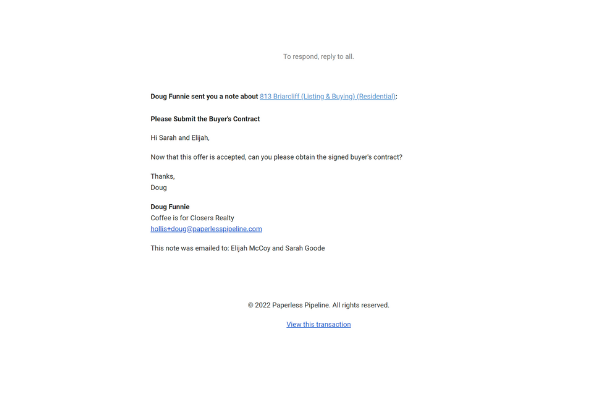
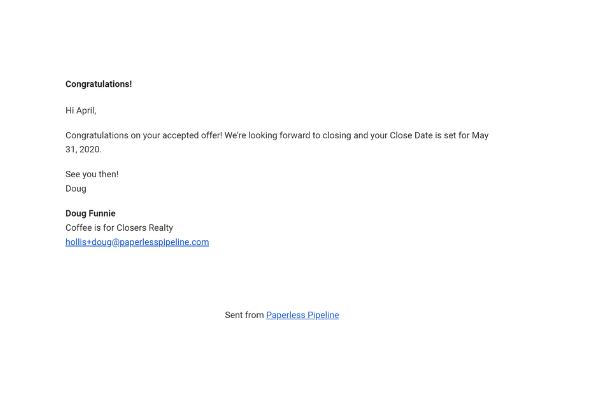
Minimally-styled emails
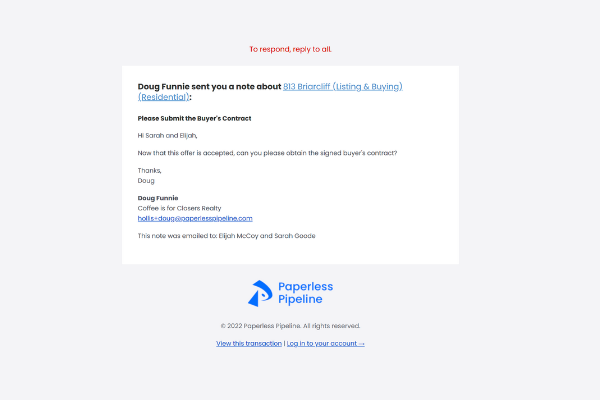
Styled emails
YTD popup now reflects transactions for an entire fiscal or calendar year
When managing commissions, all closed transactions with a CDA from the fiscal or calendar year of the current transaction's close date will be included in agents' YTD popup. In the past, only transactions through the current transaction's close date would be included, omitting any that were closed after that transaction's close date but still within the year.
Learn more about Agent's YTD Pop-up here →
Sort contacts in the order that helps you easily find them
Sort contacts on transactions so you can quickly jump to the person you need see. Sort by role, Company/Address, Name or the Order they were added, whichever helps you find your contacts the quickest. Pipeline will remember your sort preference when you view transactions later.
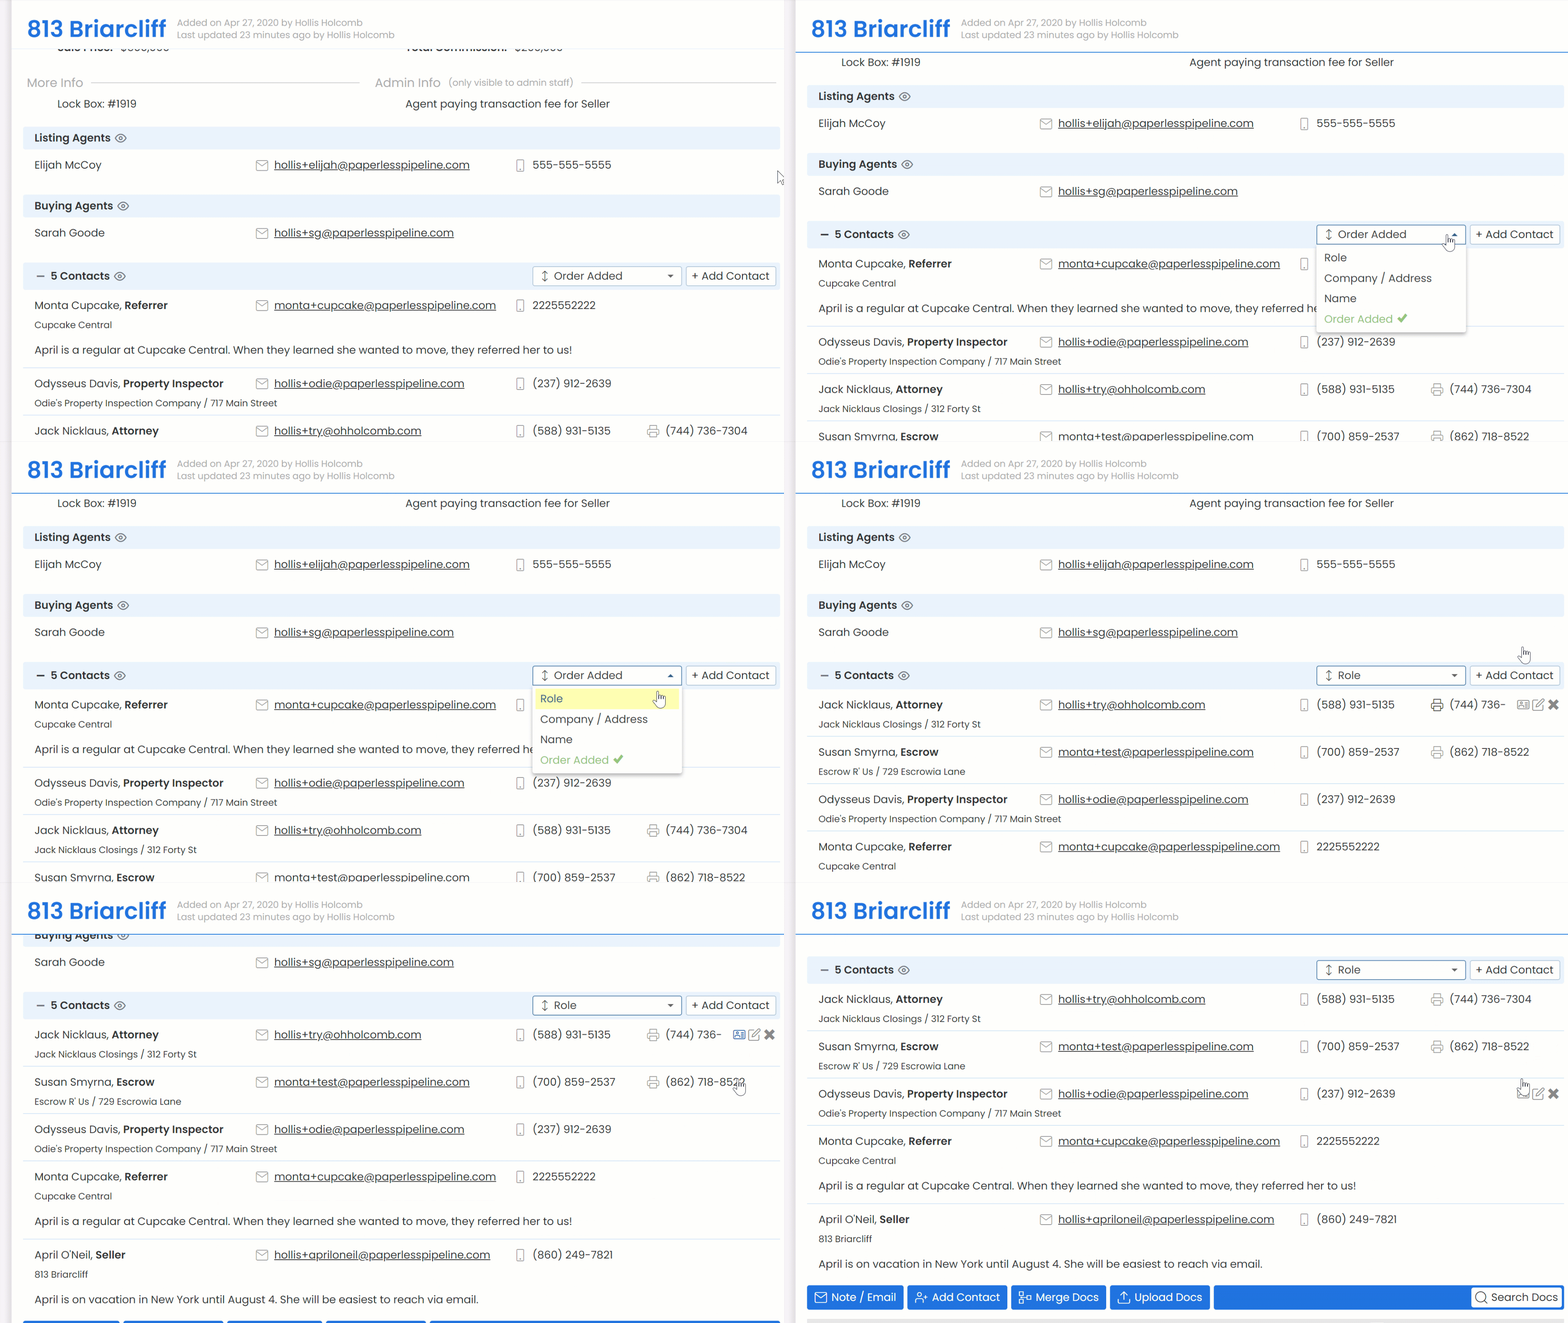
Learn more about Sorting Contacts →
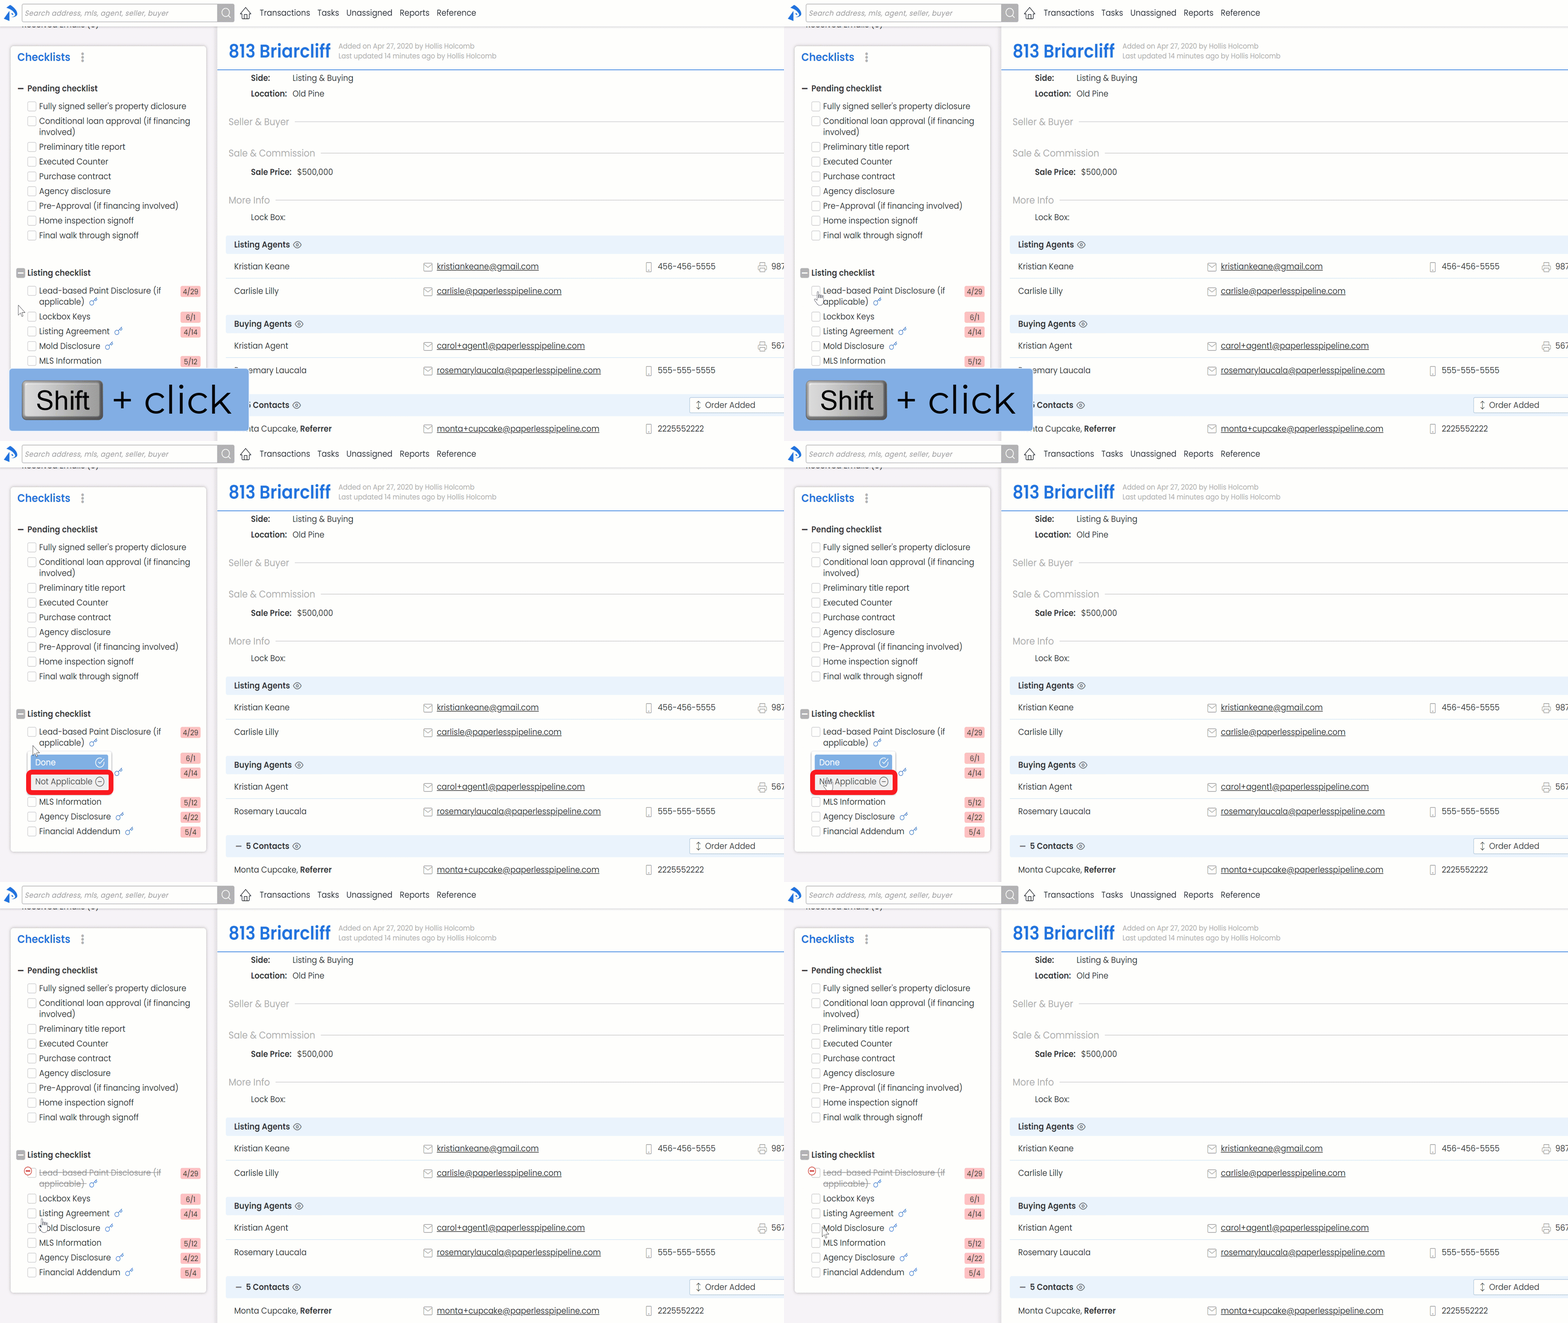
Agents can easily let admins know when a task is not applicable
Agents can now effortlessly communicate to an admin when they've determined a task is not applicable for a transaction. Train agents to SHIFT-click any task's checkbox to give them the option to mark the task as N/A. Like agent-checked tasks, not applicable tasks:
- Will no longer appear on agent's Task page or in their task reminder emails
- Will be displayed on admins' Task page for easy access to tasks needing their attention.
Admins may either:
- Mark N/A tasks as complete by checking them off (they will remain crossed out to indicate they were marked as N/A, even after fully checked)
- Delete N/A tasks if they'd like to remove them from view completely
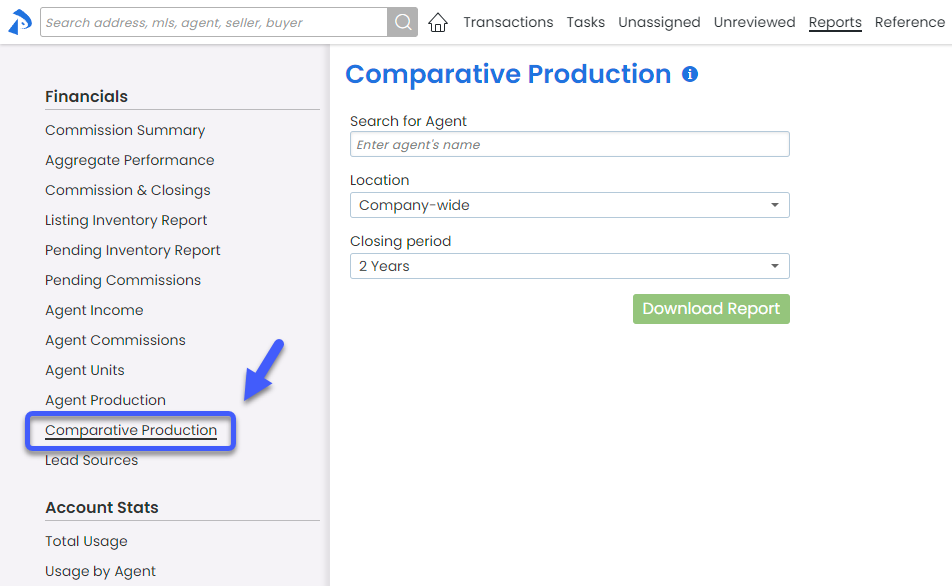
Compare performance year over year
The new Comparative Production Report allows you to measure seasonal performance by comparing figures for any given month across multiple years, as well as annual totals. Monthly and annual figures are included for sales volume, sales average, number of transactions, and (for Commission Module subscribers) sales units.
Learn more about the Comparative Production Report here→
Share checklist timelines effortlessly
You can now easily download and share a spreadsheet of your checklist timelines and their associated information with agents, team members, or clients (for TCs). Hover over a checklist title then click the download icon to download timeline happiness!
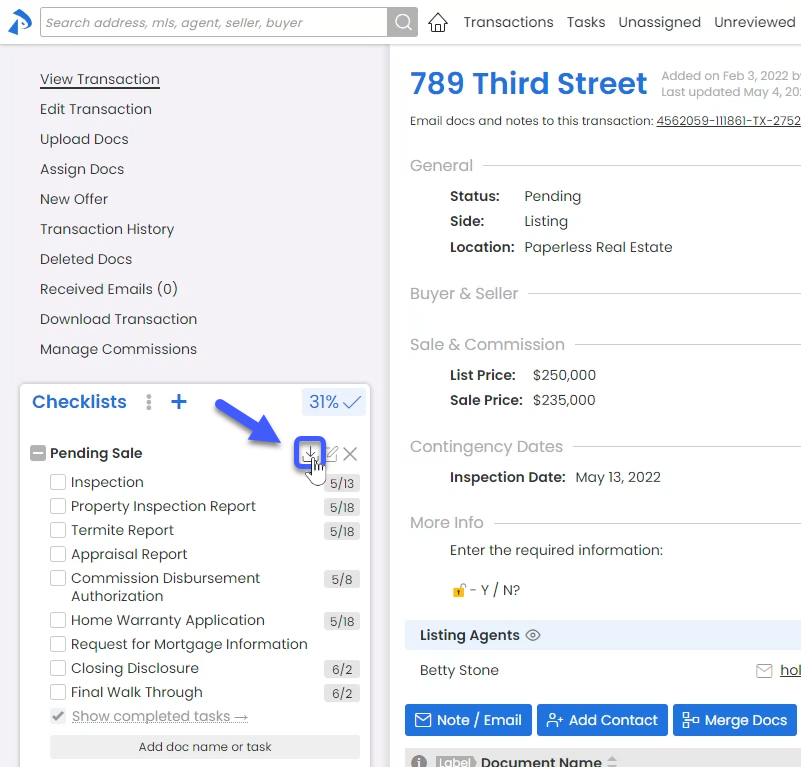
Pro tip: To quickly expand all columns in Excel to match the width of a your specific timeline's data, click the upper left master cell, then double-click any column separator.
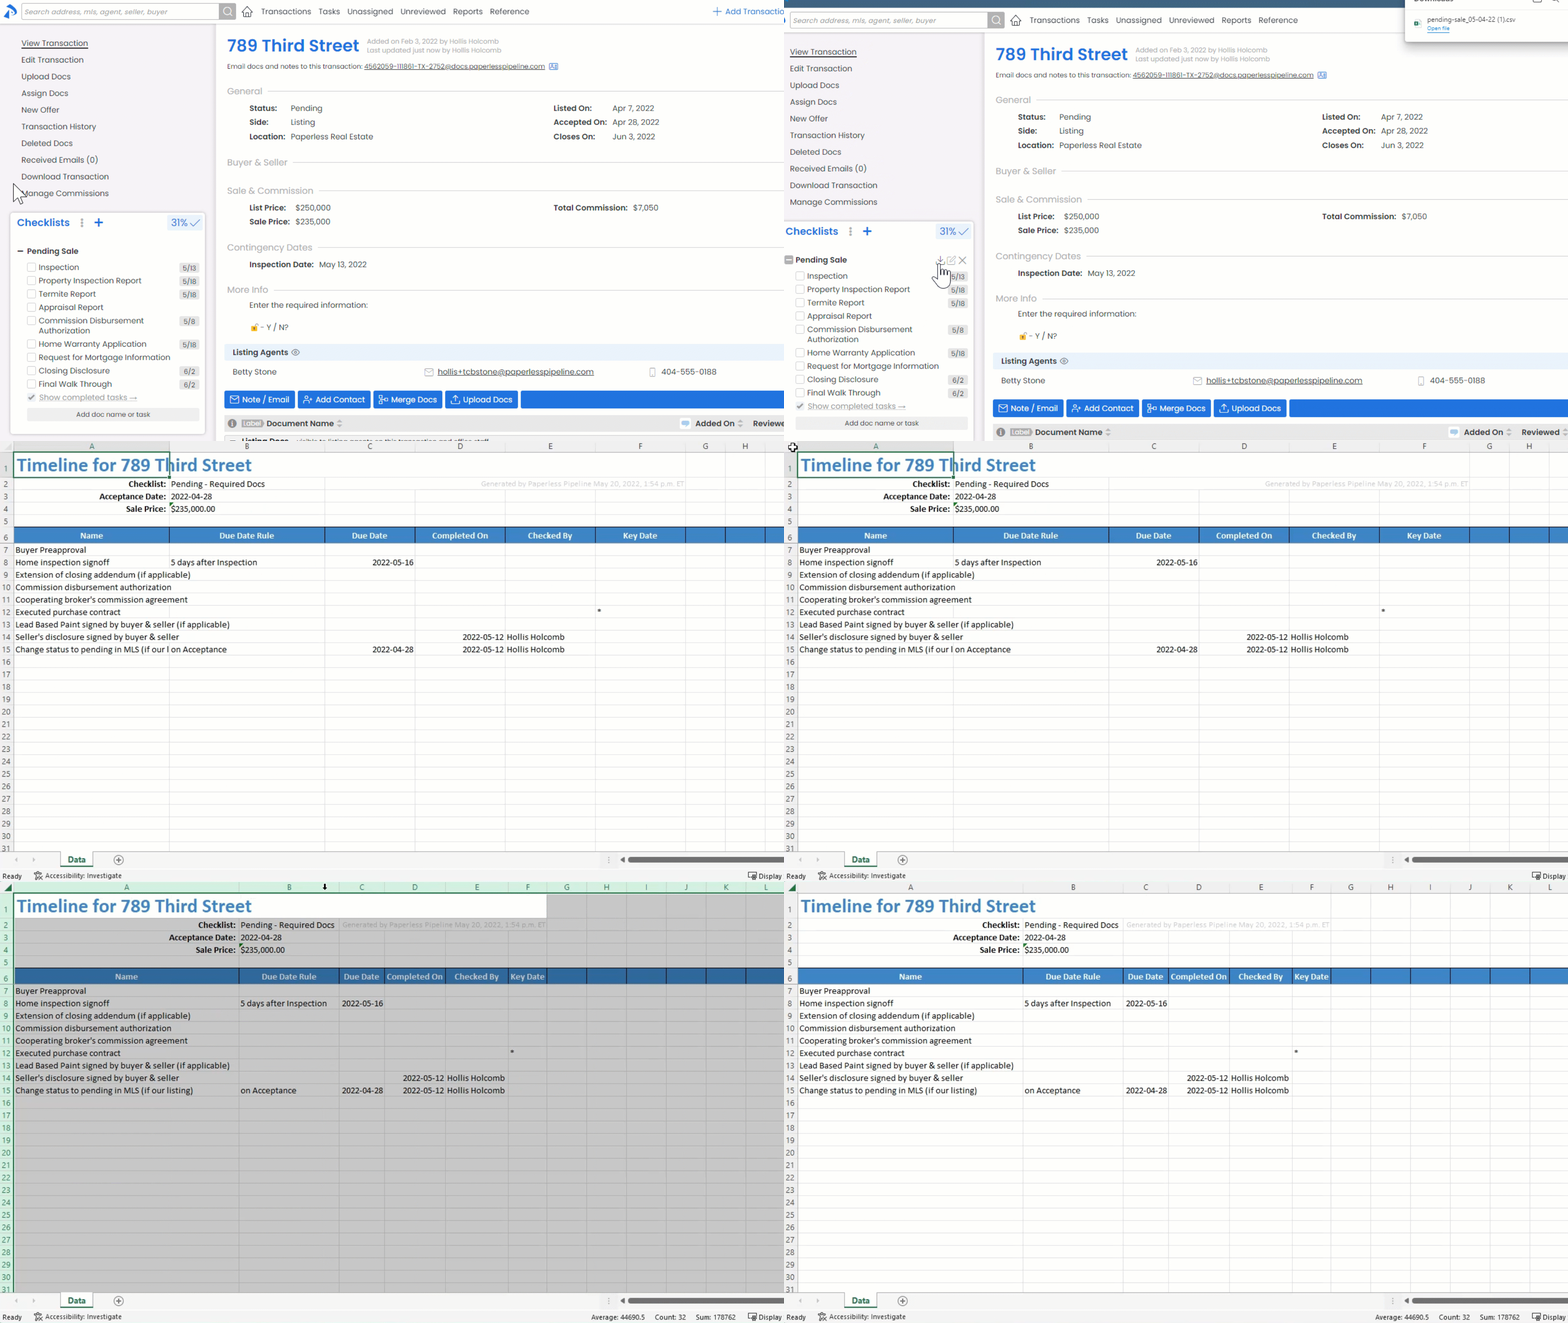
Learn how to Download a Transaction Checklist here →
Let agents update task dates they know most about
You can now allow agents to change the due dates of non-compliance tasks. From Checklist Templates, designate non-compliance tasks whose due dates are appropriate for agents to update by clicking the Agent icon next to the task.

Learn how to Allow Agents to Change a Task's Due Date →
Reply to messages with a single click
Quickly reference a message you're responding to in Pipeline by replying to it directly. From the Notes & Sent Emails section, click the Reply icon of any eligible message or comment to reply to the sender and optionally add other recipients.
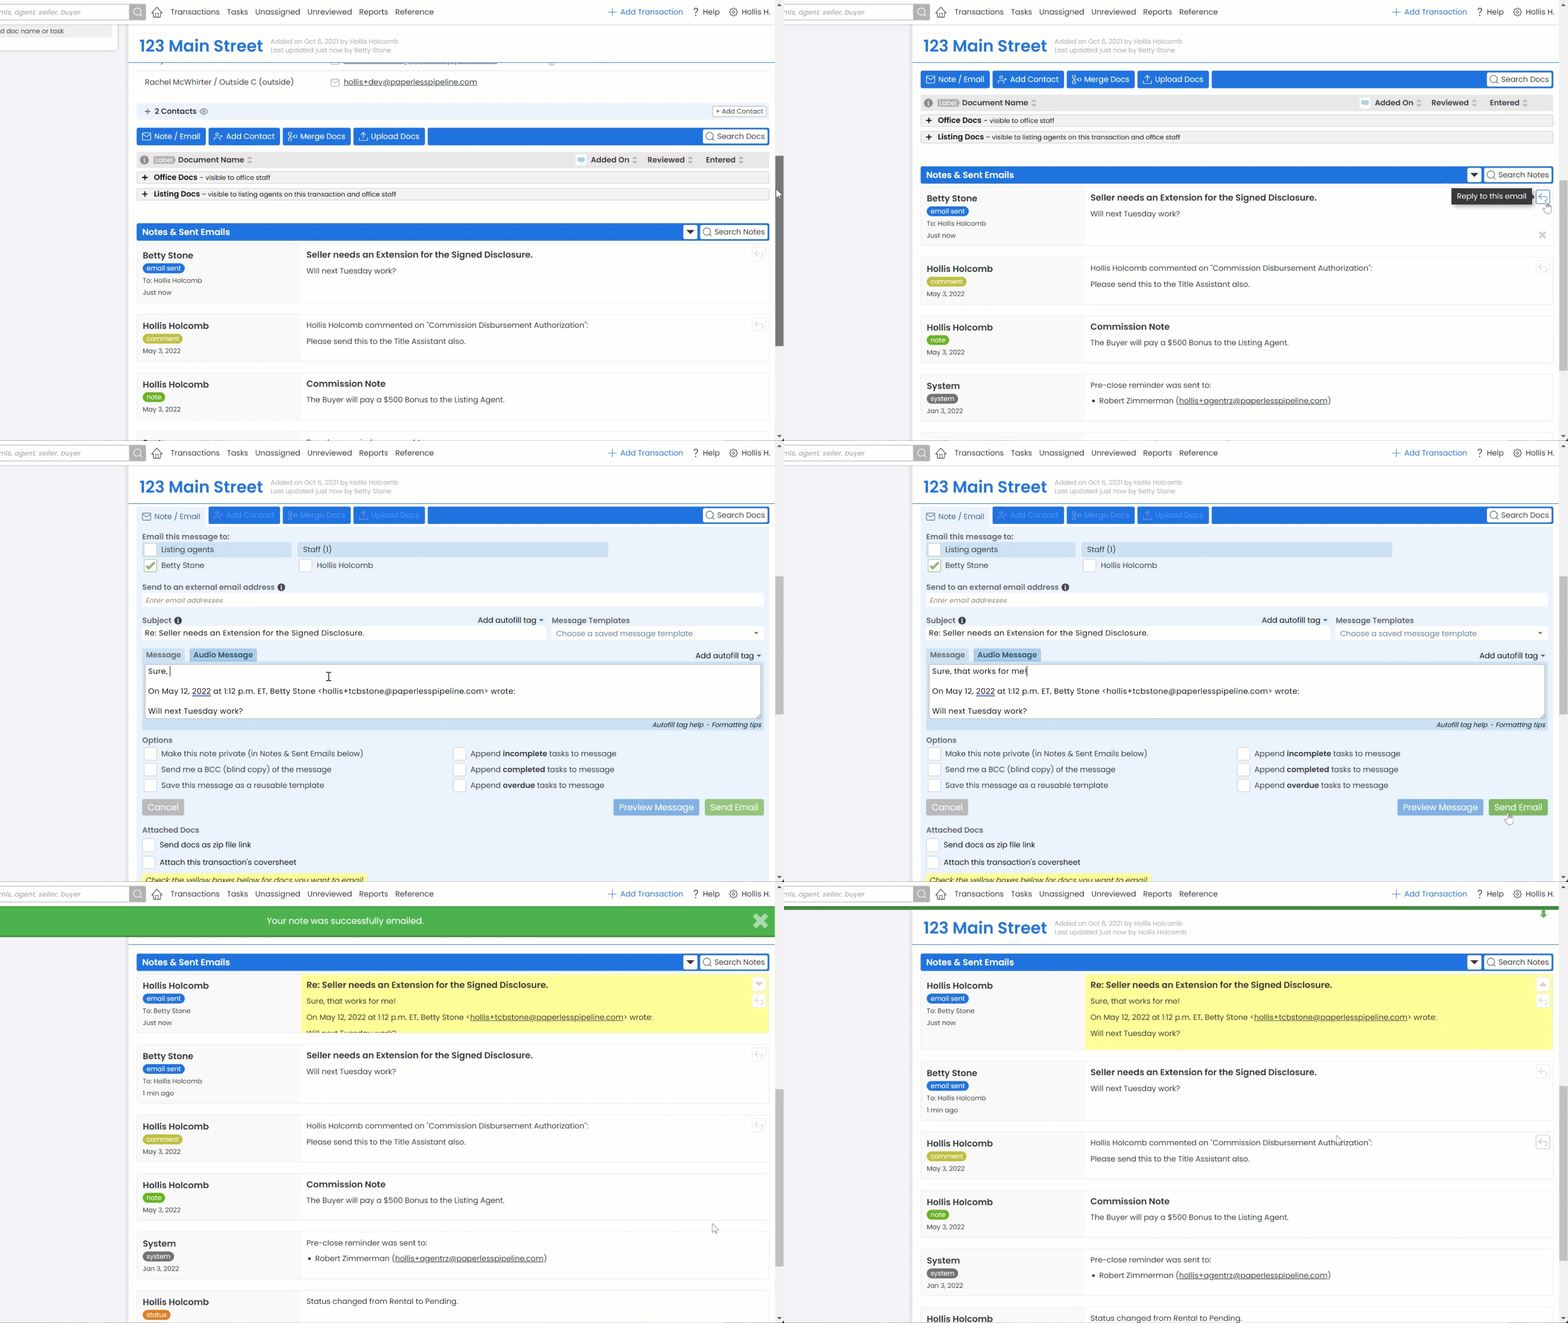
Learn how to Reply to Emails in Pipeline →
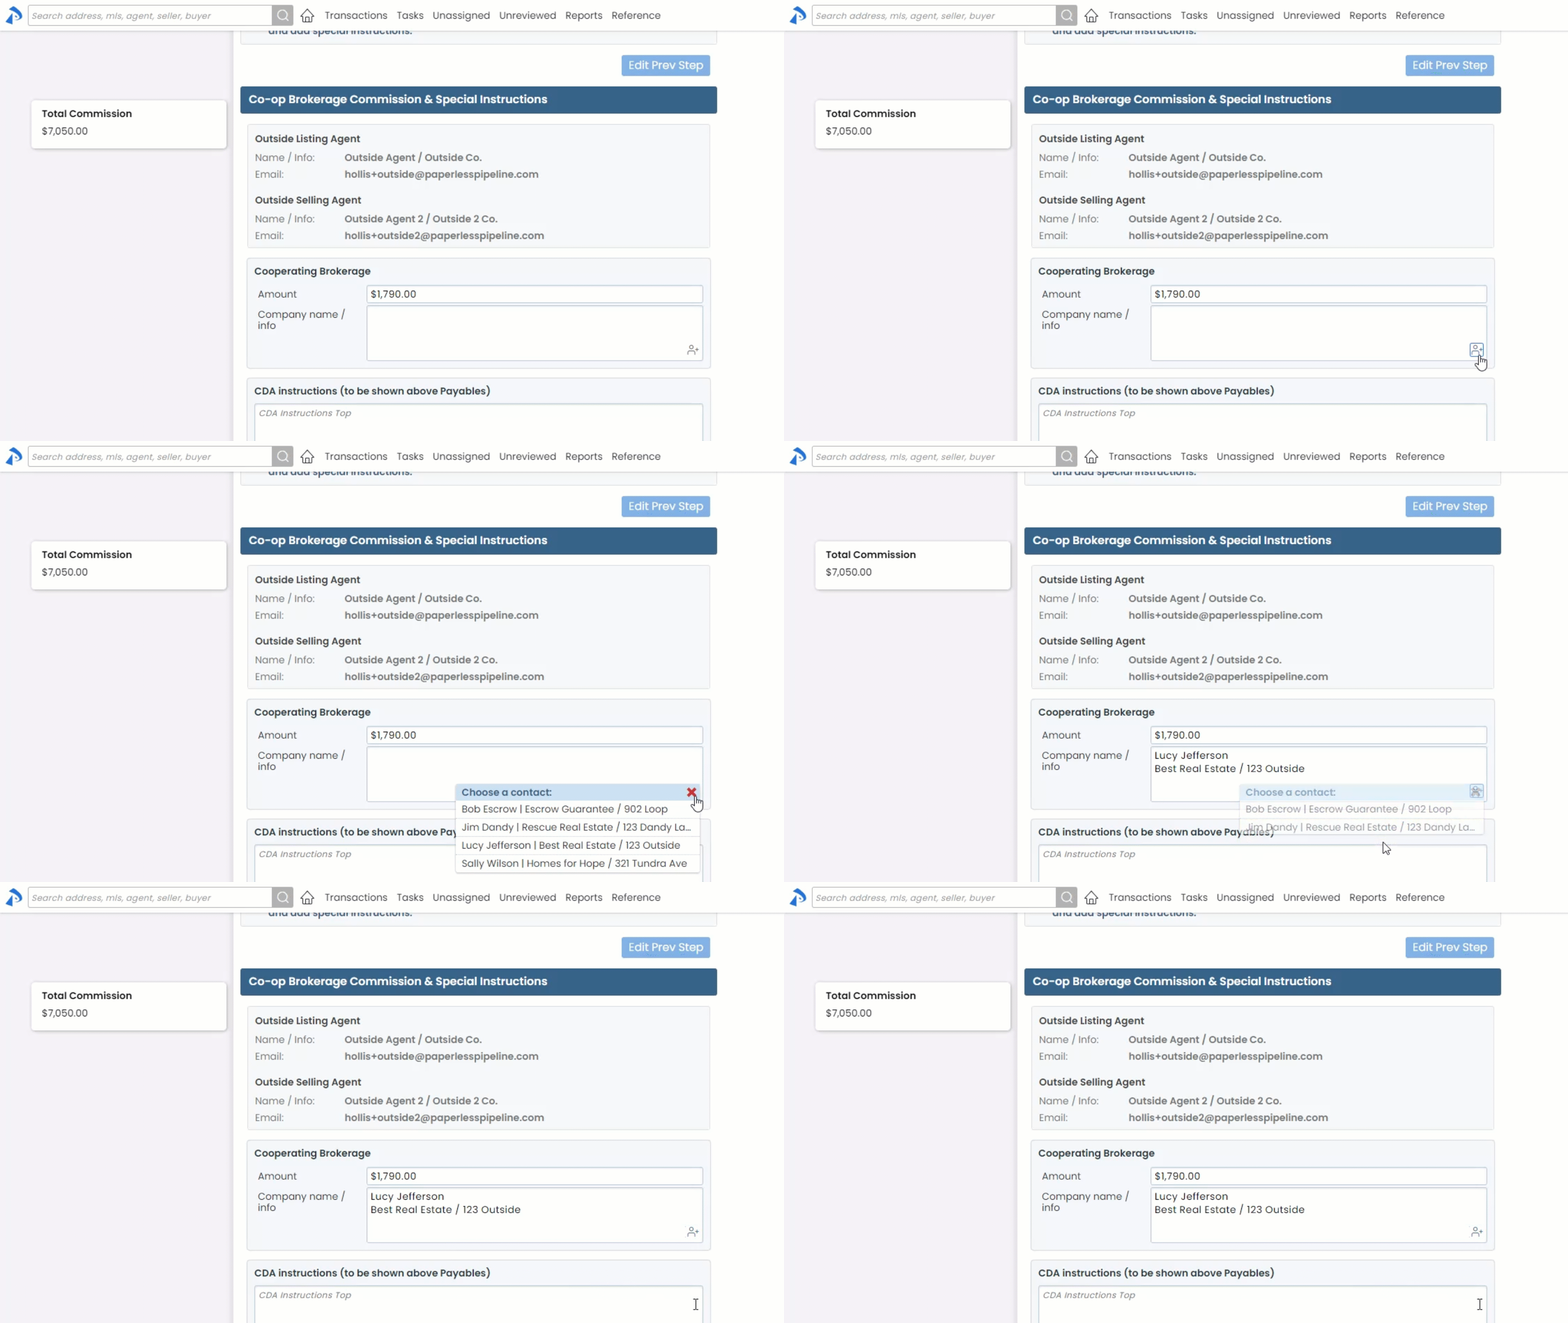
Insert contact info with a single-click when managing commissions
Inserting contacts to receive deductions or co-op commissions while managing commissions is now as easy as a single click. From the Fees & Deductions and Co-op Brokerage sections, click the people icon in the lower right corner of the field to quickly select and insert contacts from the transaction.
Find contacts by their company name
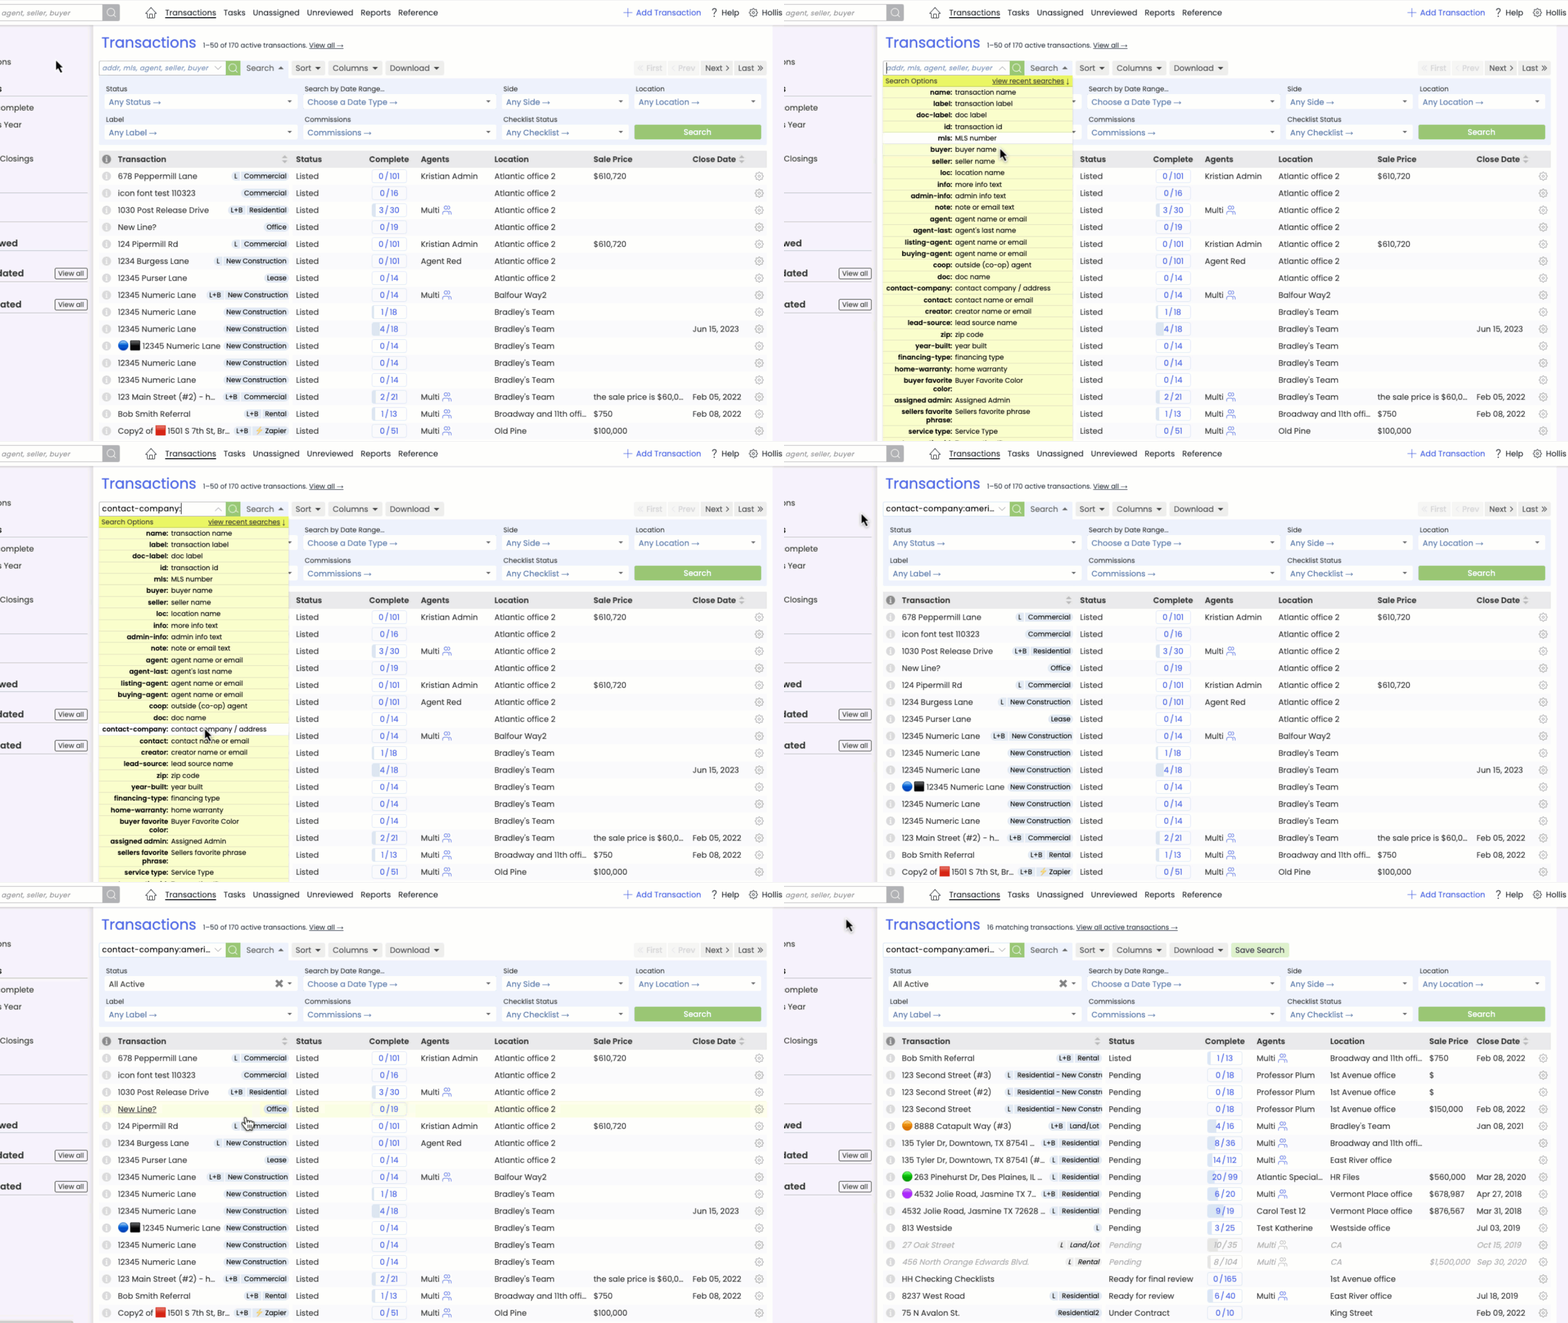
The new "contact-company" global search option allows you to search for contacts based on their company name.
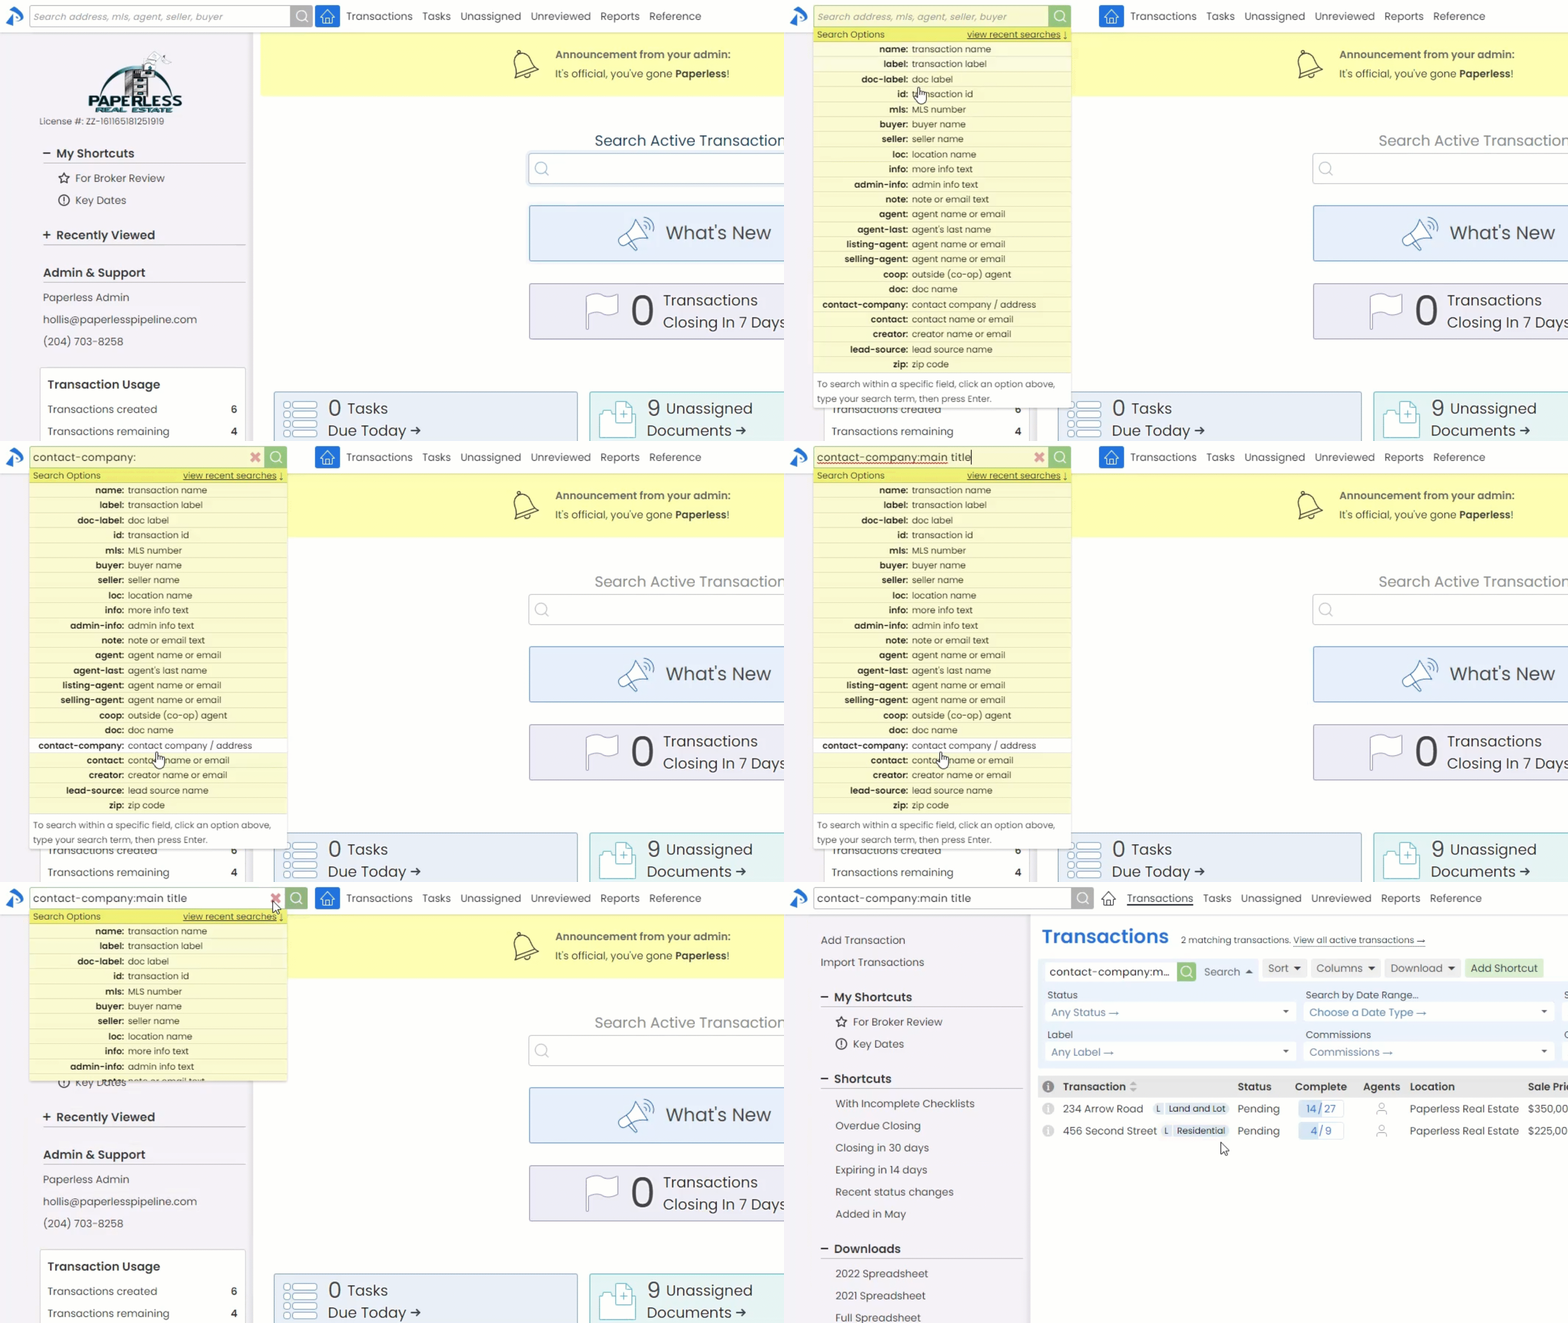
Learn more about Searching, Sorting, and Downloading here →
Cover Sheets can now include address, phone, etc.
The address, phone number, fax number, and email address of locations can now be displayed on coversheets. Access these details from the Admin menu under Manage Locations by clicking the gear icon next to a location, then Edit Location. If you subscribe to the Commission Module, you've already been enjoying this feature since those location details were already set for any locations that have CDA settings set...they've now just been moved under Edit Location.

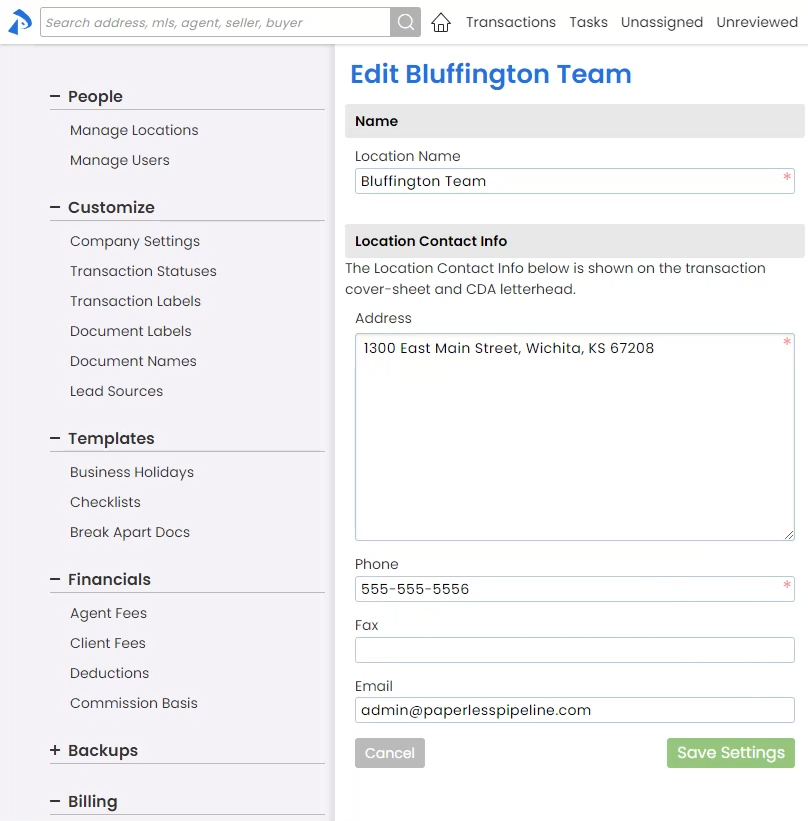
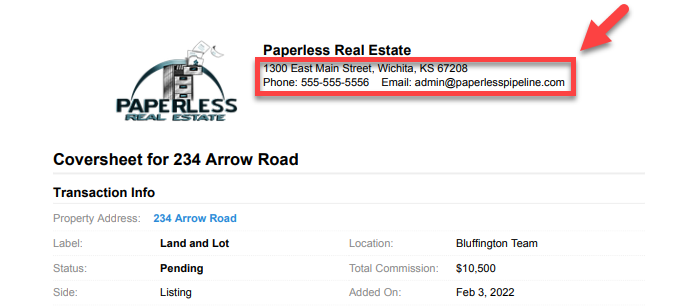
Learn more about Managing Locations here →
Drill down further into active transaction searches
Ever need to search for transactions that are active (not closed, fell through or expired) along with other search criteria? Now you can! The new All Active and All Inactive search options allow you to build off of those active/inactive statuses as a starting point, allowing you to more easily search for exactly the transactions you need to see.
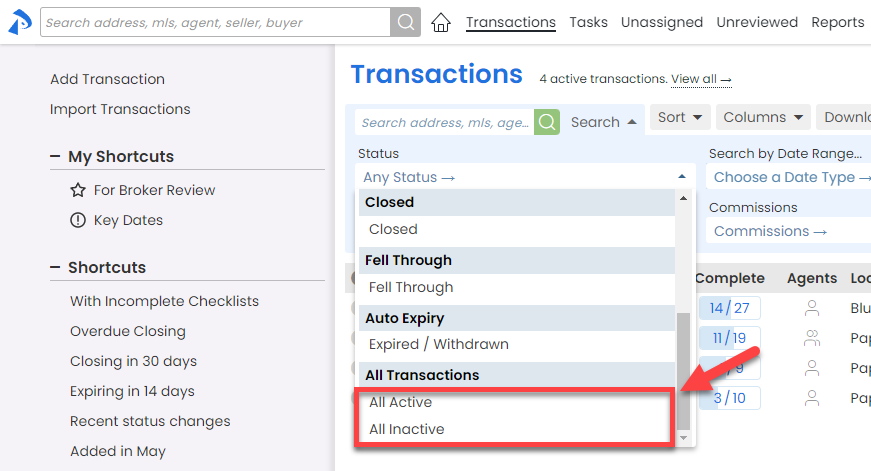
Learn more about Searching, Sorting, and Downloading here →
Help your team know what commission info to gather
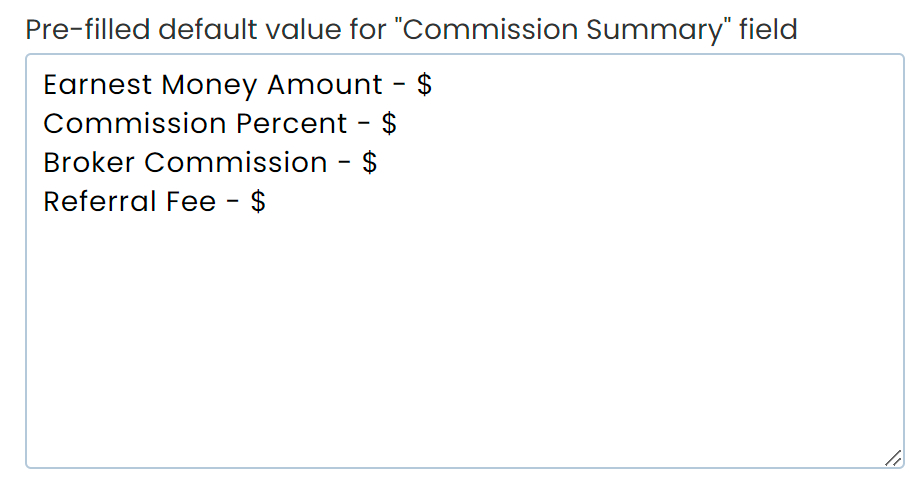
You can now insert default information into the Commission Summary field of new transactions (exactly as you can with the More Info and Admin Info fields). From commission percents to referral fees to whatever info you regularly gather in that field, enter placeholder prompts that will remind your team to enter the information needed. Set your default on the Company Settings page→
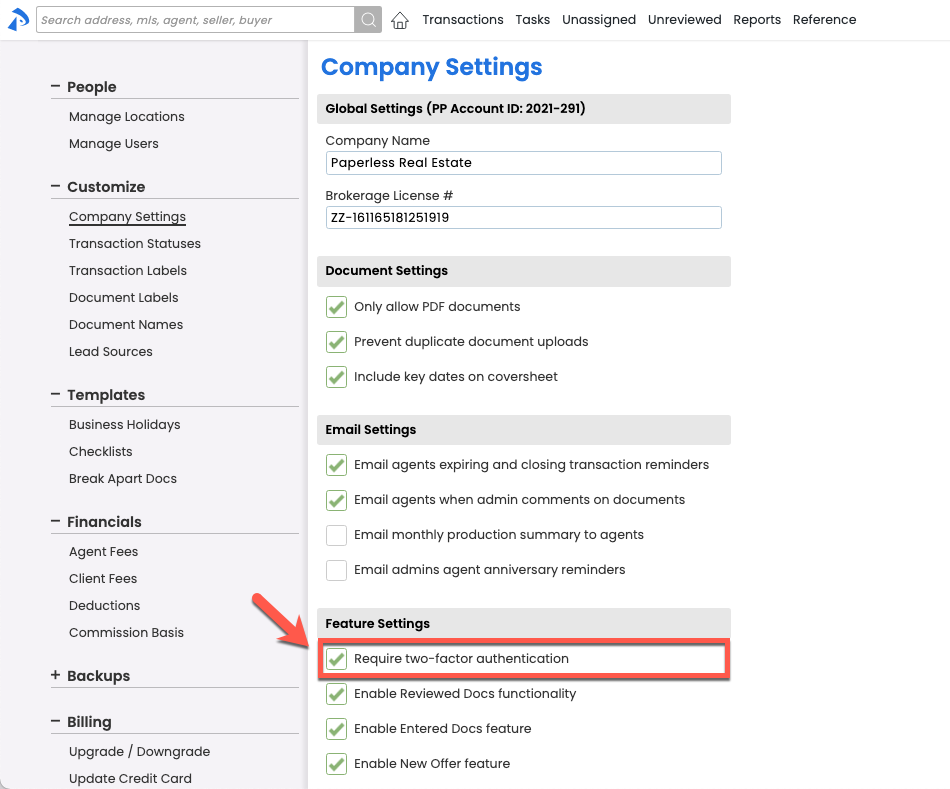
Enhance your account's security with two-factor authentication
Two-Factor authentication is an optional setting that adds an additional layer of security to your Pipeline account. When two-factor authentication is enabled on the Company Settings page, all users that log in to your company's account will be required to provide the security code emailed to them in order to successfully login. Users can opt to have the system remember their device for 30 days, and admins can opt any individual user out of two-factor authentication from the user's Manage Users profile.
Learn more about Two-factor Authentication here →
View task completion status in the format that's most meaningful to you
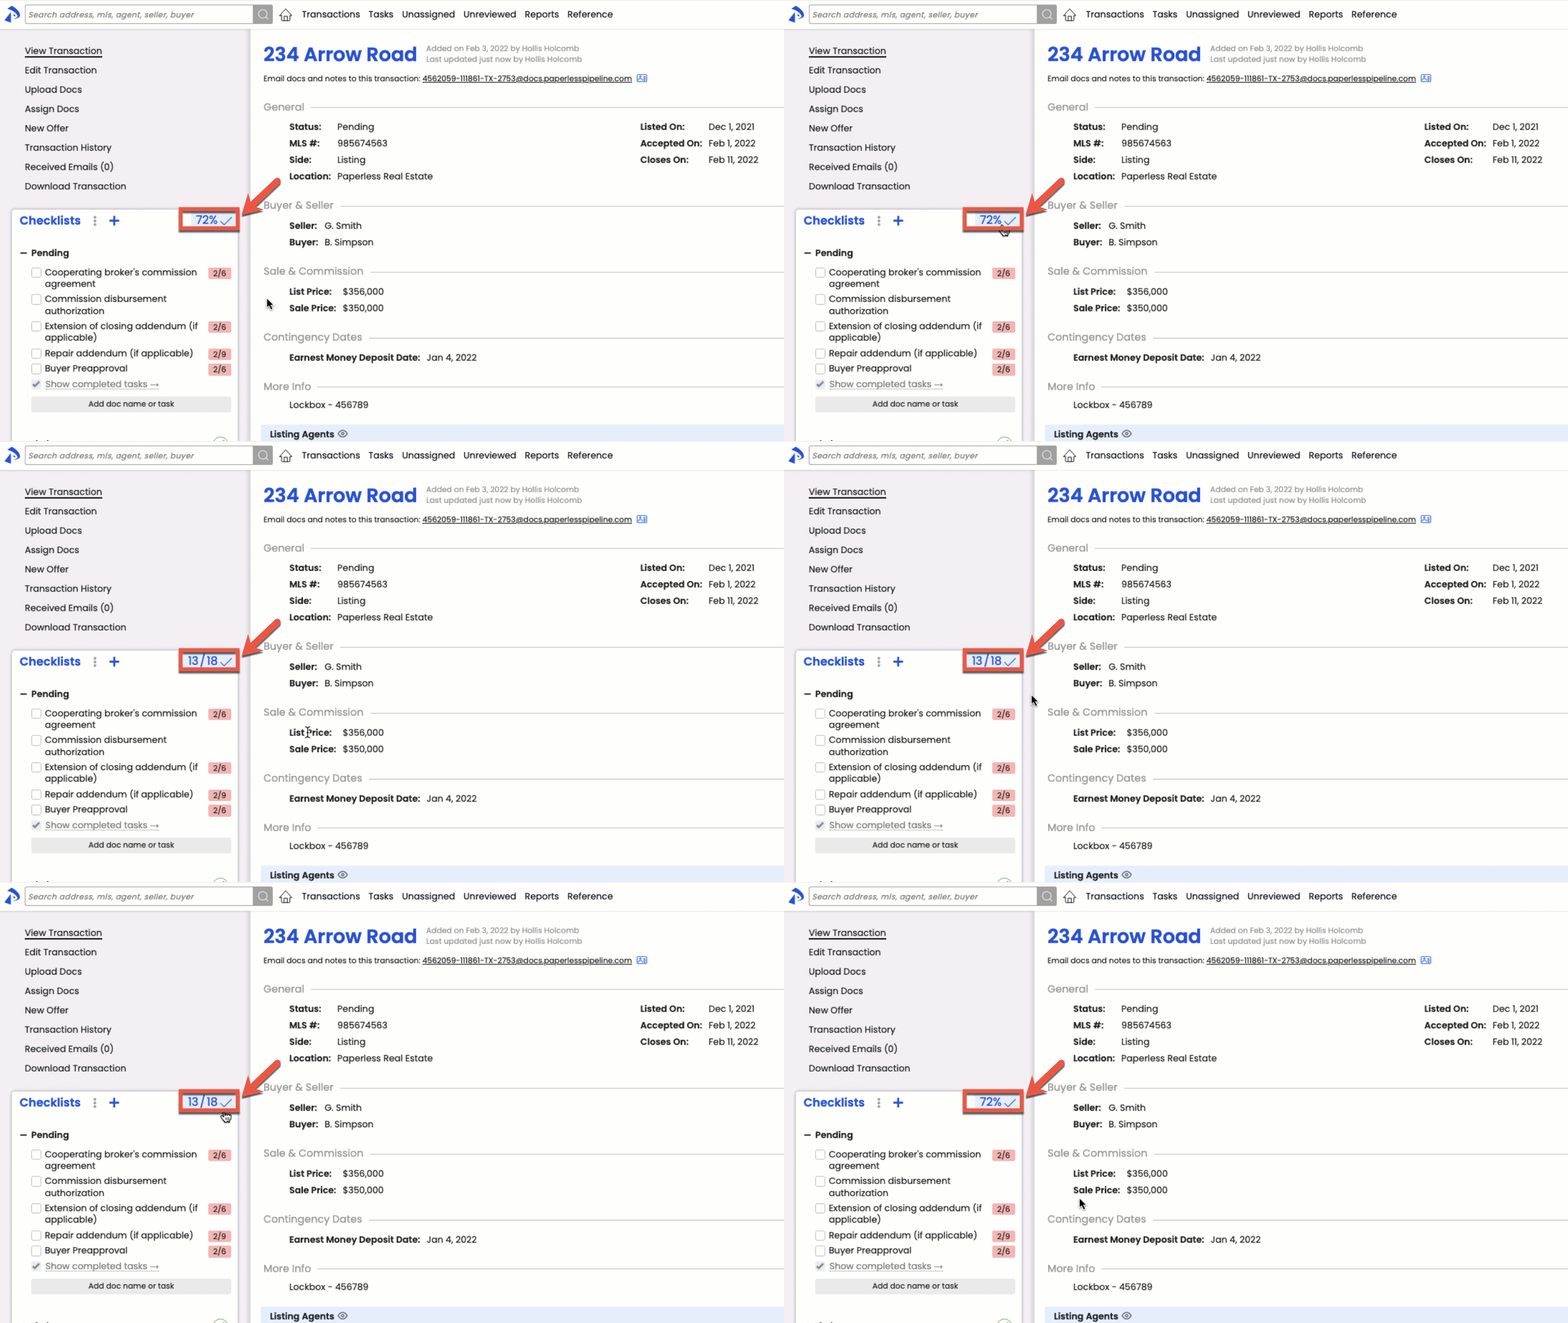
Whether it helps you to view the PERCENTAGE or the NUMBER of tasks that are complete, it's now your choice! Click the Task Completion Status block in the upper right corner of a transaction checklist to toggle it to your desired format. If you change it, the system will remember and keep it that way.
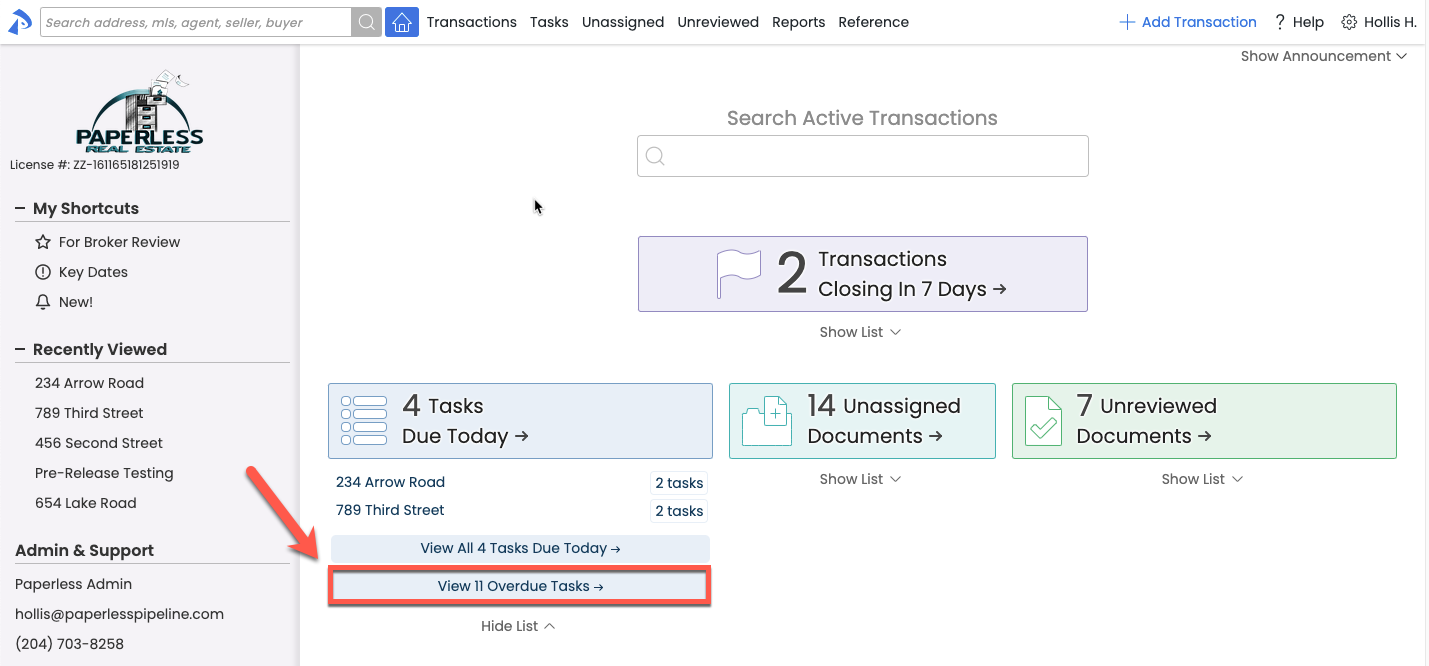
Get to your most urgent tasks faster
Click the new "View Overdue Tasks" bar directly from the Home page to jump right to your tasks that need the most attention.
Color themes just got personal
Since people relate to their computer environment differently, every team member can now experience Pipeline based on the color theme that keeps them happiest and most productive. Each of your team members can select either the dark or light theme from their Personal Profile.
Light Theme: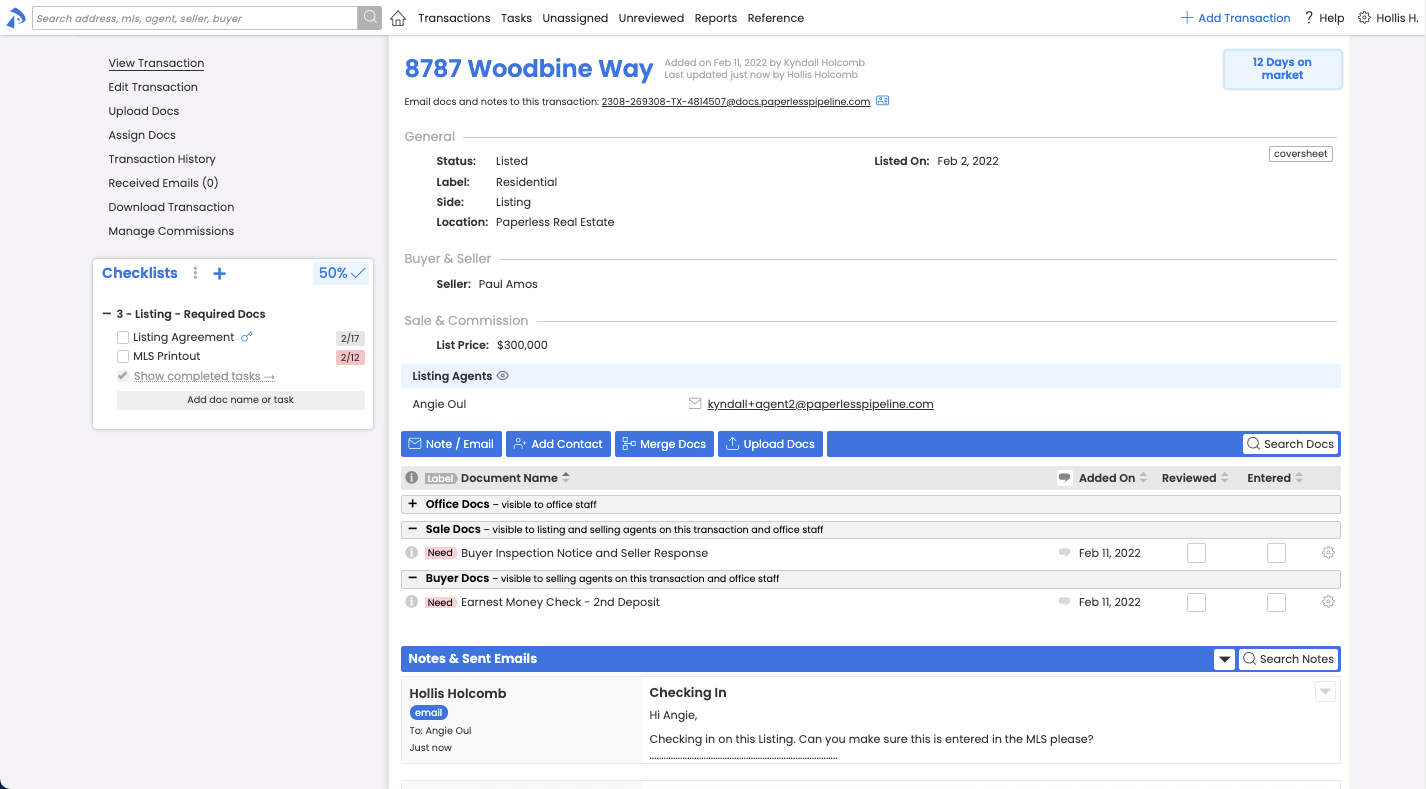 Light Theme
Dark Theme: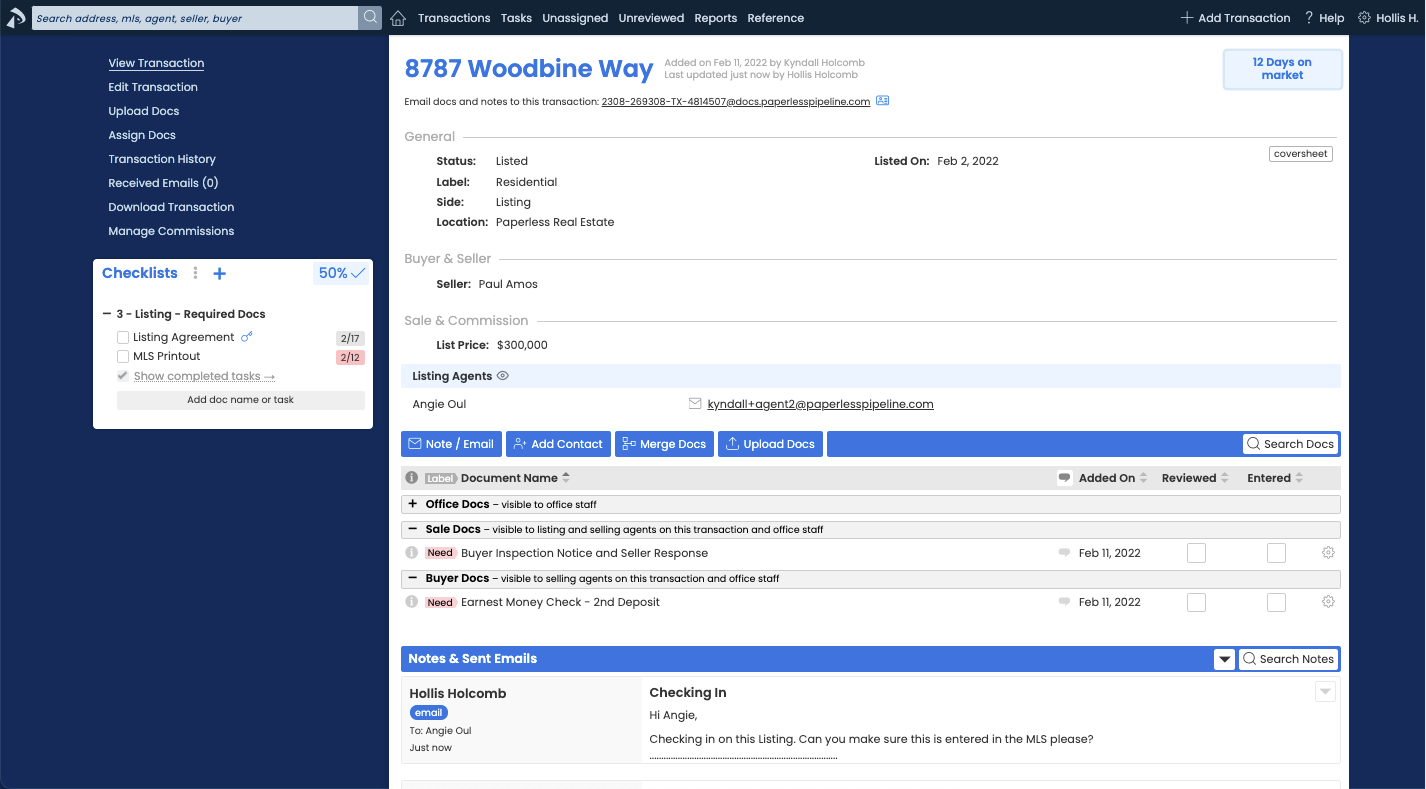 Dark Theme
The Assign page received a mini-makeover
We did a little tidying up on the Assign page to streamline your document assignment process. The changes are subtle, so with the exception of the list of assigned docs appearing at the TOP of the page instead of in Step 2, you likely won't notice the differences.
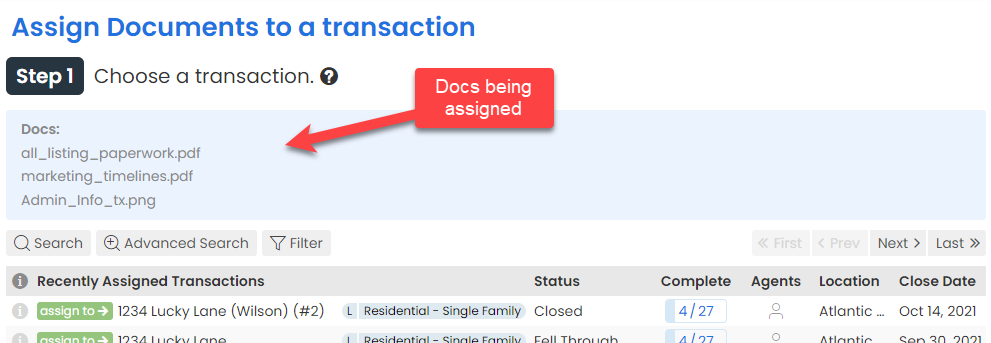
SEARCHING & FILTERING
Assess your company's performance based on rolling 365 days: All reports and Transaction List searches now offer a "Last 365 Days" option. Combine this new option with all the existing search and filter options to target and view the exact data you need to see.

Learn more about Searching & Filtering Transactions here →
ADMIN CONTROLS
Never forget to update agents' commission info on their anniversary: If you'd like admins to be automatically reminded to update agents' commission split information on their anniversary, head over to Company Settings and check "Email admins agent anniversary reminders". When checked, location and master admins will receive an email reminder 5 days before each user's Start Date anniversary.
Learn more about Managing Agent Commission Splits here →
No confusion about when New Offers can be created: The option to add a new offer has been removed until it's an appropriate time. If you have the "Allow New Offer" feature enabled in your account, going forward, the New Offer option will only show on the left menu of transactions if that transaction is in a Pending or later status. That way, agents won't accidentally add a new offer without first entering the original offer into the main transaction.
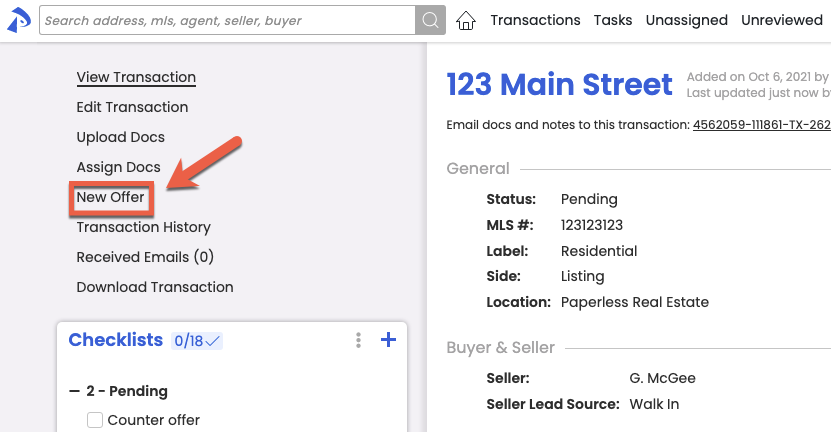
Learn how to Create a New Offer here →
Associate document names with labels and categories once. Reap the benefits forever: Each time a document is added to a transaction, it can now take on the doc label and permission category pre-associated with the document's name. Pre-associating labels and categories to doc names will save your team the time of having to set them manually as each doc is added.

Learn more about Setting Up Standard Doc Names here →
For offices that don't track compliance in Pipeline, remove Review from your view: If your office doesn't track compliance in Pipeline (e.g., TC offices, Teams, etc.), you can now disable the Document Review feature to remove the unneeded fields and extra effort involved in marking docs as reviewed. To turn off review, uncheck "Enable Reviewed Docs functionality" on the Company Settings page.
PRO TIPS & SHORTCUTS
Quick-select all docs in a category when sending docs: When sending a message from within Pipeline, quickly select all docs within a category by holding down the [Shift] key on your keyboard, then clicking any doc within the category. All docs in that category will be selected. You can individually deselect any that shouldn't be sent or [Shift]+click again to deselect all docs in the category.
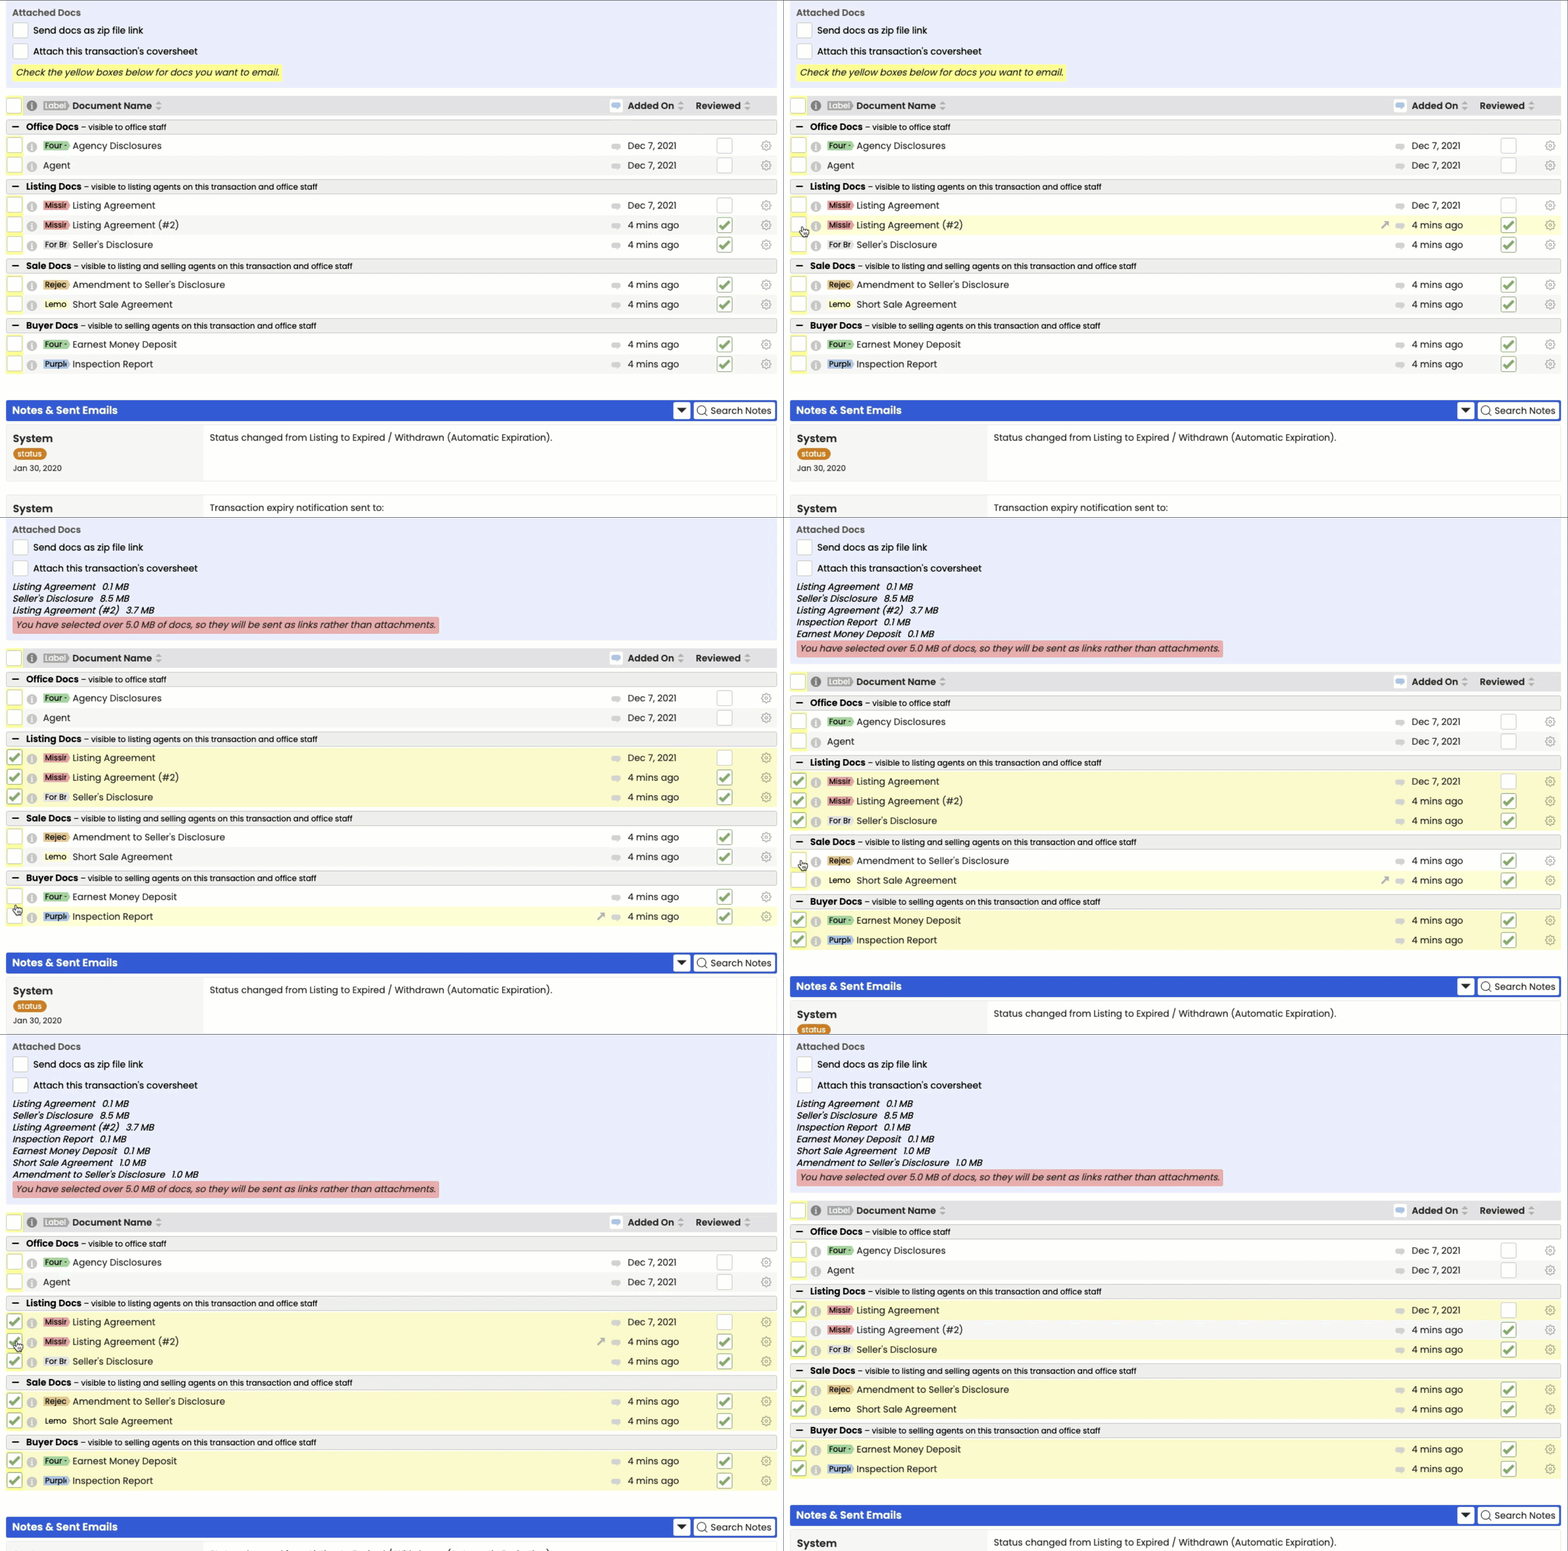
Learn more about Emailing Docs and Notes from Transactions here →
OTHER FEATURES
Track and share key dates effortlessly: You can now designate tasks as important timeline dates that can be displayed on your cover sheets, synced to calendars, and autofilled into emails and message templates.
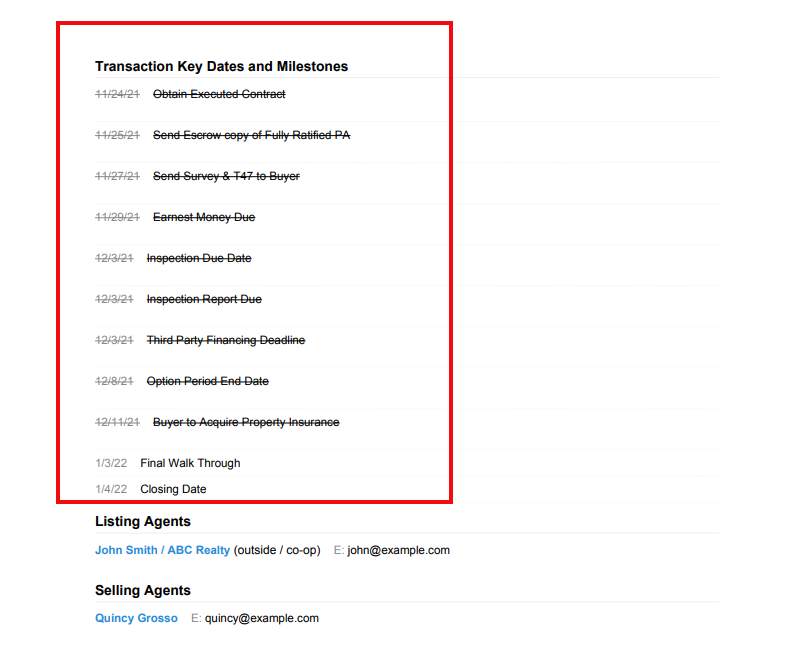
Learn more about Setting and Using Key Dates here →
Avoid click-thru by viewing Sale Price, Buyer, and Seller from your Transactions List.: If your workflow will be helped by viewing Sale Price, Buyer, or Seller on your Transactions List, enable them under the Columns tab.

Learn how to Show and Hide Columns on the Transactions List →
Know the stage of a transaction at-a-glance: Transactions now display key stages in the upper right corner of each transaction as that transaction progresses through its life cycle. Key stages include:
- Days on Market
- Days since Accepted
- Days to close

New look for completion ratio meter: The completion ratios displayed on the Transactions List have a new look. The ratios have stayed put, but their background is now a single blue color that's appropriately filled in based on how complete the transaction's checklist is.

Broker license number at your fingertips: Your broker license number is now displayed for all users under your company's logo on the home page.
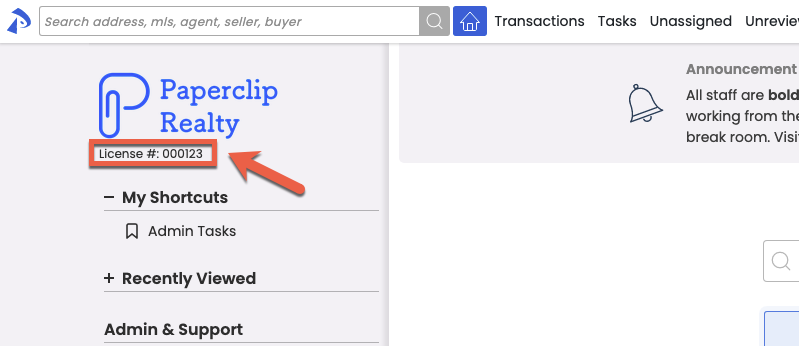
Add your broker license number here →
COMMISSION MODULE
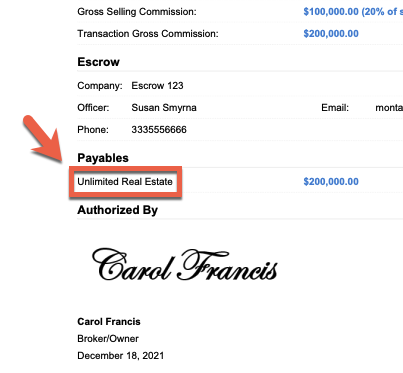
For Teams: Set the proper payee name for your broker payables: If you're a Team who needs the Broker Payables on CDAs to reflect your brokerage's name instead of your team's company name, enter their brokerage name in the CDA Settings' "Broker Name for Commission Disbursement" field. That name will be properly reflected as the Payee for any brokerage payables throughout the Manage Commissions process and on the CDA.
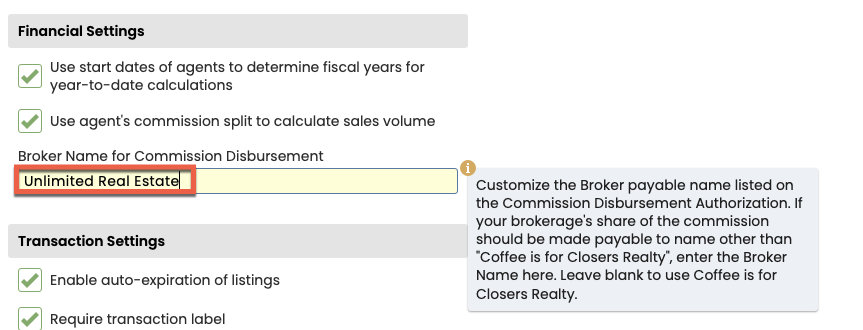
LOOK & FEEL
Style refresh is now even fresher: We've heard your feedback, both good and bad, and have made a few tweaks we're confident you'll be thrilled with! Pipeline has still retained the clean look and feel of the previous refresh, but we've refined it to enhance distinction and focus where warranted. This new version should be even more clear, clean, and easy on your eyes than before.
Also, if your account is utilizing the "Light" theme and the distinction between elements within a page is not significant enough for you, be sure to try out the dark theme to see if it's more to your liking.

Contact roles bolded for quick identification: Contact roles are bolded allowing you to quickly locate contacts of a certain type.

Identify master and primary location admins at-a-glance: Identify Master Admins and Primary Location Admins more easily on the Manage Users list by viewing their new M and P icons.

Identify the transaction you're on, no matter where you scroll: The transaction name at the top of transactions now remains frozen there, so you'll know which transaction you're on, no matter how far down the page you scroll.

MORE HELP
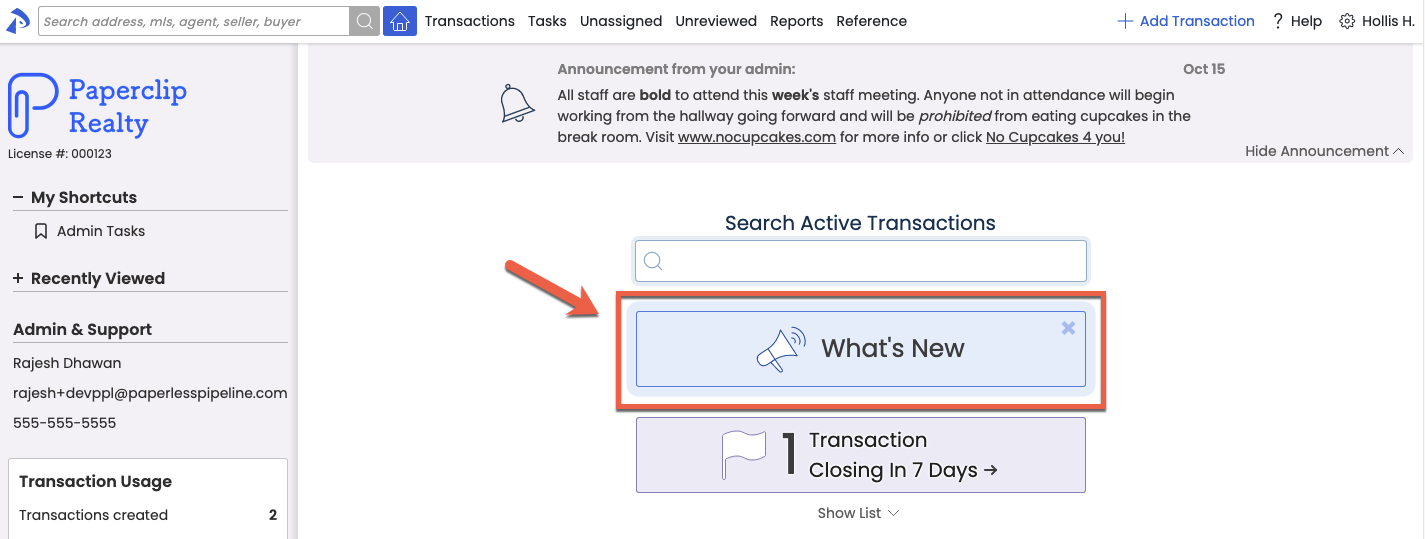
Take advantage of new features the moment they're released: You won't be able to miss the new "What's New" button displayed whenever we launch a new release! Click it to view a list of recently released features, and it'll go away once you do. You can also still access "What's New" any time from the Help Menu.
Help is closer and better than ever: Our new help widget is designed to get you the exact information you need easier and faster! Click Get Help (from the Help Menu) to get:
- Immediately shown links to articles related to the page you're on

- Easy access to search the full help site

- As always, a simple way to contact us so we can help you along;

- All of the above happening within a new streamlined, in-page widget that allows you to stay within Pipeline while browsing and viewing articles.

And as an added bonus, all links to articles you see throughout Pipeline will automatically launch the widget, so you'll see the exact information you need instantly AND within Pipeline! Woohoo!!!
Learn more about How to Get Help here →
SEARCHING & FILTERING
View docs flagged for your attention: You can now filter Unassigned Docs by custom doc labels to quickly view the docs you need to see most. Doc labels are used to categorize docs based on priority, type, or other any classification, so you can now view only the docs that match the classification you need to see.

Learn more about Custom Color Coded Document Labels here →
Find agents' transactions based on their side: New "listing agent" and "selling agent" search options have been added to the global search bar allowing you to find transactions for an agents, only when they are on a certain side of the transaction. To run the search, select "listing agent" or "selling agent", type the agent's name or email address, then hit [Enter] on your keyboard.

Learn more about Searching & Filtering Transactions here →
View tasks based on their status or side: New "Status" and "Side" filter options allow you to find tasks based on the side of the transaction represented and/or the status of the transaction.

Learn more about searching and filtering tasks here →
Store your custom Task & Unreviewed searches for instant access later: You've told us how much you love saving your frequently-run transaction searches. Now you can create shortcuts for Task & Unreviewed searches, filters, and sorts, too! After running a Task or Unreviewed search or sort in Pipeline, click "Add Shortcut" to save your custom search to be run instantly from your Shortcuts menu on the Home, Tasks, and Unreviewed pages.
Learn more about Saving Custom Searches & Sorts here →

"Agent-checked" & "Your @ Tasks" are now combinable with other filters: You can now quickly access tasks agents have indicated they've completed and tasks where you've been @mentioned from the Filter dropdown menu on the Tasks page. That means you can combine those filters with all other task filters to help you hone in on the tasks you want to see.

And as an added bonus, as mentioned, you can now save task filters as custom shortcuts. That means you can have instant access to your agent-checked and @mentioned tasks from your home page!

ADMIN CONTROLS
Start managing commissions whenever you're ready: You now have 100% control over Paperless Pipeline’s Commission Module on your account. This means you can activate the Commission Module without having to contact Support or fill out additional forms. Check it out from the left menu of Admin/Settings under the Add-ons section.
Learn more about the Commissions & Reporting Module here →
Fully delete docs that need to be inaccessible: Deleted docs that need to be fully removed from the system because they contain sensitive information or otherwise need to be inaccessible can now be removed. Master admins can click "Deleted Docs" from the left menu of Transactions and Unassigned Docs, then either bulk or individually permanently delete the docs from there.

Move inactive locations out of your team's way: Deactivate locations no longer in use so you and your team can focus on the data that matters. Transactions and users can not be added to deactivated locations, and any transactions that may exist in deactivated locations will be grayed out to indicate their inactive state. Visit Admin | Manage Locations and click the gear icon to deactivate a location.

Learn more about Managing Locations here →
PRO TIPS & SHORTCUTS
Take a shortcut to editing transactions
The new [ ctrl + shift + E ] shortcut allows you to quickly access the edit page of a transaction. While viewing a transaction's main page, hold down the [ctrl] and [shift] keys on your keyboard, then tap the [E] key.
Learn about more keyboard shortcuts here →
Build personalized message templates faster: Type-ahead has been added to the list of auto-fill tags on messages to allow you to find the tag you need faster. Engage the auto-fill tag list then start typing a tag name to see matching tags. If you're not using auto-fill tags in your message templates, you're missing out on seriously personalized automation! If you're not using message templates...I have no words.

Learn more about Autofill Tags in Emails here →
Learn more about Reusable Message Templates here →
COMMISSION MODULE
Know exactly how much remains before an agent meets their commission split threshold: No need to calculate how much is remaining before an agent's next commission split. The system now displays "Remaining Commission to Next Split Threshold" on the Agent Commission report and YTD Production email.


Learn more about Commission Split Thresholds here →
See true value of broker payable when it's negative: When the Earnest Money Held is greater than the broker net payable, CDAs will now reflect the appropriate negative amount.

Fresh, new look: Pipeline has gotten a facelift! You'll still see all the features you know and love in their same places, but with updated styling, coloring and other modern enhancements. Take a look around to check out all the new feels.
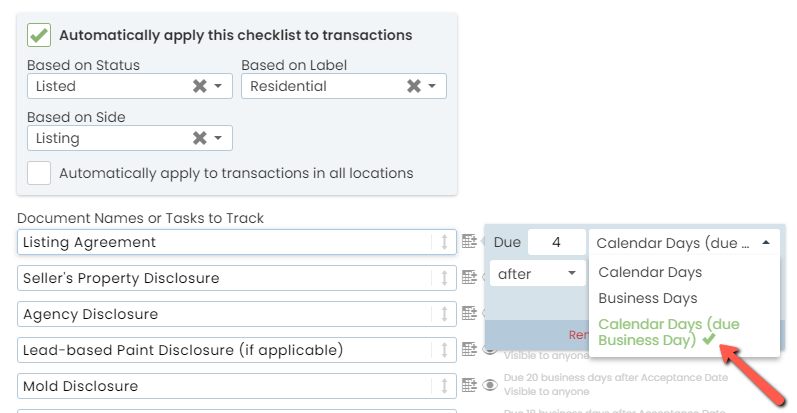
Bump "Calendar Day" due date calculations to the next business day: In addition to automatically calculating task due dates based on calendar days or business days, you can now calculate due dates by calendar days, but bump the due date to the next business day if it falls on a weekend. Select "Calendar Days (due business day)" for any tasks that need that calculation.
Learn more about Due Date Calculations here →
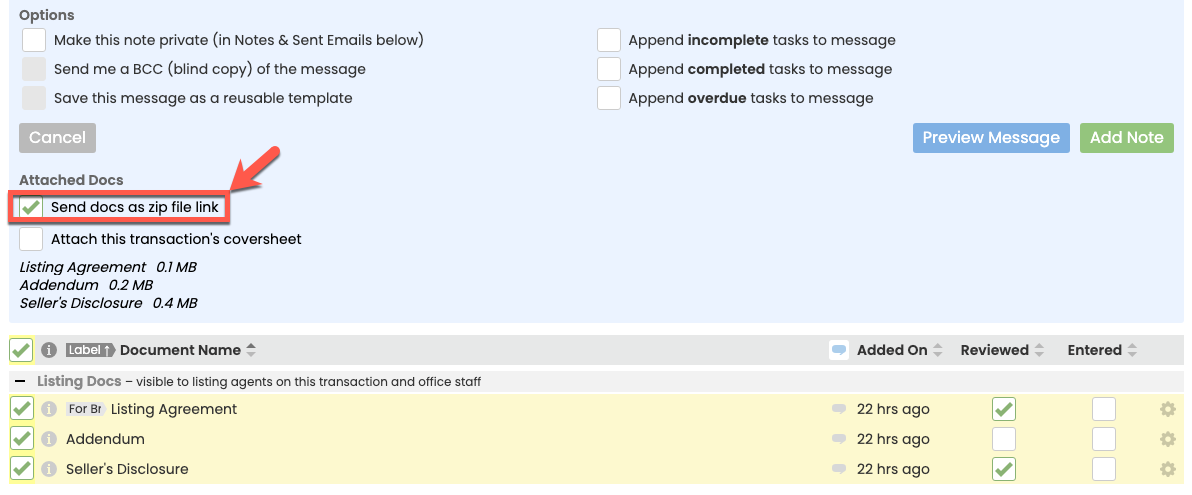
Send closing package docs or other transaction docs as a single zip file: When sending docs from a transaction, you can now send them as a link to a single zip file. When drafting your message, add yourself or others as a recipient, select the docs you'd like to send, then check "Send docs as a zip file link" before sending. The email will contain a link to the resulting zip file which can be forwarded to share or clicked to download and store.
Learn more about Sending Docs as a Zip File here →
Save up to 8 Transaction List shortcuts: The limit on how many time-saving Transaction List shortcuts you can save has been increased from 5 to 8. Use these shortcuts to store any search or sort you run regularly, then run the search with just a click later. After running a transaction search/sort in Pipeline, click "Shortcut" to save it to your "My Shortcuts" menu.

Learn more about Saving Custom Searches & Sorts here →
Automatically reference the More Info field in messages: The More Info field is now an auto-fill tag available to be inserted into reusable message templates. Adding this or other fields to message templates automatically inserts transaction-specific information from the field into the message whenever the template is used to send a message from a transaction. This allows you to effortlessly create very personal and custom messages with a single click. Most customers build (and share!) libraries of wonderfully elaborate messages using both standard and advanced auto-fill tags.
Learn more about Autofill Tags here →
Learn more about Message Templates here →
Learn more about Sharing Message Templates here →
Optional date fields included in transaction downloads: If you've enabled any of the optional transaction date fields / trigger dates from the Company Settings page, those fields will now be included in transaction downloads.
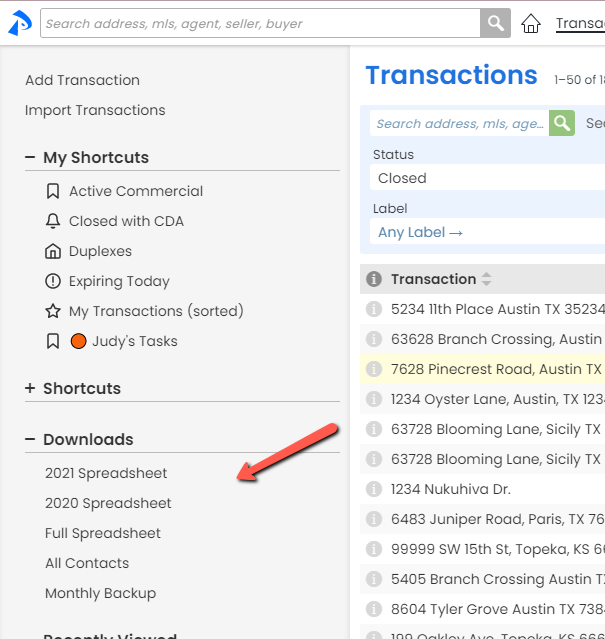
Learn more about Optional Transaction Date Fields / Trigger Dates here →
"Fax/Other" field label renamed: Heads up that the "Fax / Other" field label you used to see in the License/Fax/Other section of Manage User profiles has been changed to "Other (Fax #, Team name, etc.)". Only the label has changed, so you can continue to store fax number or any other info in that field, as desired.
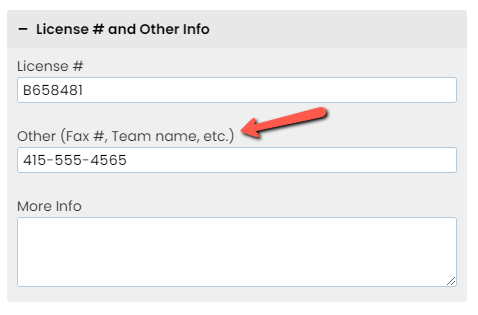
Learn more about Editing User Profiles here →
Admins without Delete permissions can no longer delete docs while merging: Heads up that we've fixed an obscure bug where admins with the "View All Transactions" permission, but without "Delete docs" permissions could elect to "Delete docs after merge" when completing the merge docs process. Without the "Delete docs" permission, they will no longer be able to do so.
COMMISSION MODULE
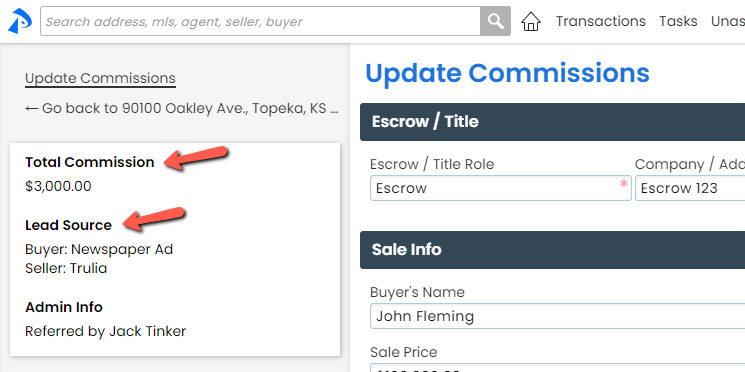
Easy access to Total Commission and Lead Source: When managing commissions, you'll now see the Total Commission and Lead Source fields displayed on the left of the page.
Filter Usage by Agent Report by date range: Pull your team's Pipeline activity based on any date range you specify. Pre-set date periods still exist to continue to allow you quick and easy access to activity for those common date ranges.
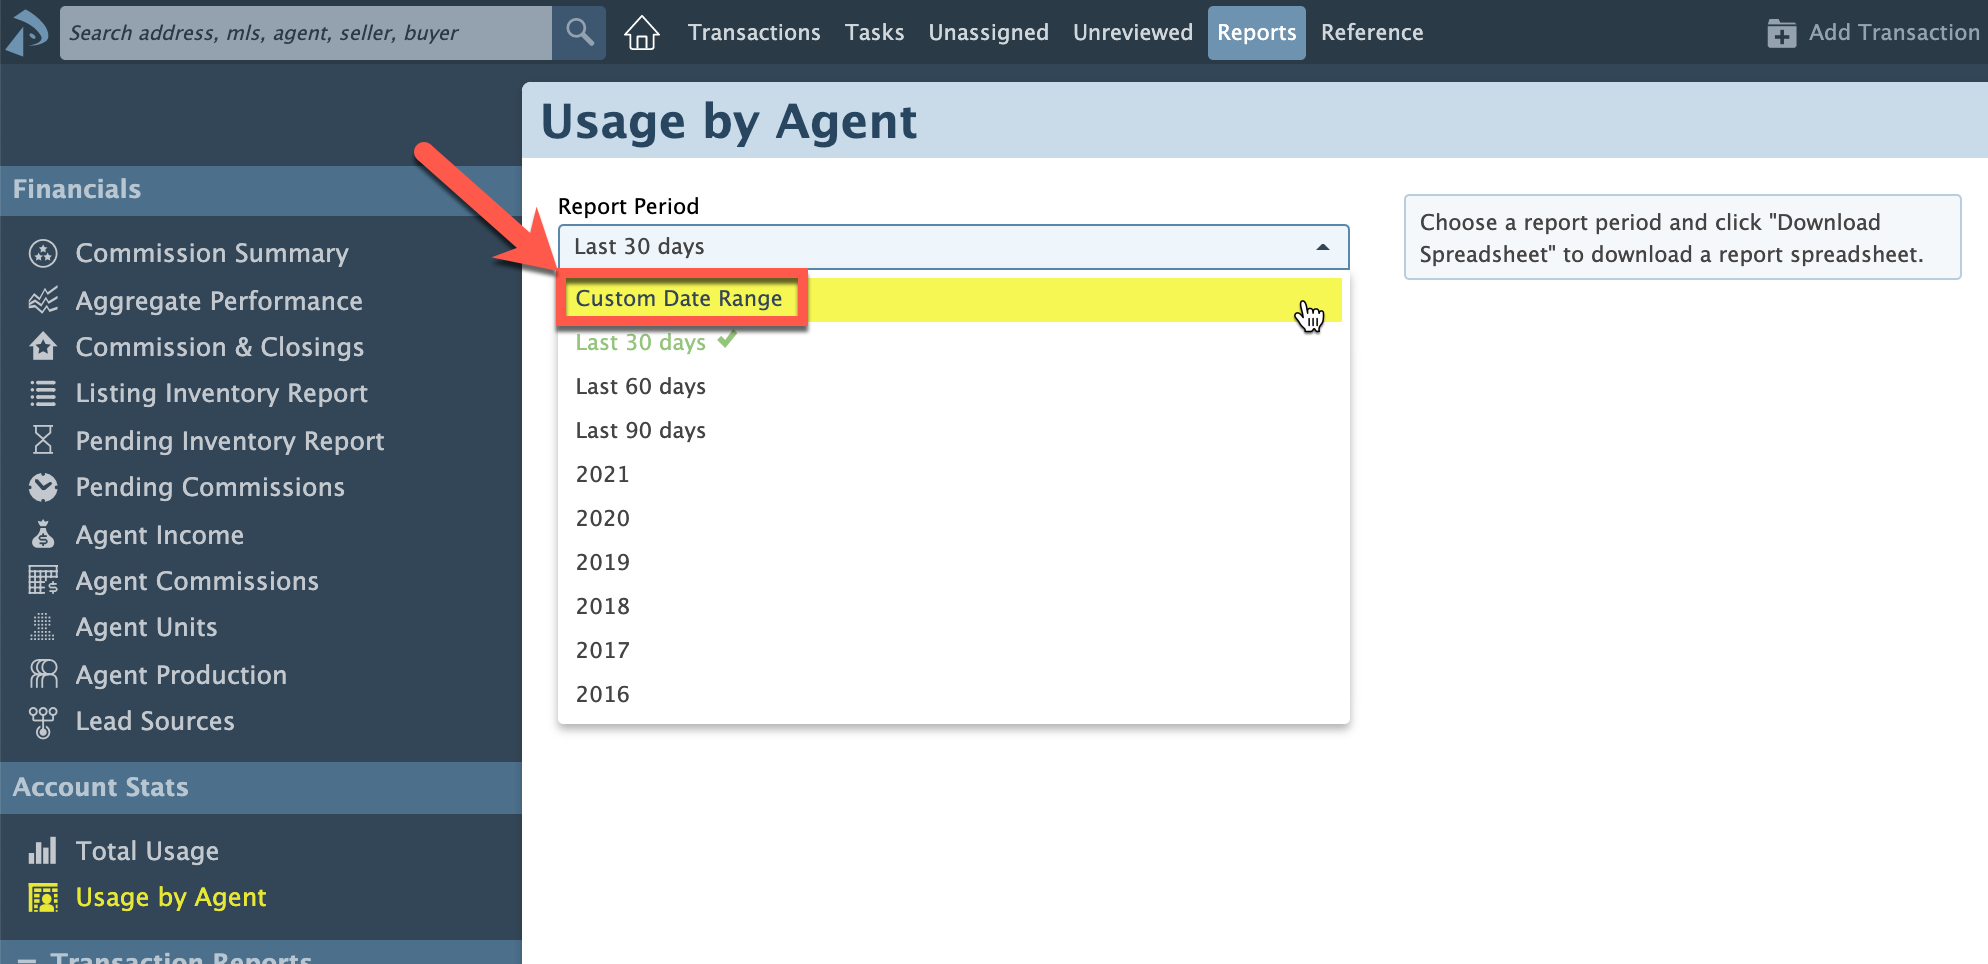
Learn more about the Usage by Agent Report here →
Prominently display your Admin contact's phone number in Pipeline: Add your main admin's phone number under Company Settings. It will then be displayed prominently on the left menu of the Home page where your agents will have easy access to it and your admin.
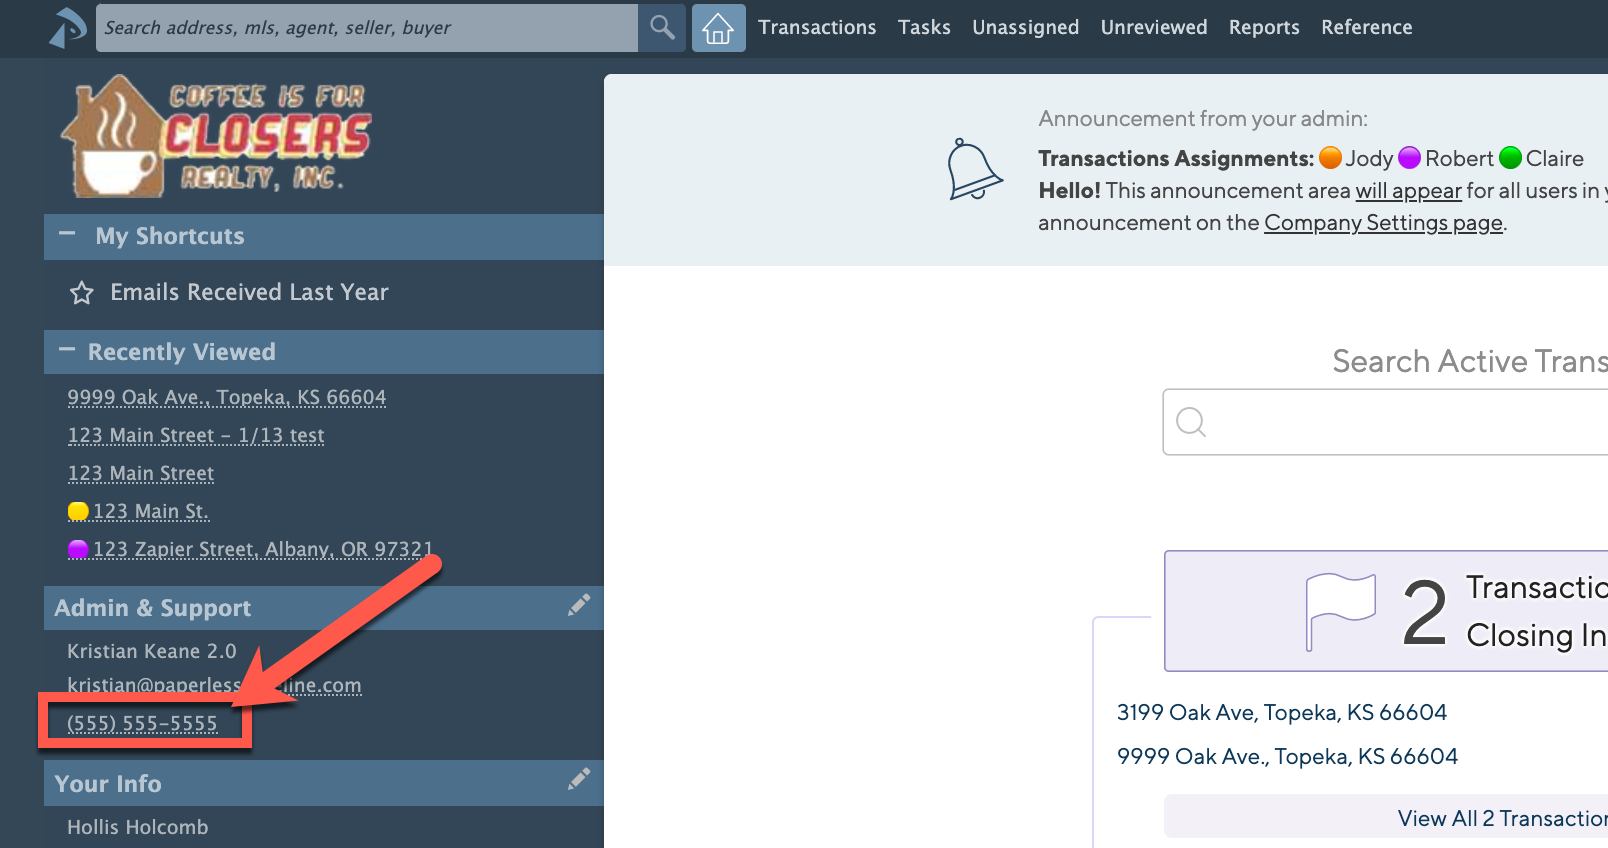
Learn more about Admin & Support Contact info here →
COMMISSION MODULE
Manage off-the-top deductions: Deductions can now be taken off-the-top (OTT) of commissions (before broker/agent splits) when managing commissions on a transaction. This will allow the broker and agent gross commissions to consider those deductions and accurately reflect their true amounts. These OTT deductions can be a flat dollar amount or based on a percentage of sales price or gross commission. Like other deductions, you can set these OTT deduction amounts to have default values or enter them at the time of CDA generation. OTT deductions may be paid to the broker, agents, or external recipients and will be reflected on all appropriate reports.
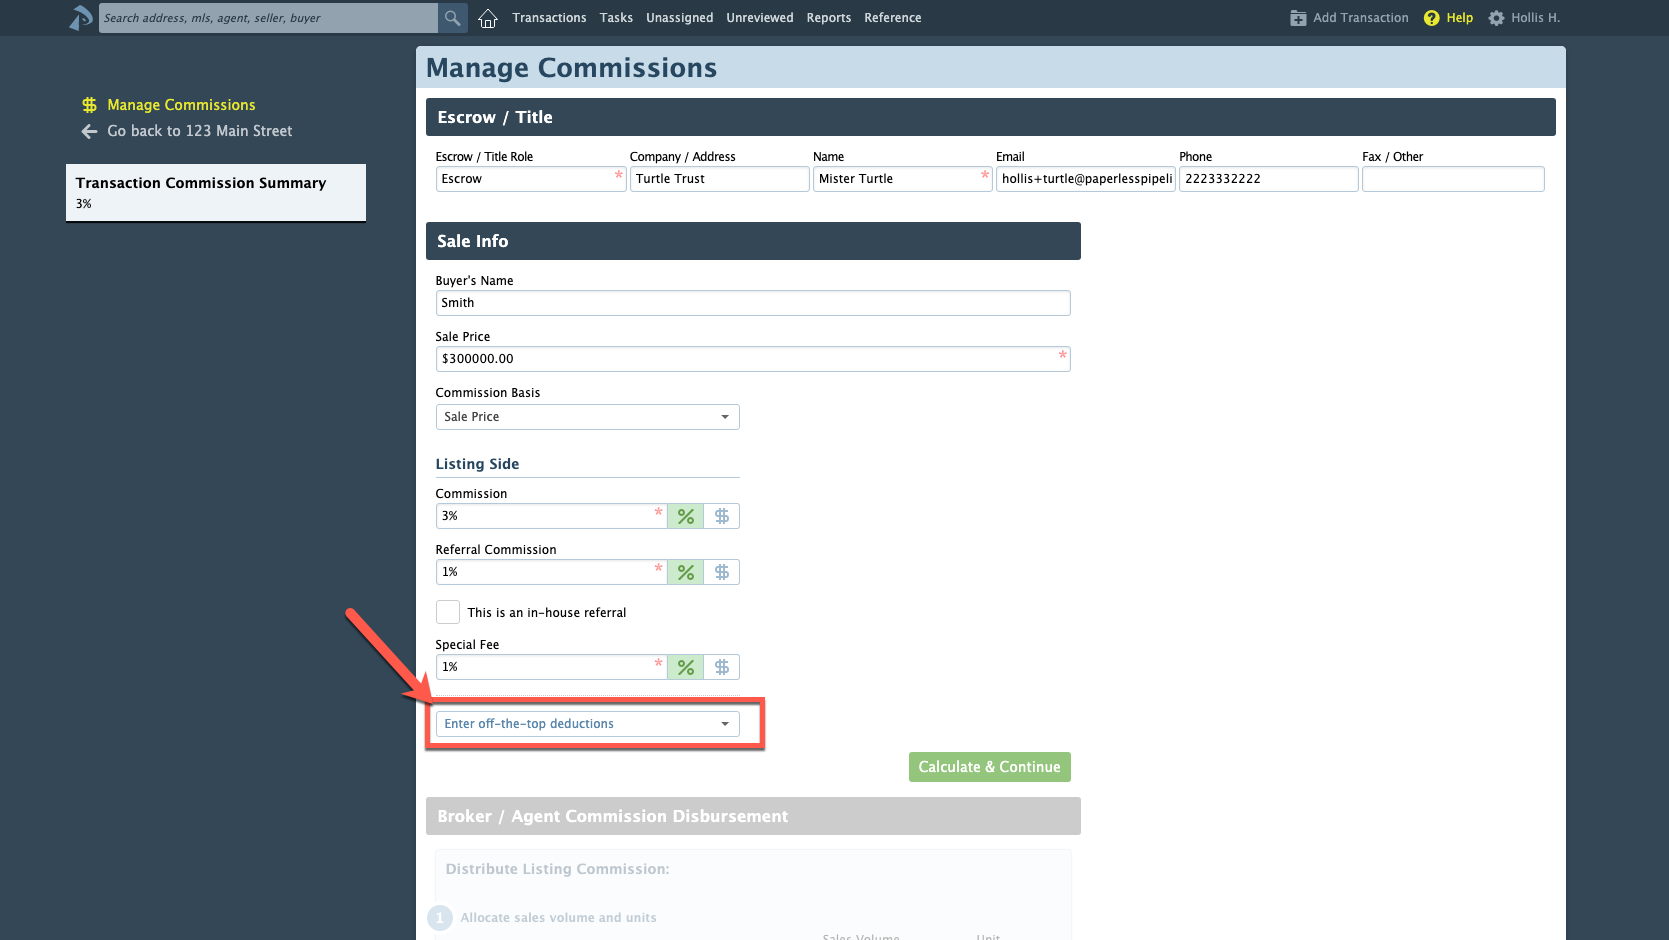
Learn more about Off-the-Top (OTT) Deductions here →
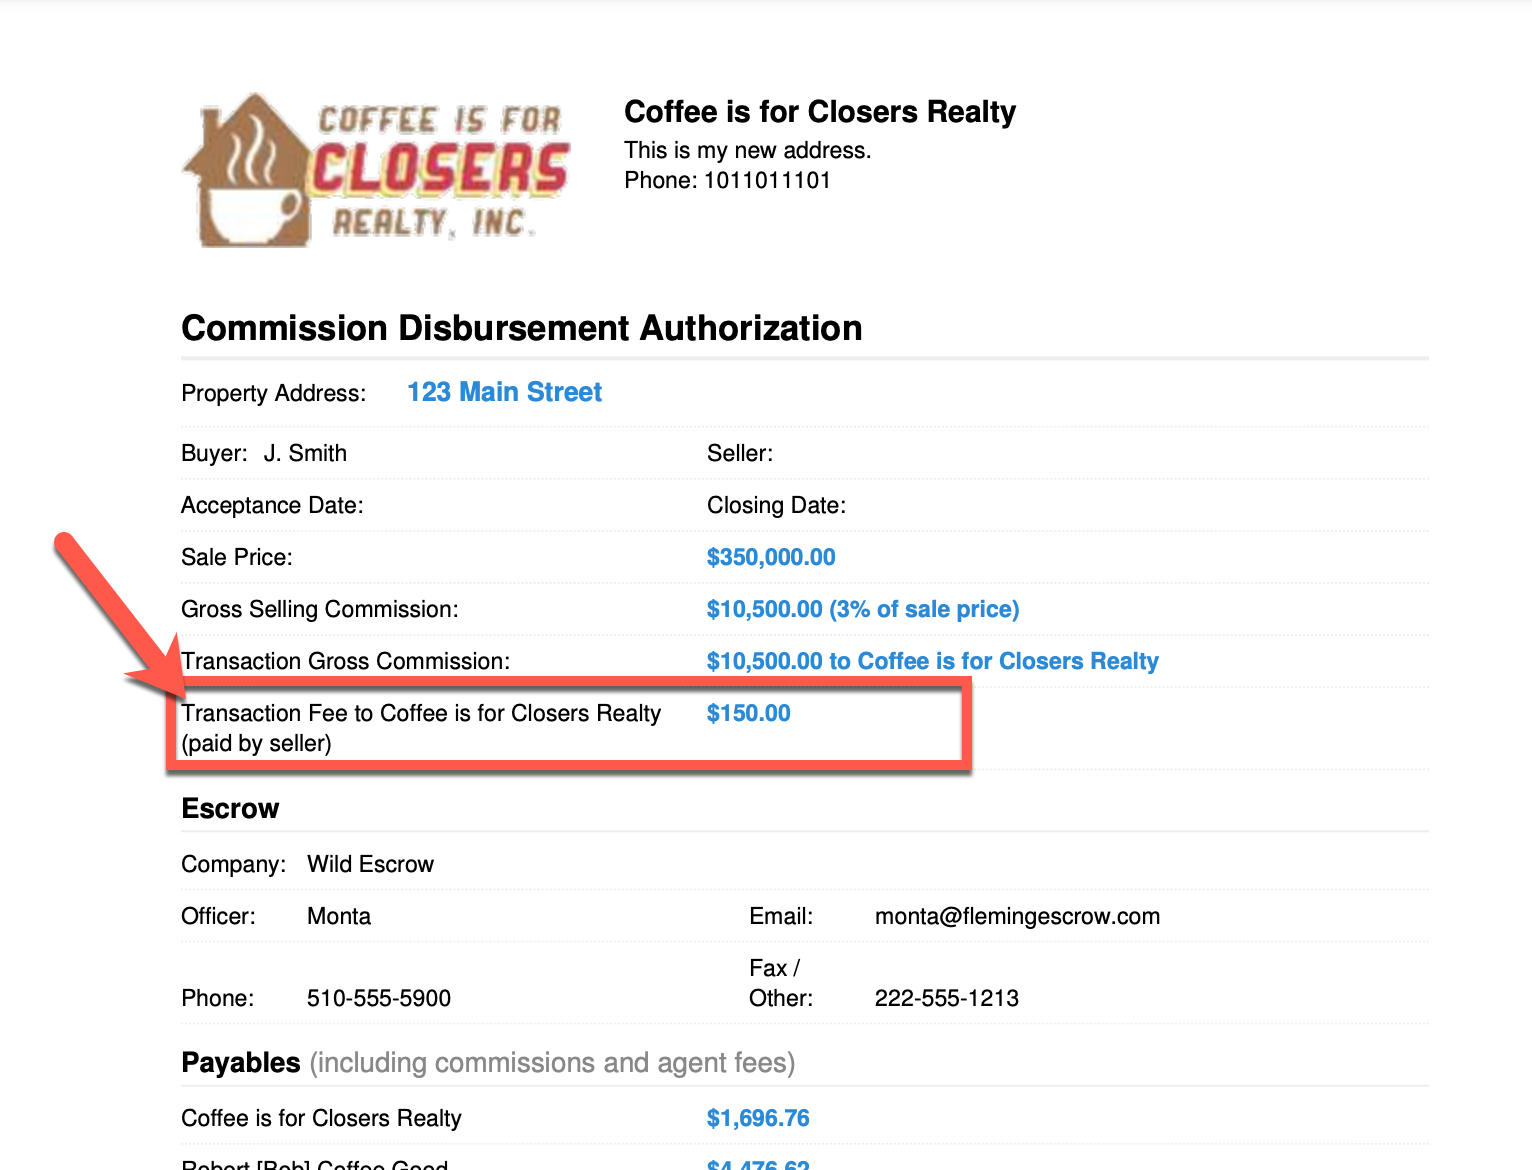
Client Fee details re-positioned on CDAs: When client fees exist on a CDA, they will now be itemized in the Commission Disbursement Authorization section and reflected as a single payable amount in the Payables section.
Speed switch between $ and % when managing commissions: Love keyboard shortcuts that help you breeze through your input process? When you'd like to change the mode of any $ / % toggle field on the Manage Commissions page, include the symbol when entering the number (e.g., $225 or 75%), and the system will switch modes automatically. Give it a try!
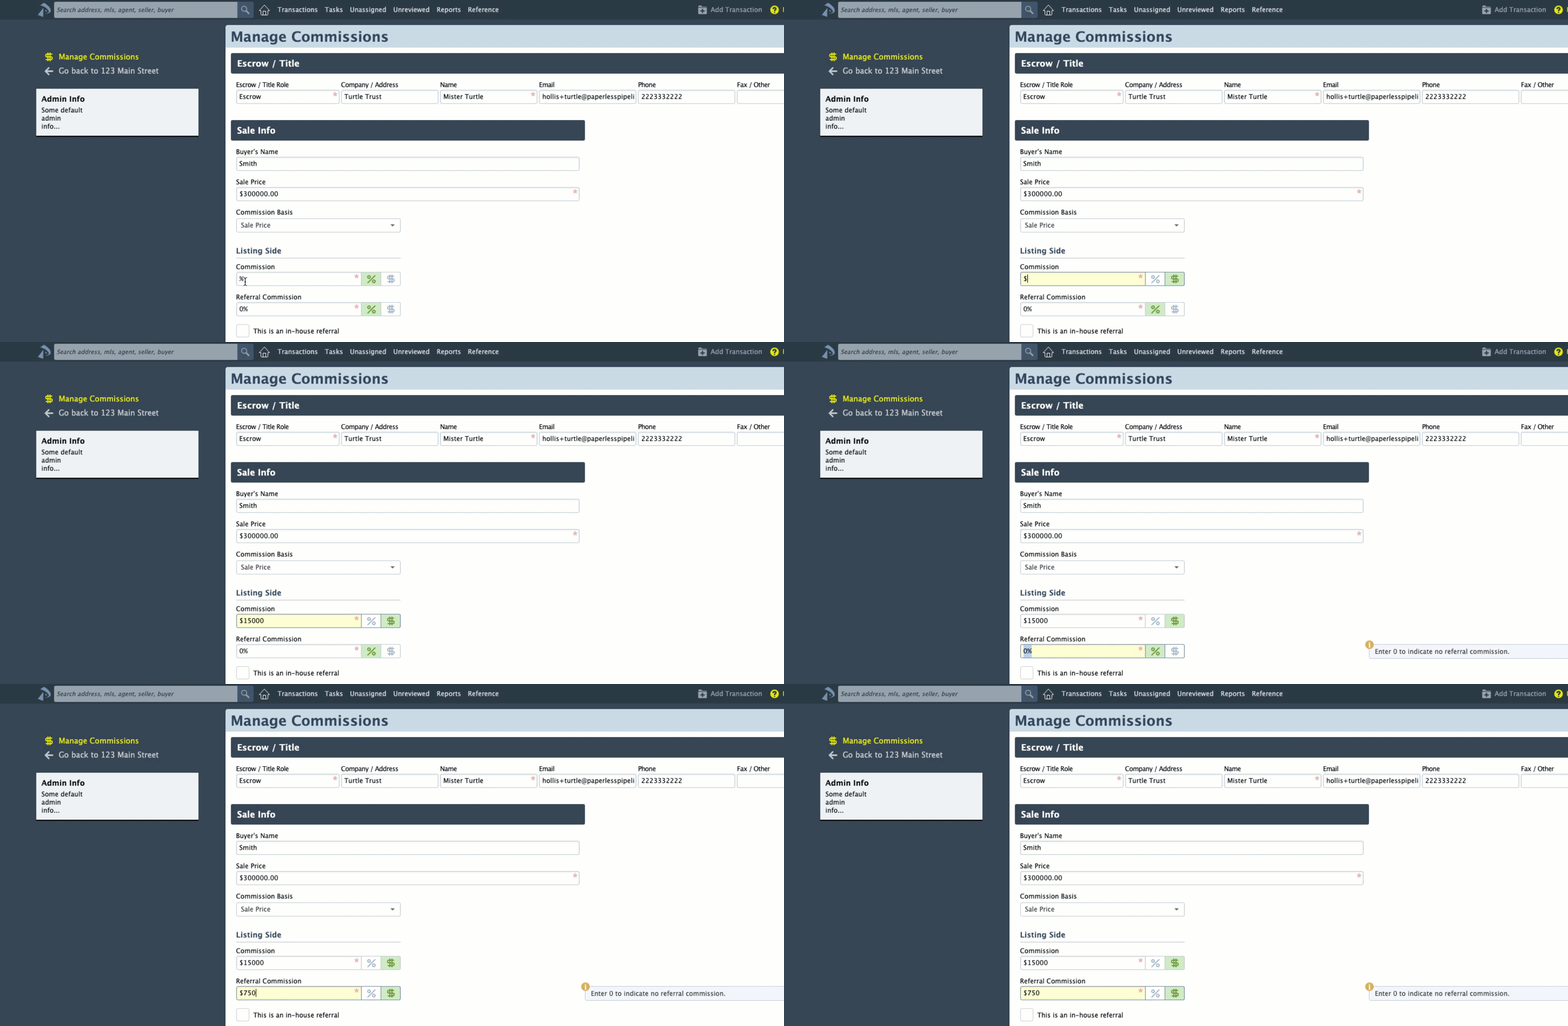
Learn more super user tips & tricks here →
Commission split thresholds updated to be based on Close date: The system will now determine whether a multi-tier commission split threshold has been reached based on the Close date of a transaction rather than the date you're processing the commissions.
Learn more about managing multi-tier commission splits here →
View CDA status on transaction downloads: Your transaction download reports now include a "Has CDA" column so you can easily see which transactions have had their CDAs generated and help you determine if action needs to be taken.
Learn more about downloading transaction spreadsheets here →
Escrow/Title contact and company info added to Commissions & Closings report - The Escrow/title company contact information that's present at the top of the page while Managing Commissions is now included as the furthest right column on the Commissions & Closings report. This addition will allow you to more easily sort, filter, and report on commissions data by Escrow/Title company.
No more forgotten attachments: When sending a message from Pipeline, the system will warn you if you've mentioned you'll be attaching a doc but haven't attached one.
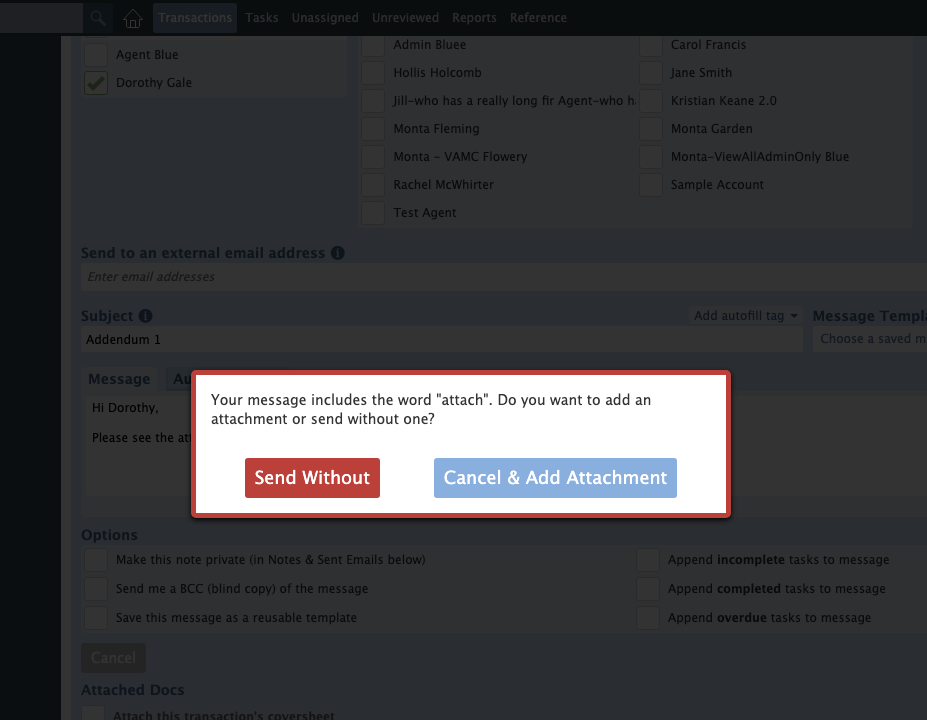
COMMISSION MODULE
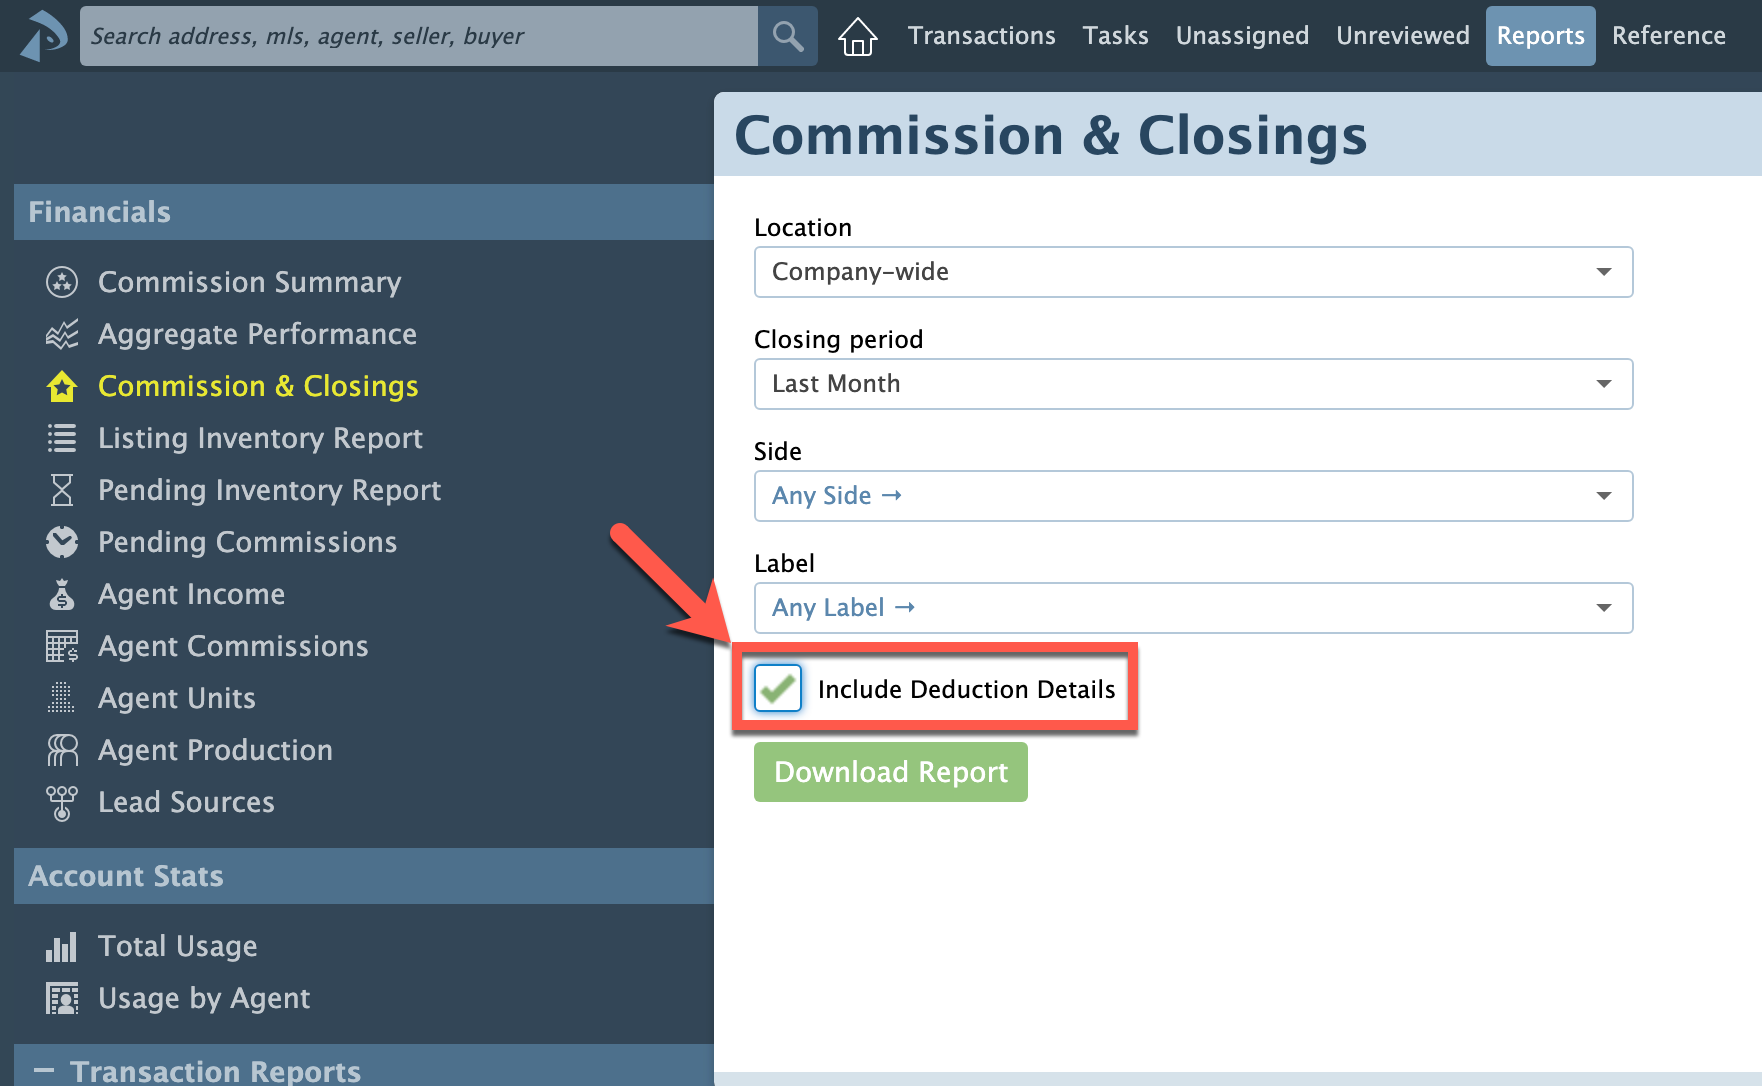
View itemized deductions on key reports: Include a breakdown of deduction amounts on the Agent Income and Commissions & Closings reports by selecting the "Include Deduction Details" option when running the reports. To continue to view deduction totals only, leave the option unchecked.
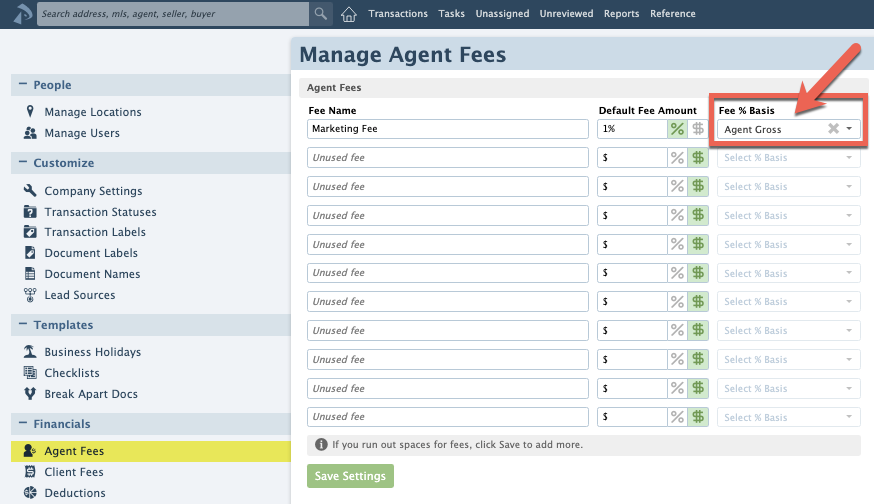
Learn more about commission module reports here →
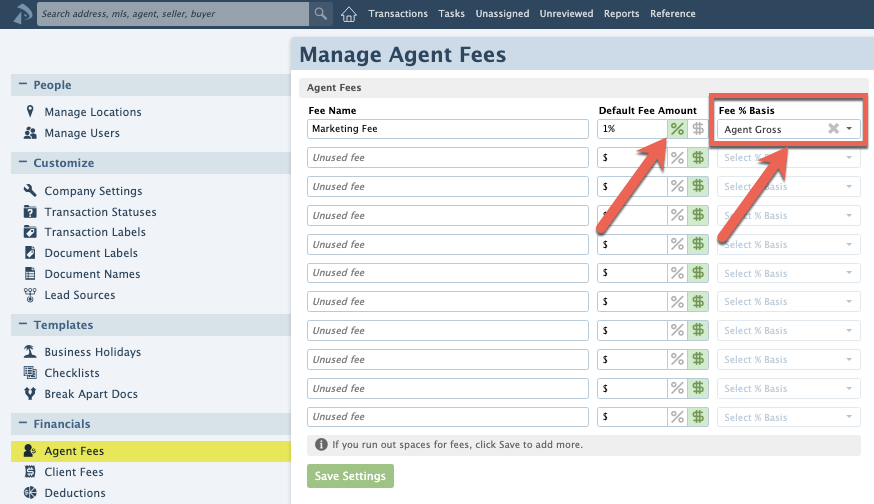
Calculate Fees & Deductions based on a percentage: Agent Fees, Client Fees, and Deductions can now be based on a pre-defined percentage. When setting up fees based on a percentage, specify the default amount (if applicable) along with the desired percentage basis for each fee (e.g., sale price, gross commission, distributable commission, etc). When managing commissions on transactions, your specified basis will be used to calculate the fee amount.
Learn more about managing fees and deductions here →

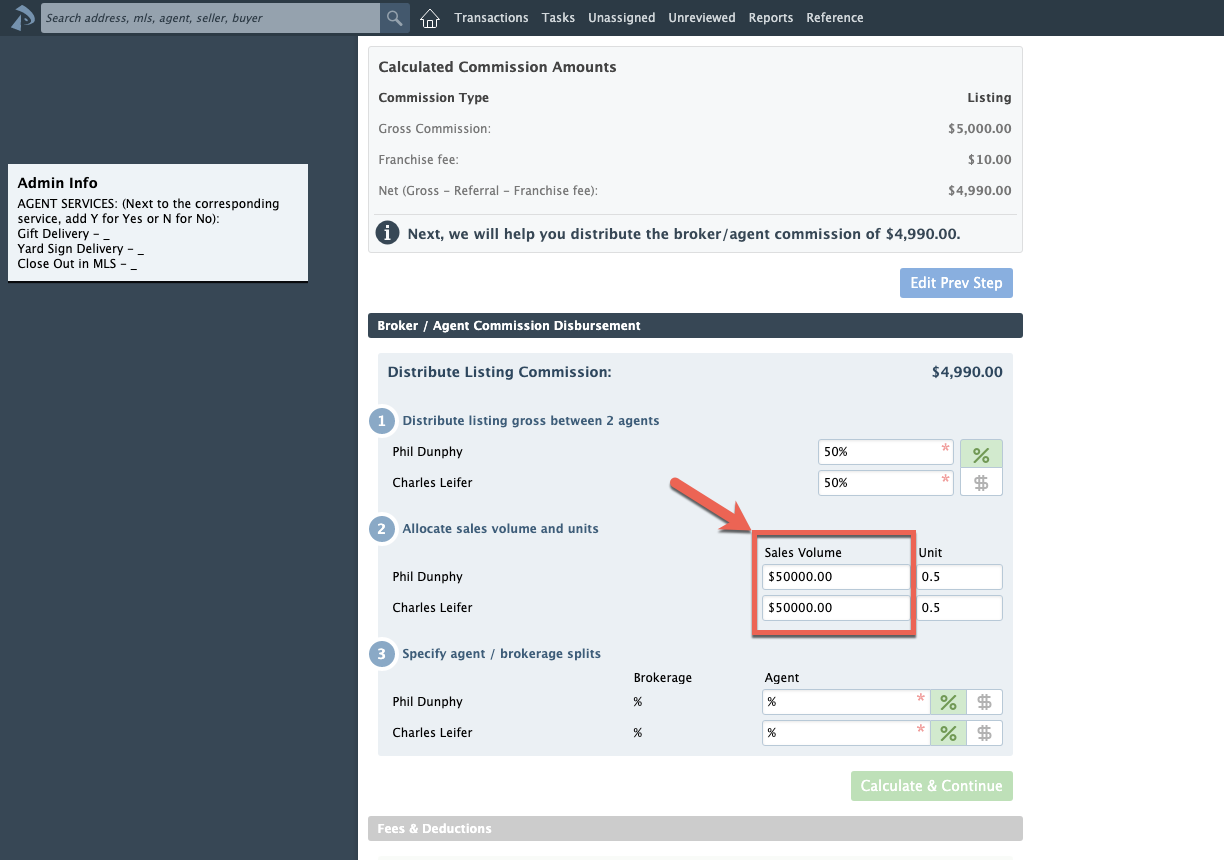
Auto-calculate sales volume: When there is more than one agent on the side of a transaction, Pipeline can automatically allocate sales volume to match the agents' split of commission. Turn this feature on from the Company Settings page if it fits your company's needs.
Learn more about managing commissions here →
Run Agent Income report by fiscal year: "Last Fiscal Year" and "Current Fiscal Year" date range options allow you to run the Agent Income report based on an agent's fiscal year.
Learn more about the Agent Income Report here →

Easily identify docs that correspond to completed tasks: Easily spot which doc has fulfilled a task on a transaction. Hover over a task name within a transaction's checklist to highlight the matching doc. In cases where more than one doc may match, utilize versioning in your naming convention or use Pipeline's Document Labels for easy identification of the final doc.
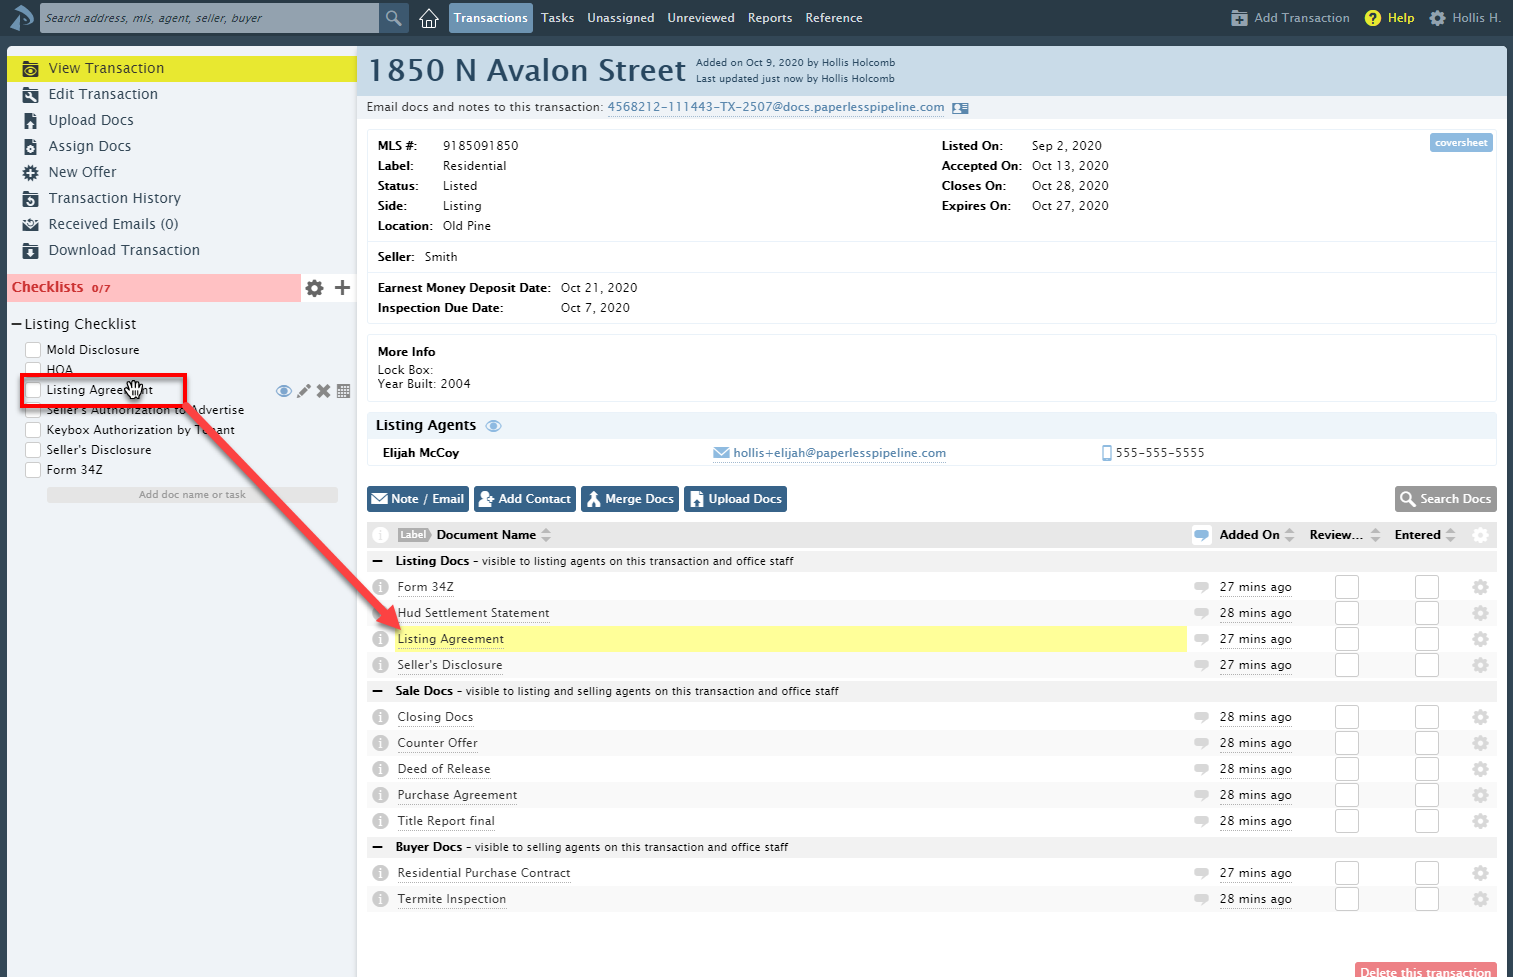
Set tasks to only be visible to certain individuals or groups: Let your @mentions control who sees tasks. Our new @mention visibility setting allows you to set tasks to only be visible to the person or people you've @mentioned. Use it along with the other visibility settings to make sure your team only sees tasks intended for them.
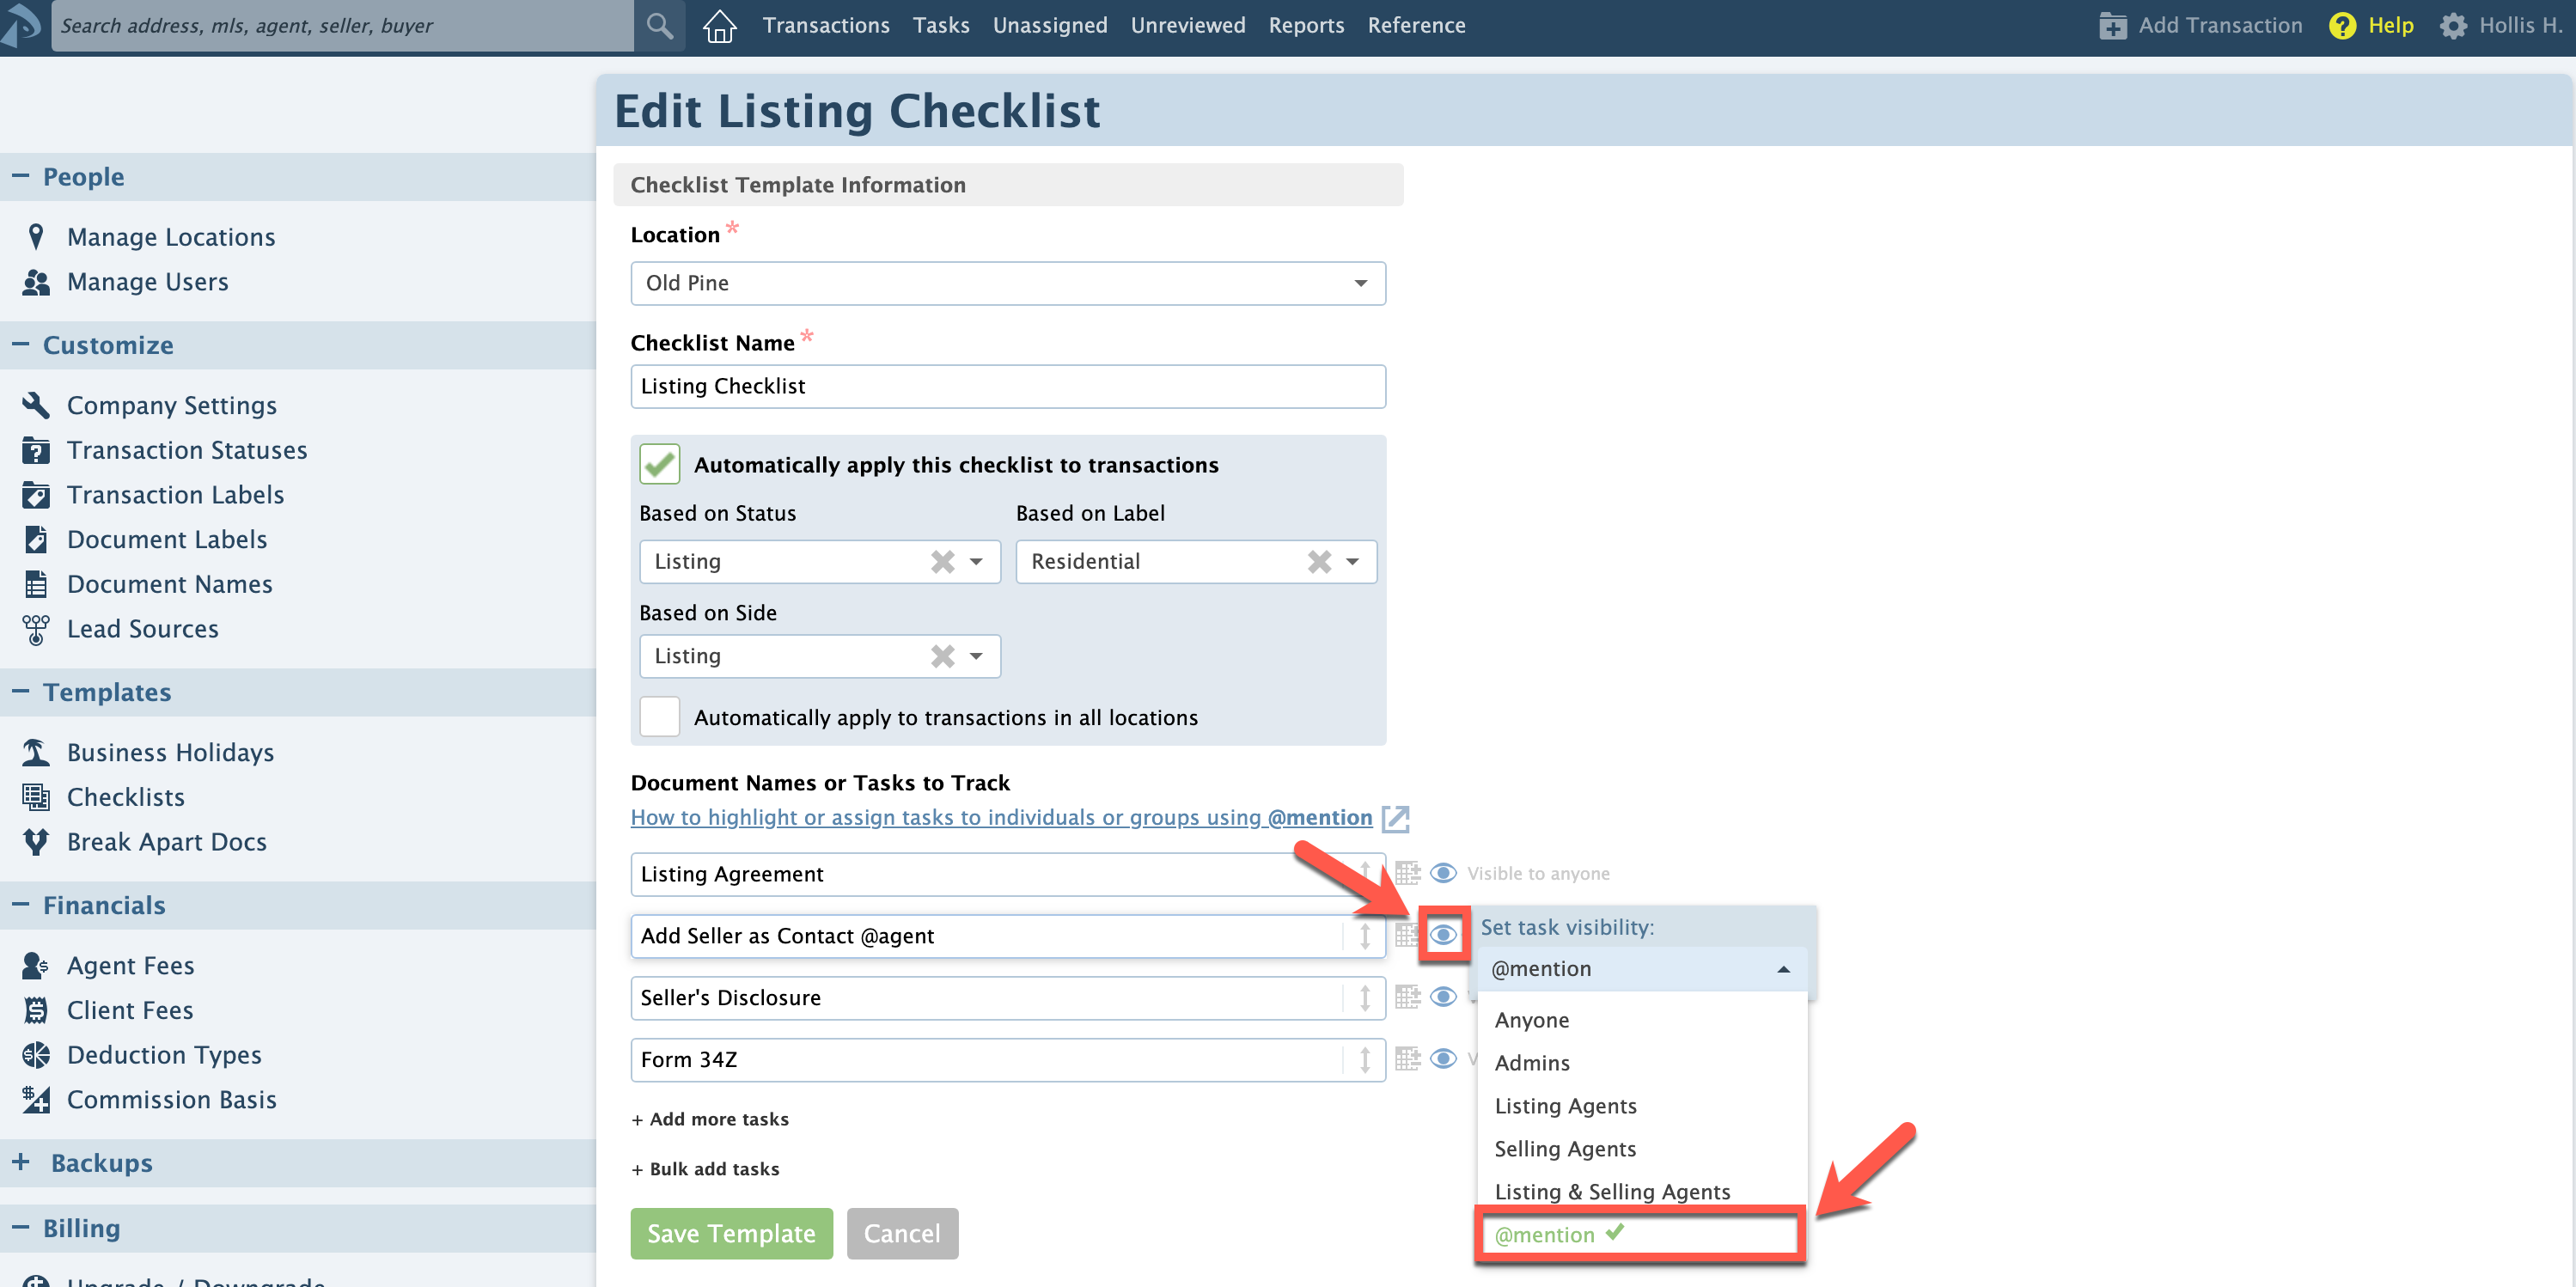
Learn how to Set Task Visibility here →
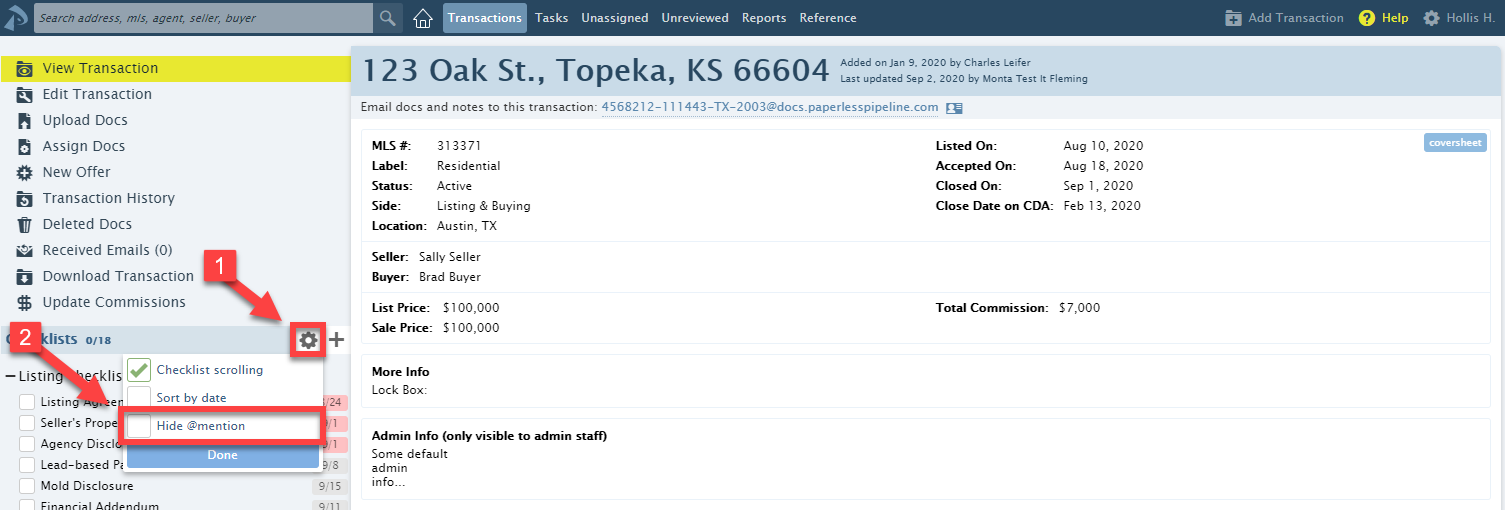
Make task names easier to read by hiding @mention text: Click the new option to hide @mention text from your task names, keeping them clean and easy to read. The new option appears at the top of your Tasks page and under the checklist gear icon on each transaction.

Mark tasks as complete faster: Admins can now check tasks off directly from the Tasks page. The checkbox works the same as it does on transactions.

Learn how to check tasks on the Tasks page here →
Filter tasks by agents: View only the tasks that belong to a certain agent while managing what they need to complete. Enter the agent's name into the Agent Name field on the Tasks page to work from that ideal list.

Learn more about filtering tasks by agent here →
View transaction tasks in the order they're due: Find the task you're working on faster by using the new [Sort by Date] option. Check the option for the tasks to be ordered by due date on every transaction. Uncheck the option for the list to return to it's default order.
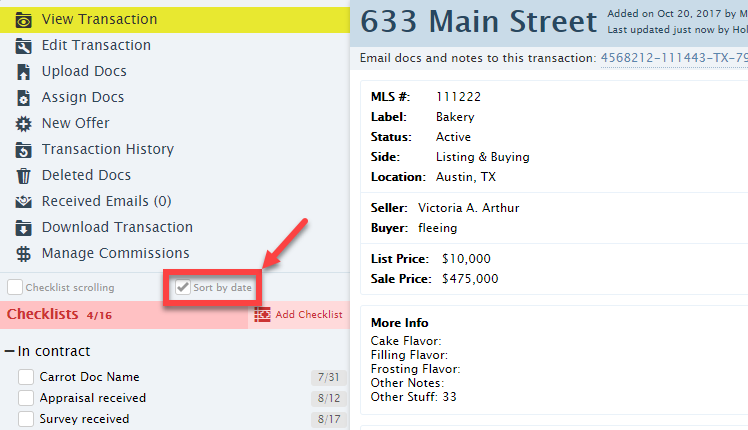
Learn more about sorting tasks by due date here →
Plus other minor fixes and improvements throughout the system.
New Home page steers you where you need to go: Pipeline's new Home page now includes information that will allow you to quickly determine which area needs your greatest attention. Expandable areas allow you to view details that are critical for you to know each time you login to Pipeline.

Learn more about the new Home page here →
Company-wide announcements: Pipeline's new announcement feature allows you to post an announcement to be displayed on the Home page to all the users in your account. The reader can hide the announcement once it has been read, and it will re-appear if the message is updated. Master admins can update the message from the [Company Settings] page.

Track incoming emails sent to transactions: Quickly identify which transactions have received email messages during your specified time period using the new Email Received search option.
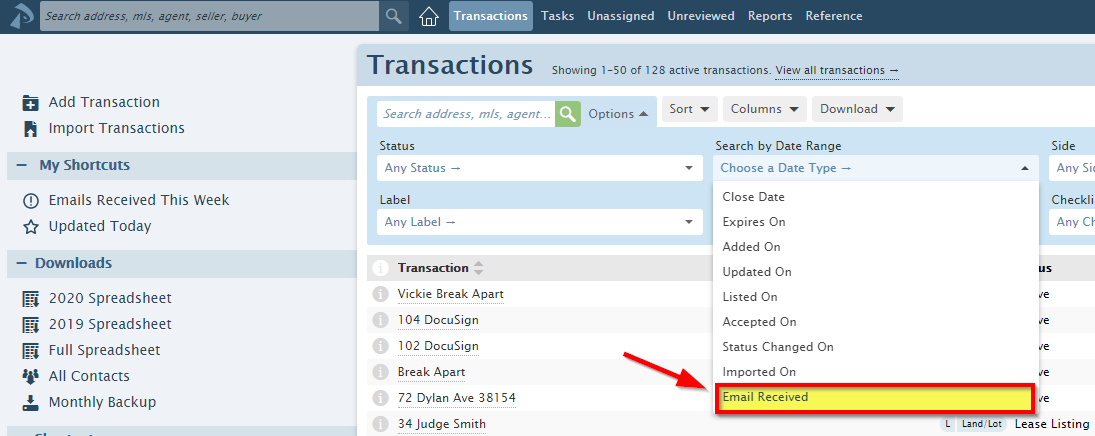
Save the search as a custom shortcut for regular, easy access from your Home page and Transactions page left menus.

Estimate potential and future revenue in an instant:
- The PENDING INVENTORY REPORT allows you to forecast future commissions for specified time periods. It includes sales and commission figures for all your pending transactions, and can be filtered by side, Transaction Label, and date range.
- The LISTING INVENTORY REPORT allows you to closely monitor the health of your business and track market changes by reporting your listing side inventory for a specified period. The report includes the number of listings, list price volume, and average list price.
Download search results to manage transaction data offline: Download spreadsheets of your custom searches and sorts to fully manage and present transaction information, including filtering, sorting, adding totals and subtotals and more. Click the [Download] button on the Transactions page to choose from downloading either displayed fields or all transaction fields.
Track More Dates and Use Them to Trigger Checklists: Several new date fields allow you to track important dates on transactions. Enable any of the new fields from your Company Settings page. Once a date is turned on, it will also be available as a trigger date for automatically assigning checklists.
Send Audio Notes & Messages: Save time by speaking your transaction notes and messages instead of typing them. Audio messages allow you to quickly record a note to yourself or send it to others. Record messages from your mobile device when you're on-the-go, from your laptop when you're in the office, or any time.
Bulk add doc names: When setting up Standard Document Names, paste in your list of doc names to save time and minimize errors.
Learn how to bulk add doc names here →
Agent communication of task completion: Agents can indicate to admins that they have completed a task by checking the task's checkbox. Tasks checked by agents will display a special indicator which lets both agents and admins know when a task has been completed.
Share checklists with a single action: Need to send a list of all the tasks on a checklist instead of just one or two? Drag and drop a transaction's entire checklist onto the message area of a note or email to share its tasks.
Hide completed tasks on transaction checklists: Make checklists cleaner and easier to work with by setting completed tasks to be hidden on transaction checklists. Hidden tasks can be displayed at any time with a single click.
Learn how to hide completed tasks here →
Customize your Tasks and Unassigned Docs lists: Display the fields that make the most sense for your workflow, and hide the fields you don't need to see. Removing unneeded fields from these pages will also increase space for the fields you do use.
Learn to show and hide fields here →
More fields displayed on reports: Several fields can now be viewed on designated Commission Module reports allowing you to analyze commissions and performance more easily. They include:
- View Sales Volume on the Commission Summary page
- View Listing & Selling Volume on the Commissions & Closings report
- View Client Fees on the Agent Commissions report.
Filter Commission Module reports by transaction label: Use the Label filter to report on commission numbers based on transaction type and generate reports that have only the data you need.
On-demand transaction reporting: Build (and save) custom reports that pull the exact transactions you need to see. The Advanced Search area allows you to combine search and filter criteria for all the primary transaction fields, including date fields, saving you the time of manually excluding unneeded transactions.
Track lead sources to measure the effectiveness of your advertising campaigns: Record buyer and seller lead sources on transactions. View a lead source aggregate report. View lead source information on other financial reports.
Customize your message templates with automatic (auto-fill tags): Select from a list of auto-fill tags when creating a message template. The system will automatically replace each tag with the appropriate value from the transaction whenever you use the template to send a note from a transaction. Learn how to use auto-fill tags here →
Copy doc comments to messages in one click: Instantly copy your doc comments into a note or email by dragging them into the message area. Learn how here →
Include contacts when sending a coversheet. Now you can choose whether you'd like contacts to be included when emailing a coversheet from a transaction.
COMMISSION MODULE
View Transaction Gross Commission and Franchise Fee on Agent Income Report: The Agent Income Report now includes Transaction Gross Commission and Franchise Fee amounts, allowing you to see the total commission produced by the agent before the franchise fee has been deducted.
View more information about an agent by hovering over their name on a transaction: Admins can view an agent's start date, license number, and more info by hovering over an agent's name on a transaction. Agents are not allowed to see each other's information by this method.
External recipients of email messages can see and reply to all recipients: When external contacts who receive an email message sent from Paperless Pipeline REPLY ALL to the message, all recipients on the message will now receive the reply. Previously, external recipients were not shown internal recipients of a message and thus could not include them when replying.
Plus dozens of fixes and improvements.
Read the blog post for more info →
COMMISSION MODULE
Receive assistance with multi-tier commission splits: When entering commission information for a transaction, you will receive a warning if any agent is about to surpass their commission split threshold and needs to be processed on multiple tiers of splits.
Look up agents' year-to-date and previous month's commission figures: Admins can access agents' YTD and previous month's commission figures directly from the Reports section. Agents will continue to receive their YTD and previous month's commission figures monthly by email for offices that have turned on that setting.
View in-house referral commissions during CDA generation: An agent's in-house referral commission figures will now be included in the YTD totals box displayed on the right hand side during CDA generation.
Plus dozens of little fixes and improvements.
Format notes and send structured emails from transactions: Format transaction notes and messages with bolded text, italics, bulleted lists, etc. Pipeline now supports the popular and easy-to-learn Markdown formatting method to give you better control over the appearance of your transaction notes.
Private Notes! Keep transaction notes visible only to sender and recipients. When adding a transaction note, you can now mark it as private with a single click. A private note is only shown to its author (i.e. sender) and recipients in the Notes & Sent Emails section of the transaction. Previously, all notes were shown to all users who had access to the transaction.
Copy and paste multiple tasks in one shot when setting up checklist templates: Paste in a list of tasks with one click to save time and minimize errors when setting up checklist templates.
Hide checklist completion percentages from agents to simplify agents' view of transactions: Uncheck the company-wide setting "Show checklist completion percentages to agents" to prevent your agents from seeing checklist completion percentages across their transactions. This can eliminate agents' confusion if the percentages reflect tasks that agents are not able to view.
Plus scores of small improvements.
Read the blog post for more info →
COMMISSION MODULE
Drill down Commission Summary data: Click figures on the Commission Summary report to see the Pending or Closed Transactions that were used to calculate those figures.
And scores of small improvements.
Recover deleted docs: Master admins and document deleters can recover docs deleted from transactions as well as unassigned docs. Click the "Deleted Docs" option from the left-hand menu of the transaction or the Unassigned Docs section to locate and download the deleted doc. Then re-upload it to the system if needed. Learn how this works here →
Keep your computer logged in for 7 days: When logging in to Pipeline, you can now select the option called "Stay logged in for 7 days". For security, be sure to only use this option from your own computer and own secure network. Learn more here →
Buyer and Seller email addresses included in transaction downloads: Need to send an email to buyers or sellers? Download transaction spreadsheets to access email addresses of buyers and sellers. Learn how to download spreadsheets here →
Open next/previous document previews with new keyboard shortcuts: Now you can use Shift + ↑ and Shift + ↓ (Shift plus up or down arrow on your keyboard) to quickly open the preview of the previous or next docs when in any document list.
New high-contrast color theme: Pipeline's new high-contrast color theme offers distinctive lines and colors, helpful for color-blind and visually impaired people. Learn how to apply the new color theme to your account here →
View new offer status right from its original transaction: Hover over a transaction's new offer to instantly see that offer's current status and creation date.
And scores of small improvements.
Read the blog post for more info →
COMMISSION MODULE
Filter the Pending Commissions Report by acceptance date.
Commission Disbursement Authorizations and Financial Info now saved within monthly backups and downloaded transactions: Monthly backups and downloaded transactions will now include CDAs and all other financial info.
And many small improvements.
Quickly search a transaction's documents: There's a new search option above the documents area of every transaction. Use it to instantly locate a document.
And many more small improvements.
Read the blog post for more info →
COMMISSION MODULE
Agents can receive a monthly commission report that summarizes their year-to-date and last month's production numbers: Turn this feature on or off from the Admin Settings page using the checkbox "Email monthly production summary to agents".
Generate reports based on any date range: From a report's "period" drop-down list, select the option "Custom Date Range", then specify the desired start and end dates.
Search transactions based on whether they have commission data entered or not: From the Transaction's page, go to the Advanced Search section and use the new "Commissions" filter.
The "Generate CDA" option has been renamed to Manage/Update Commissions: How you enter a transaction's commission data hasn't changed. Just the menu option now appears as either Manage Commissions or Update Commissions.
Rename franchise fee to match your company's naming conventions: If your office pays a franchise fee but calls it by a different name, now you can specify that name.
Admins, you can now share your saved message templates with agents. Previously you could only share with other admins.
Easily scan transaction notes: Transaction notes are now shown collapsed. This will make it easier for you to scan them quickly. A green triangle at the right of a collapsed note will let you expand that note.
Search transaction notes: On the top right corner of the Notes area, there's now a "search notes" box allowing you to quickly locate notes that match a search phrase.
Easily set up standard doc names from tasks and tasks from standard doc names: Now when creating checklist tasks, the system will auto-suggest matching document names. Similarly, when creating standardized document names, you will see matching task names being automatically suggested.
Know if your attached files will be emailed as links or as attachments: Whenever you attach more than 5 megabytes worth of docs to your emails, the system always sends those as downloadable links rather than direct attachments. Now the system will warn you whenever your selected docs will be sent as links.
And several general improvements.
