SUMMARY
Learn how to combine multiple identical Checklists Templates related to individual Locations or Labels into a single Checklist Template related to multiple Locations or Labels.
Introduction
You can now relate a single checklist to multiple Locations and multiple Labels instead of relating a checklist to either one or all Locations and Transaction Labels. This eliminates the need to create separate checklists to represent each different location/label. This new option:
- Allows you to set a single checklist to be automatically added to transactions in multiple Locations that have one of multiple Labels
- Allows you to give checklist-related permissions to a single checklist for admins in different Locations
- Helps organize and streamline your checklist setup since you no longer need multiple checklists to represent multiple Locations and Labels.
If you previously created multiple checklists to represent multiple Locations or multiple Labels, follow the steps in this article to combine them into a single checklist.
Steps to Combine Checklists
To combine multiple Checklist Templates into a single checklist:
- Choose one Checklist Template to become your new single Checklist Template by editing or copying an existing Checklist Template, or adding a brand new one. Learn more below.
- Update the Locations or Labels set for the Checklist Template. Learn more below.
- Once you've combined the Checklist Template into a single checklist, delete any additional, unneeded, duplicate Checklist Templates you'd previously set up for each Location and / or Label. Learn more below.
- Repeat these steps for each checklist you need to consolidate.
Choose a Checklist Template
Choose one Checklist Template to become your new single Checklist Template by editing or copying an existing Checklist Template, or adding a brand new one. Choose the method below that best fits your needs:
Option 1: EDIT an existing checklist template to use
Pick your cleanest, most comprehensive Checklist Template to start from, and edit it.
To edit a Checklist Template:
- Go to Admin / Settings
- Click your name in the upper right corner, then [Admin / Settings].
- Select [Checklists] from the left menu.
- To the right of the template you want to edit, click the Checklist Name and select [Edit Template].
Option 2: COPY an existing checklist template to use
Pick your cleanest, most comprehensive Checklist Template to start from, copy it, and update the copy.
To copy a Checklist Template:
- Go to Admin / Settings
- Click your name in the upper right corner, then [Admin / Settings].
- Select [Checklists] from the left menu.
- To the right of the template you want to copy, click [⚙️] and select [Copy Template].
Option 3: ADD a new checklist template to use
Start fresh with a brand-new Checklist Template to be used across multiple Locations and / or Labels.
To add a Checklist Template:
- Go to Admin / Settings
- Click your name in the upper right corner, then [Admin / Settings].
- Select [Checklists] from the left menu.
- Click [Add Template].
Update Locations or Labels
Update the Locations or Labels set for the Checklist Template.
Set Locations
If your company has more than one Location in Pipeline, specify which Locations the Checklist relates to. Regardless of which Locations are specified, any Checklist Template can still be manually added to any transaction.
When a Checklist Template is set to be automatically applied, it will only be applied to transactions within the specified Locations.
Only admins of the specified Locations will be able to able to make changes to the template.
To set Locations for a Checklist Template:
- If your company has more than one Location in Pipeline, select the appropriate Locations for the Checklist.

Set Labels
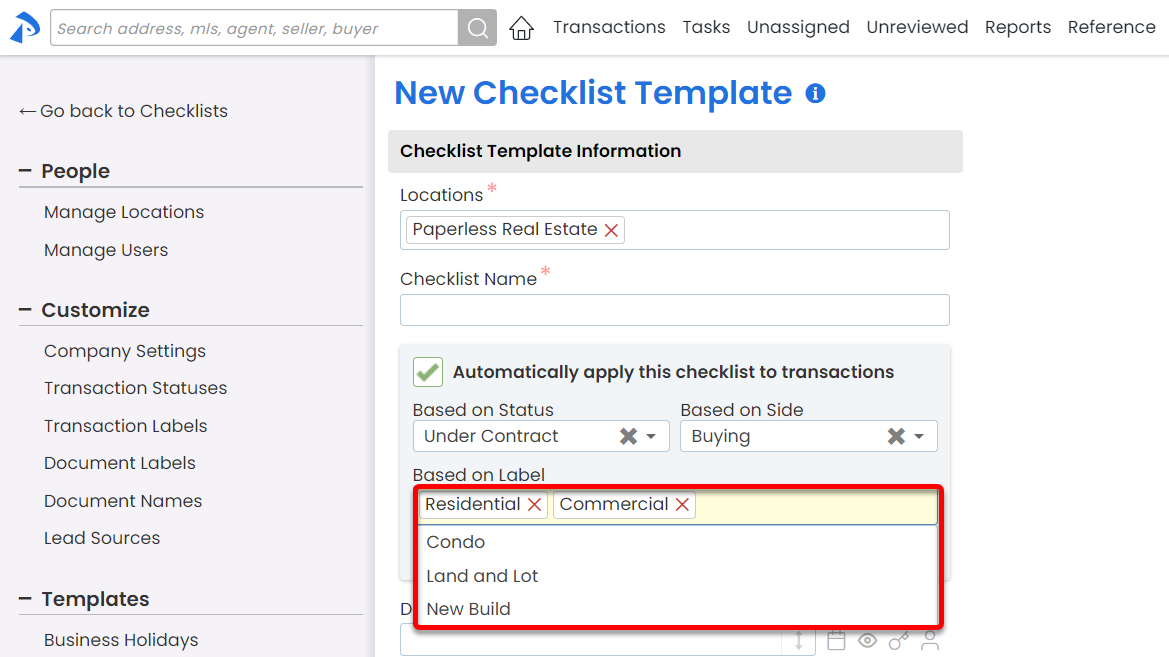
You can optionally set checklists to automatically apply to transactions with particular Transaction Labels.
For example, if both commercial and residential transactions require the same checklist of tasks, specify both Commercial and Residential in the label section to allow the checklist to be applied in either case.
Learn more about Transaction Labels →
To automatically apply a checklist to transactions based on Label:
- Click the Label dropdown and choose your desired Label.
Delete Any Extra Checklist Templates
Once you've combined the Checklist Template into a single checklist, delete any additional Checklist Templates you'd previously set up for each Location and / or Label.
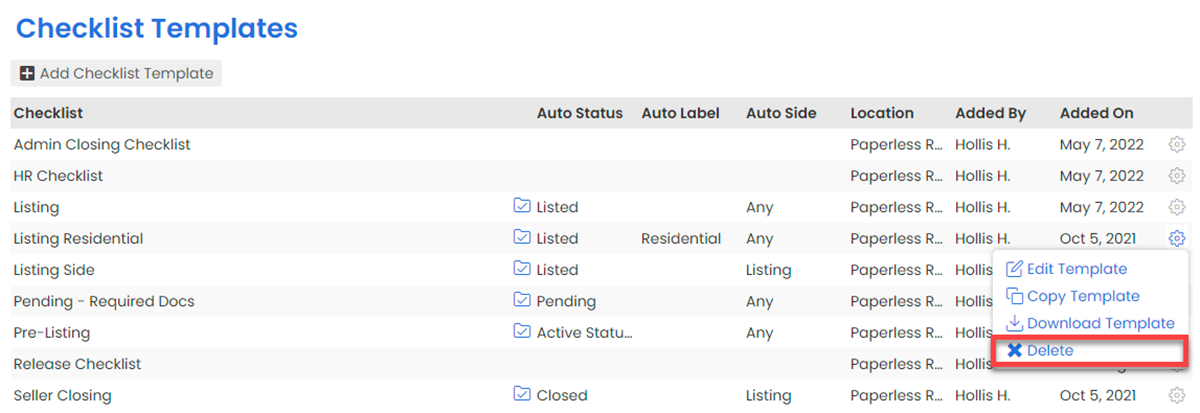
To delete an unwanted Checklist Template:
- Go to Admin / Settings
- Click your name in the upper right corner, then [Admin / Settings].
- Select [Checklists] from the left menu.
- To the right of the template you want to delete, click [⚙️] and select [Delete].
- Click [delete] again to confirm deletion.
Deleted Checklist Templates will not be removed from transactions where they have already been added.