SUMMARY
This article introduces some of the advanced, time-saving features available to admins.
2:57
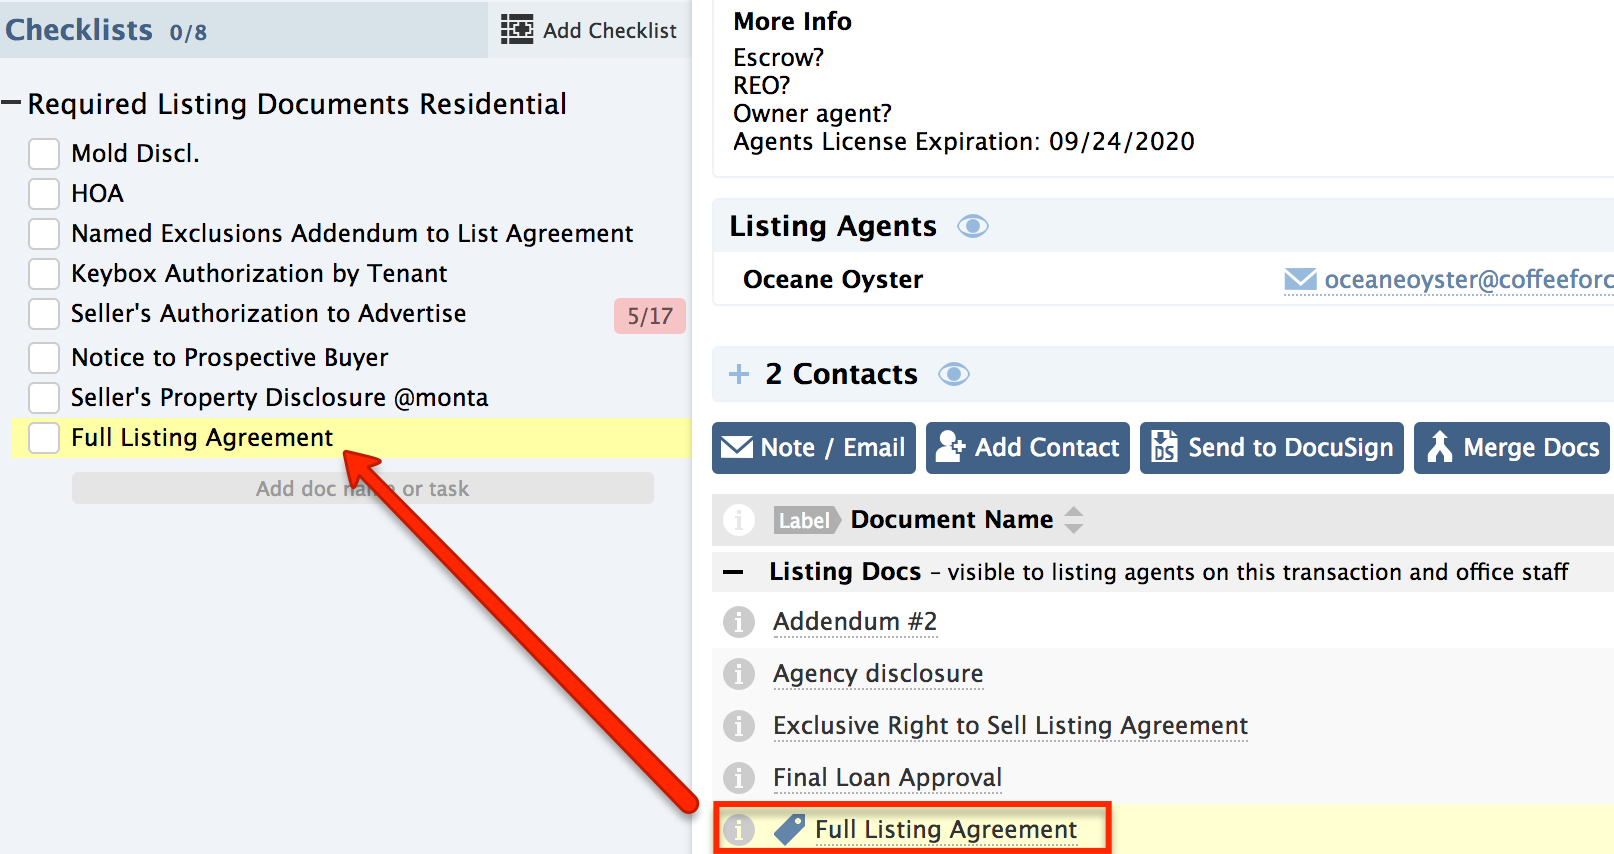
Match Checklist Tasks with Documents
Make Pipeline identify the checklist task that corresponds to a document you are working on. To enable scrolling of checklists:
- Open any transaction and click [Enable Checklist Scrolling]. You only need to do this once. Pipeline will remember your choice.

This feature works best when checklist scrolling is enabled.
When you click a document name and that name is contained within a task on the transaction, the task will be highlighted automatically. If you have enabled Checklist Scrolling, that task will also be repositioned so that you can see it easily.
Keyboard Shortcuts
Using keyboard shortcuts will save you lots of time while working in Pipeline. Let’s learn about the keyboard shortcuts available in Pipeline. These shortcuts work on Mac and PC.
When a preview is open:
- Use the left and right arrow keys to page through it. Or type in a page number to jump directly to a page.
- When previewing a doc in either pop-out or inline modes, pressing Shift + Up-arrow or Shift + Down-arrow will show the previous or next doc preview, if available.
Use:
- Alt-R to mark as reviewed the doc whose preview is currently open.
- Alt-E to mark it as entered.
- Ctrl-Shift-Z to jump to the Admin area.
- Ctrl-Alt-T to add a transaction.
- Ctrl-Alt-D to upload a doc.
Go to a menu item on navigation bar using Ctrl-Shift- and the position number of the menu, For example:
- Hit Ctrl-Shift-1 to jump to the Dashboard.
- Hit Ctrl-Shift-2 to jump to the Transactions page
From a transaction:
- Ctrl -Alt-N to add a note
- Ctrl -Alt-E to email docs
Learn more about Keyboard Shortcuts here ➞
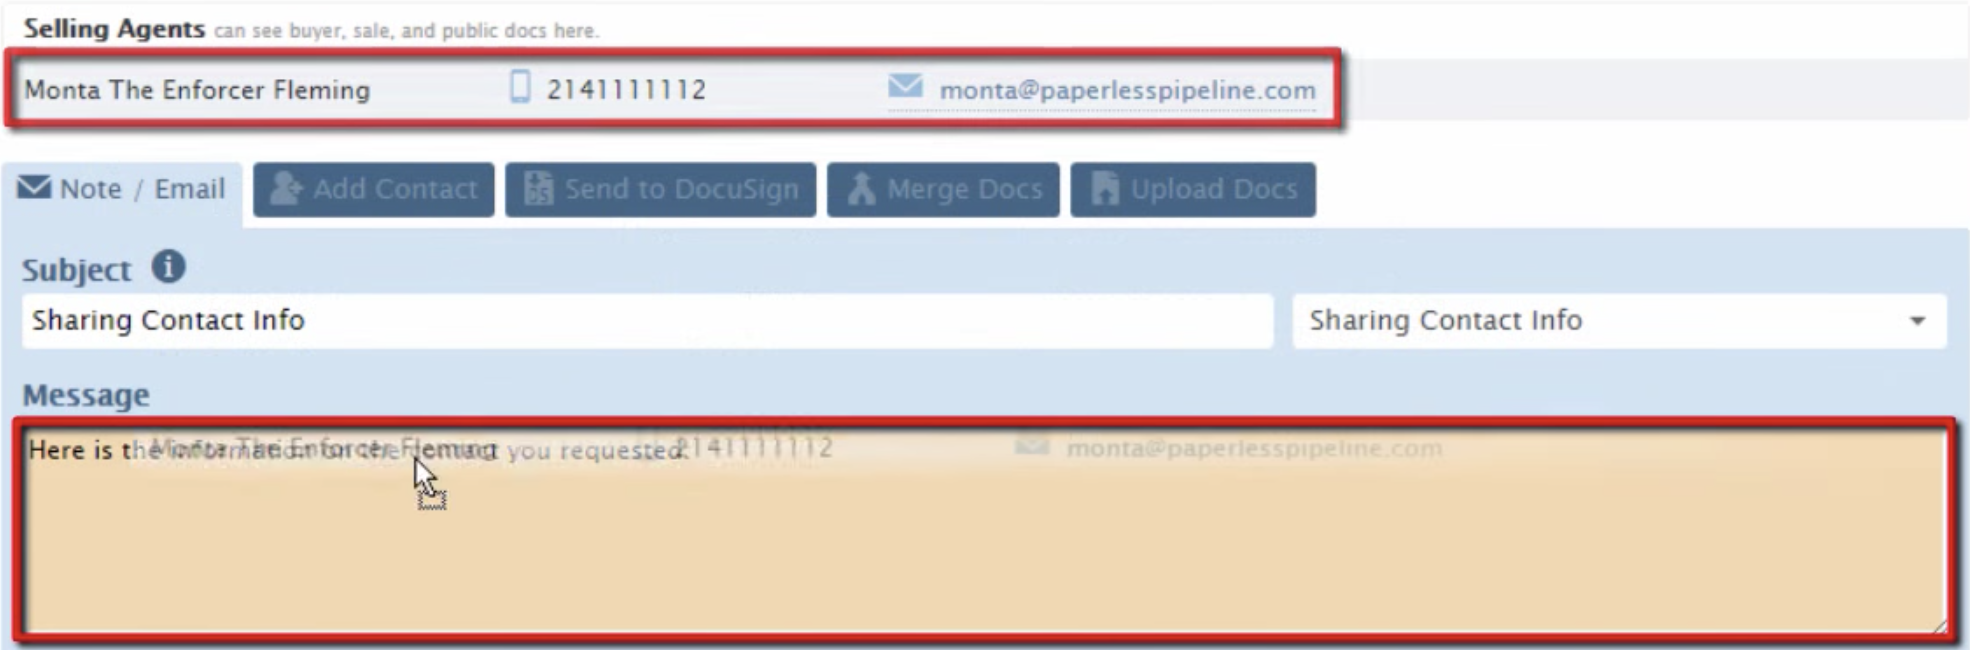
Drag and Drop Contacts into Messages
- Navigate to the transaction from where you will be sending the message. If you haven’t added the contact to the transaction yet, add it first.
- Click [Note / Email] just above the list of documents.

- To add the contact as a recipient, click and hold down anywhere on the contact, then drag the contact to the External Email Address field. Drag more contacts if you need to.
- To share the contact's full contact information, click and hold down anywhere on the contact, then drag the contact to the Message field. Pipeline will properly format the contact’s information into the message field. Drag more contacts if you need to.
- Complete your message and select any desired options or docs to attach.
- Once the message is ready to go, click [Send].

Using Dual Monitors
If you regularly review a large number of documents, we recommend setting up two monitors side-by-side. This is called a "dual-monitor setup". Bring up the Unreviewed Docs page on the first monitor, and open an individual doc or transaction on the second monitor for reviewing. This saves you time because you avoid the constant switching between two windows on the same browser (with the dual-monitor setup, both windows stay in your view across the two monitors). Once you have this setup, here's how you'd utilize it:
- From the Unreviewed page, click the transaction name of the documents you’d like to review.
- The transaction will open in a new window.
- Drag the new window to your second monitor. This new positioning will now be remembered when you open more transactions from the Unreviewed page.
This setup also works great for processing multiple transactions one after the other. Open your sorted/filtered transaction list on the first monitor, then open an individual transaction on to the second monitor by shift-clicking the transaction's name and dragging the new transaction window to the second monitor.
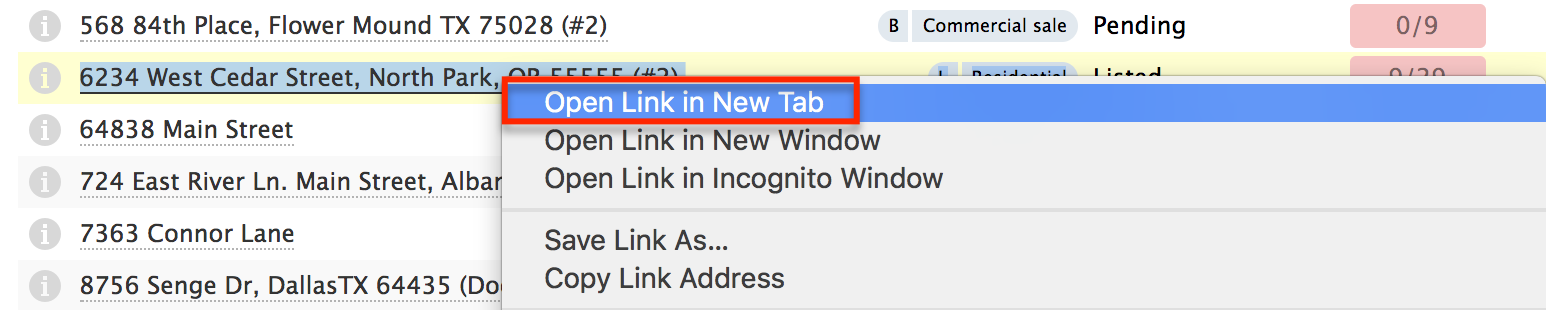
Navigating Efficiently Between Transactions
Use the following method when you have a list of sorted/filtered transactions that you’d like to remain intact as you keep processing each individual transaction:
- From the Transaction page, Ctrl-Click or Right-click on a transaction name.
- Select “Open in new tab”. This will open that transaction in a separate browser tab leaving your main transaction list intact on the original tab.
Pipeline Pro Webinar Recording: Power User Features & Tips
View more Pipeline Pro Webinars here →
Pipeline Pro Webinar Recording: Power User Features & Tips
In this Pipeline Pro webinar, discover tips and tricks to make you a reporting super user!
7:45
View more Pipeline Pro Webinars here →
Pipeline Pro Webinar Recording: Pro Document Handling
Come learn about about the advanced doc-related features in Pipeline that allow you to handle docs like a pro.
12:05
View more Pipeline Pro Webinars here →
Pipeline Pro Webinar Recording: Multitasking in Pipeline
This week we'll explore ways to deftly manage your multi-action responsibilities in Pipeline, saving you loads of time throughout your day.
7:16
View more Pipeline Pro Webinars here →
Pipeline Pro Webinar Recording: Creative Ways to Use Transactions
Did you know transactions can be used for more than just storing transactions? Come learn the clever ways you can create transactions in Pipeline to store, manage, and streamline non-transaction activities and information.
11:15
View more Pipeline Pro Webinars here →
Pipeline Pro Webinar Recording: Where's that? Finding hidden or lost treasures
Come learn how you can find information that's not readily available, that you thought was lost, or is otherwise elusive.
11:23
View more Paperless Pipeline Pro Webinars here →
Pipeline Pro Webinar Recording: Special Back-end Settings
This week we'll go over a handful of little-known account settings we can change from our end that can change how you use Pipeline.