Automatic Doc Name Grouping organizes documents with similar names into a single collapsed group in each transaction's document list, keeping things tidy and always showing the most recent version up front.
Document Name Grouping keeps your list of documents on transactions neat by folding together files that share the same base name. Instead of scrolling through a long list of versions or similar docs, you’ll just see the most recent one up front, with the rest tucked neatly behind it.
Grouping works automatically with no setup or strict naming rules required. Whether you use system versions like “Listing Agreement (2),” structured names like “Listing Agreement (Signed by Seller),” or looser names like “Listing Agreement (10/21)” or “Listing Agreement (Jim),” all versions stay organized together. It even keeps Pipeline eSign workflows organized, so you never have to think twice about how you name documents.
Offices that use Standardized Document Names can make grouping even more consistent. By defining a shared list of doc names and encouraging agents to pick from that list, admins can ensure that related docs always group together in predictable, easy-to-find ways across every transaction.
Automatic Grouping by Base Name
Pipeline groups documents that share the same base name — the text before the first parenthesis. Everything after the parenthesis can vary, such as numbers, statuses, dates, or notes, and still belong to the same group.
Example Group
- Listing Agreement
- Listing Agreement (2)
- Listing Agreement (Signed by Seller)
- Listing Agreement (Final)
Automatic Display in the Docs List
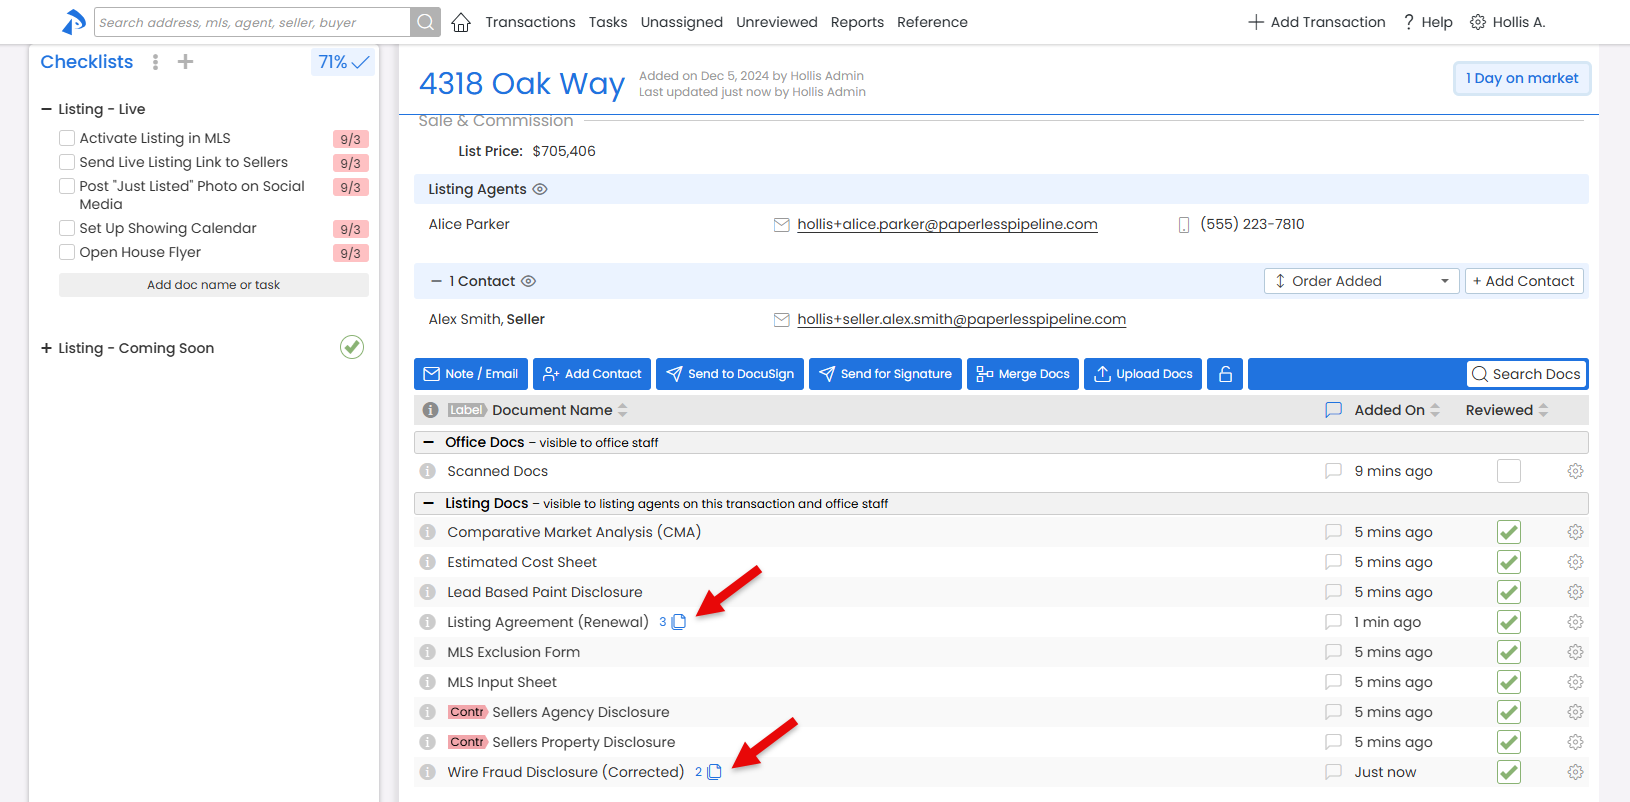
Each group shows only one doc up front, with the rest hidden behind it. A count next to the doc name tells you how many docs are in the group.
By default, the most recently added doc is designated as the primary and appears on the transaction, so you can instantly spot the latest version. This default can be overridden by manually setting a different doc as primary.
See related documents on a transaction in one collapsed list, making it faster to spot the intended version without sifting through variations.
Who Can Do This: Admins can view all docs on all transactions. Agents can view docs only on transactions they’re added to, and only within the Permission Categories they have access to.
To view grouped documents on a transaction:
- Go to the Transaction
- Open the transaction where you need to take action.
- See Grouped Docs
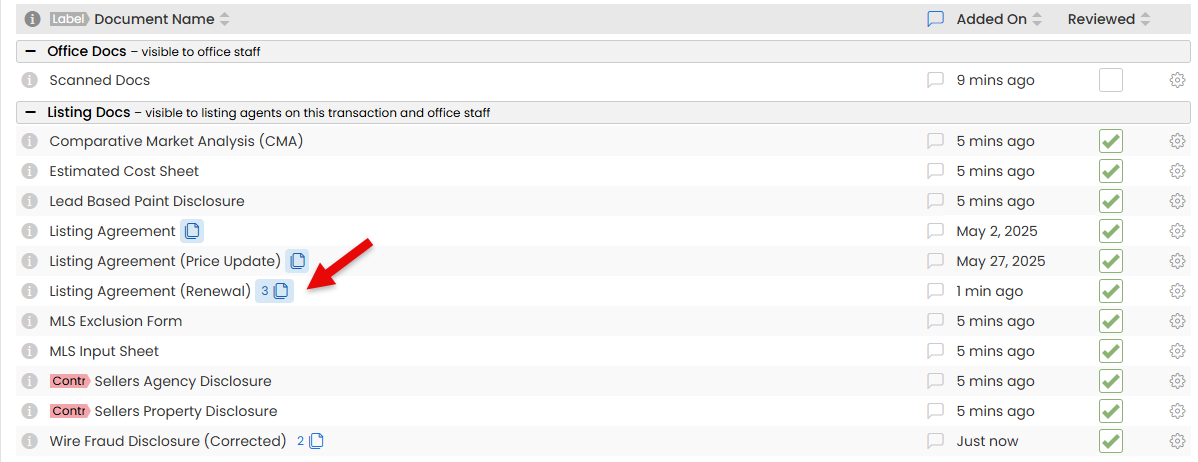
- In the Docs section, look for collapsed groups indicated by a doc count icon. They show the most recent doc and keep related ones with the same base name organized within.
- In the Docs section, look for collapsed groups indicated by a doc count icon. They show the most recent doc and keep related ones with the same base name organized within.

Doc Name Grouping works best when your docs are sorted by Document Name.
Expand a group to view all related documents at once, making it easy to compare versions and access any file you need.
Who Can Do This: Anyone who can view a doc group can expand it.
To expand a group of docs:
- Go to the Transaction
- Open the transaction where you need to take action.
- See Grouped Docs
- In the Docs section, look for collapsed groups indicated by a doc count icon.
- In the Docs section, look for collapsed groups indicated by a doc count icon.
- Expand a Group
- Click the group icon to expand and view all related docs.
- Click the group icon to expand and view all related docs.
- (Optional) Collapse Again
- Click the group icon again to collapse the docs and display only the primary doc.

Ungroup a doc so it no longer matches the other docs in the group.
Who Can Do This: Admins can ungroup docs on transactions. Agents can rename docs only if the doc was uploaded by them and has not yet been marked as reviewed by an admin.
To ungroup a doc:
- Go to the Transaction
- Open the transaction where you need to take action.
- Find the Doc to Ungroup
- Click the doc's gear, then select [Edit Doc].
- Rename the Doc
- Change the Doc Name by editing the text before the parenthesis so it differs from the other docs in the group.
- Save Settings
- Click [Save].
Manually set a document as primary if you want a document other than the most recently added to appear on the transaction.
Who Can Do This: Admins can manually mark docs as primary on transactions. Agents can manaully mark docs as primary only if the doc was uploaded by them and has not yet been marked as reviewed by an admin.
To manually mark a doc as primary:
- Go to the Transaction
- Open the transaction where you need to take action.
- Find the Doc to Mark as Primary
- Click the doc's gear, then select [Edit Doc].
- Rename the Doc
- Change the Doc Name by editing the text to add an asterisk
*at the very end of the name. Example:Listing Agreement (Signed by Seller)*
- Change the Doc Name by editing the text to add an asterisk
- Save Settings
- Click [Save].
If multiple docs in a group end with an asterisk, the most recently added one is displayed as the primary.
Turn off Automatic Doc Name Grouping to stop collapsing documents that share the same base name, so every version appears separately in the list of docs on transactions.
Who Can Do This: Master Admins.
To turn off Automatic Doc Name Grouping:
- Go to Company Settings
- Click your name in the upper right corner, then [Admin / Settings].
- Disable Automatic Doc Grouping
- In the Document Settings section, uncheck the box next to Group documents by name on transaction Document Lists.
- Save Settings
- Click [Save Settings].
Create Standardized Document Names
Admins can create a predefined list of document names for the office. Each standardized name can be linked to a document label and permission category. This improves naming consistency and makes grouping more reliable.
Learn how to Manage Standardized Document Names
Ways to Use Standardized Doc Names to Standardize Grouping
Single Base Name
Use one base Standardized Document Name (e.g, Listing Agreement). Have your team add details in parentheses, such as (draft), (final), or (signed), when uploading.
Separate Variations
Create multiple standardized names that already include the version and train your team to pick the correct one. For example, Listing Agreement (draft), Listing Agreement (final), Listing Agreement (signed).