SUMMARY
Learn to set up Paperless Pipeline's Commission Module to support your office's specific commission needs.
Introduction
The Commission Module is an add-on module within Paperless Pipeline that allows you to calculate agent & broker commissions, generate financial and production reports, give agents access to commission statements and reports, and more. After the Commission Module has been activated →, it needs to be configured to meet your office's specific commission needs.
This article will walk you through those quick and easy steps, including how to set up Commission & CDA Settings, Company Settings, User Settings, and custom Fees and Deductions.
Once you've completed setting up Commission Module, learn to Use Commission Module here →
Who Can Do This?
Only master admins can complete the full setup of Commission Module.
Full Video 🎥
This video will walk you through setting up Commission Module from beginning to end.
15:36
About the Commission Disbursement Authorization (CDA) 🎥
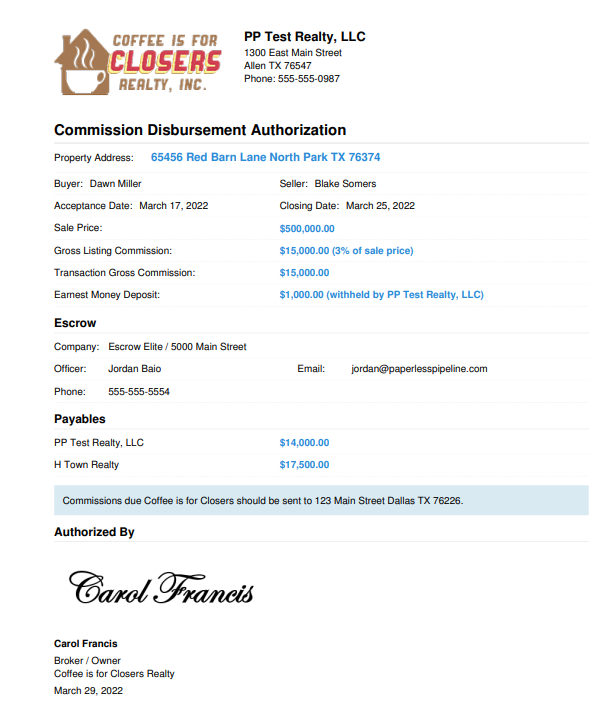
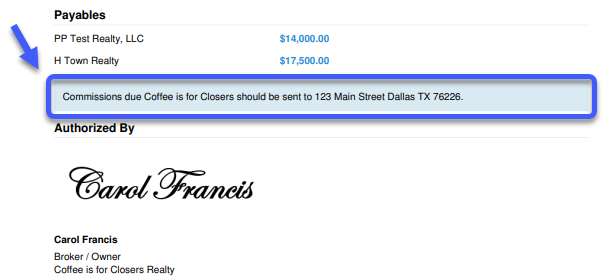
One of the useful features of the Commission Module is that it will automatically generate a Commission Disbursement Authorization (CDA) form, sometimes called a Commission Demand Letter, when you manage commission on a transaction.
The CDA document instructs the Title Company, Escrow or Closing Attorney on how to disburse commission for a transaction.
0:49
The CDA will be customized with:
- your Company Logo in the header
- an overview of the basic transaction information, including the Sale Price and Gross Commission
- the transaction’s Escrow, Closing Attorney or Title Company Contact information
- a Payable section
- the Signature of the broker or person authorized to sign the document
Here is an example of a Commission Disbursement Authorization (CDA) document:
Commission & CDA Settings 🎥
Customize how the commission disbursement form works by configuring Commission & CDA Settings for each Location in your company's account.
3:33
To set up Commission & CDA Settings for a Location:
- Click your name in the upper-right then [Admin / Settings].
- From the left menu, click [Manage Locations]. You'll need to complete the setup for each Location in your account where you plan to manage commission.
- Click the⚙️next to the Location, then [Commission & CDA Settings]. From this page, you'll be able to customize how the form works.
- Complete the fields as appropriate (described below).
- Click [Save Settings].
CDA Payability Settings
CDA Payability Settings determine who commission is paid to. For both agents and referrals, you have the option to instruct Escrow or Title to pay commission to your brokerage or to pay agents / referrers directly.
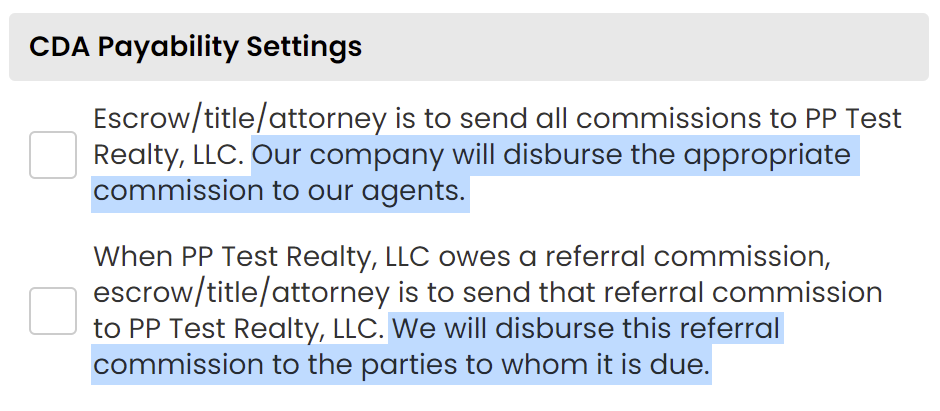
To set your preferred CDA Payability Settings:
- Check the first box if your brokerage is responsible for disbursing commission to agents.
If you prefer Escrow or Title to pay agent commission directly to agents, leave the box unchecked. - Check the second box if your brokerage is responsible for disbursing commission to referrals.
If you prefer Escrow or Title to pay referral commission directly to agents, leave the box unchecked.
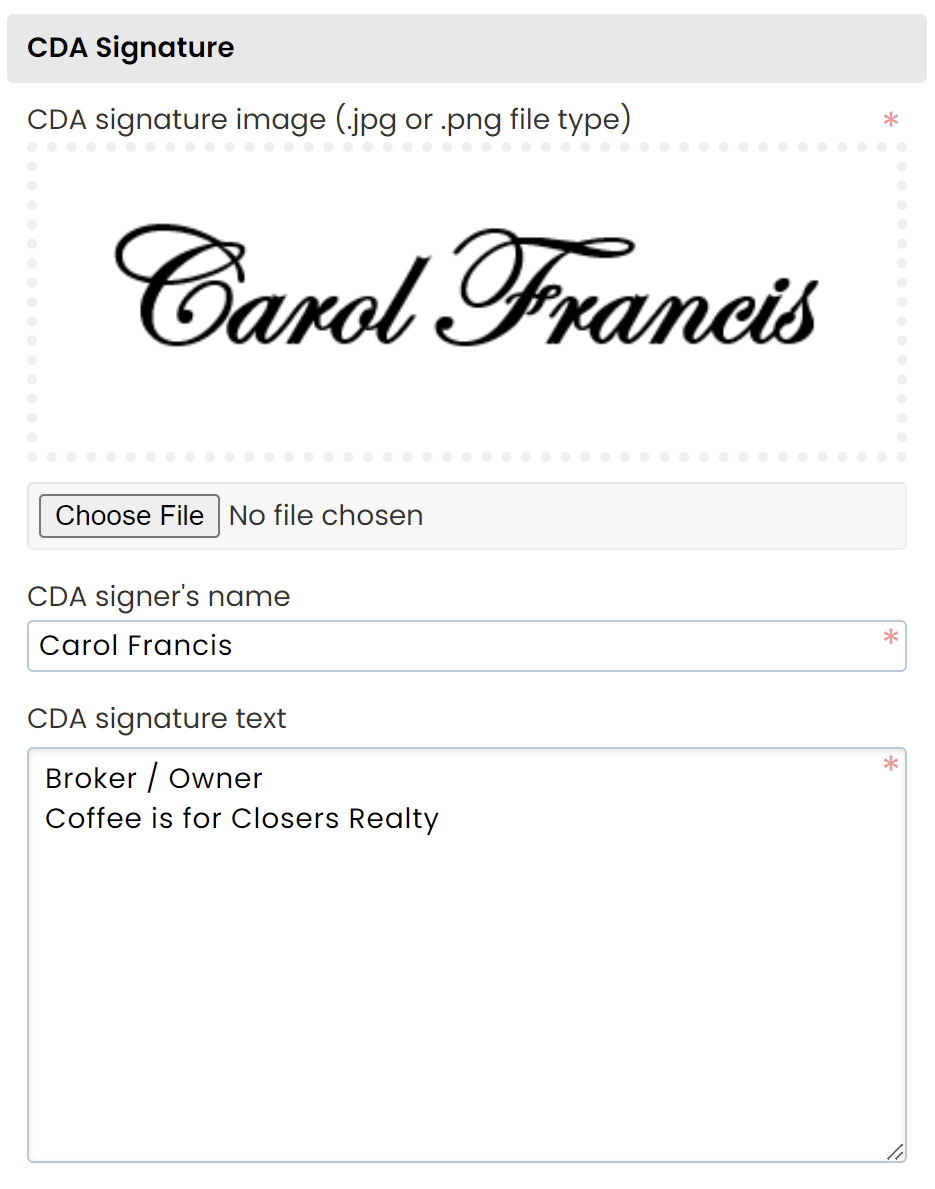
CDA Signature
Add the signature of the broker or person authorized to sign the CDA.
To add a CDA Signature:
- Upload the Signature Image.
- Complete the fields with the Signer's Name, and Signature Text (such as title and company name) that you'd like to appear under the signature.
Location Contact Info
Add the broker or appropriate company contact information to be displayed in the header of the CDA, as shown in this example:
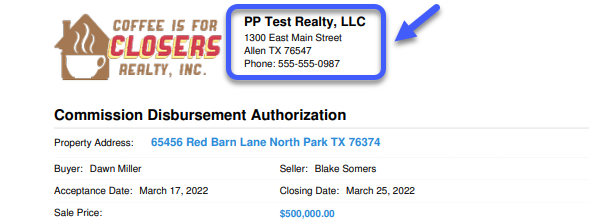
To add your Location Contact Info:
- Enter your broker (or appropriate Contact's) Address, and Phone Number.
- Optionally, enter their Fax or Email.

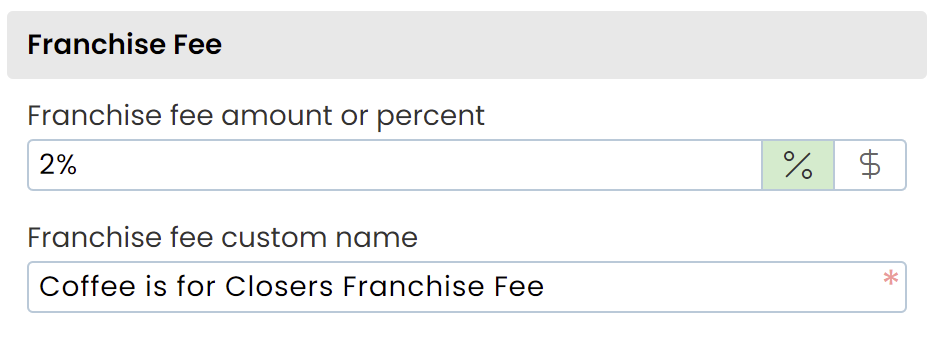
Franchise Fee
If your office pays a franchise or corporate fee per transaction, customize your company's Franchise Fee and optionally base the fee on a percentage or flat dollar amount. When managing commissions on a transaction, the Franchise Fee will be deducted before the Broker / Agent Disbursement.
To customize your Franchise Fee:
- If your office does not pay a Franchise Fee per transaction, leave the Franchise fee amount or percent empty.
- If your office does pay a Franchise Fee per transaction, select [%] or [$], then enter the Franchise fee amount or percent.
• If the amount varies per transaction, enter 0.
• If the amount is fixed, enter the fixed amount.
• If the amount is based on a percentage of each transaction's Net Commission amount, enter the percentage amount and select [%]. - Enter the Franchise Fee custom name.
Off-the-Top Deductions
You can optionally collect custom off-the-top Deductions such as B&O, Royalty Fee or State Tax.
To turn on the ability to collect off-the-top Deductions:
- Check the box next to [Allow off-the-top deductions]. If you do not collect off-the-top deductions, leave the box unchecked.

Earnest Money Deposit
You have the option to allow Earnest Money Deposit deductions if your brokerage holds earnest money that needs to be credited at closing.
To allow Earnest Money Deposit:
- Check the box next to [Allow earnest money deposit deduction]. If you do not hold earnest money, leave the box unchecked.

CDA Instructions
Create your own custom text that will appear on the CDA. For example, you can include wiring instructions or details on where the Title Company should mail the commission.
To add CDA Instructions:
- Enter your desired instructions in CDA instructions (to be shown above Payables) and / or CDA instructions (to be shown below Payables).
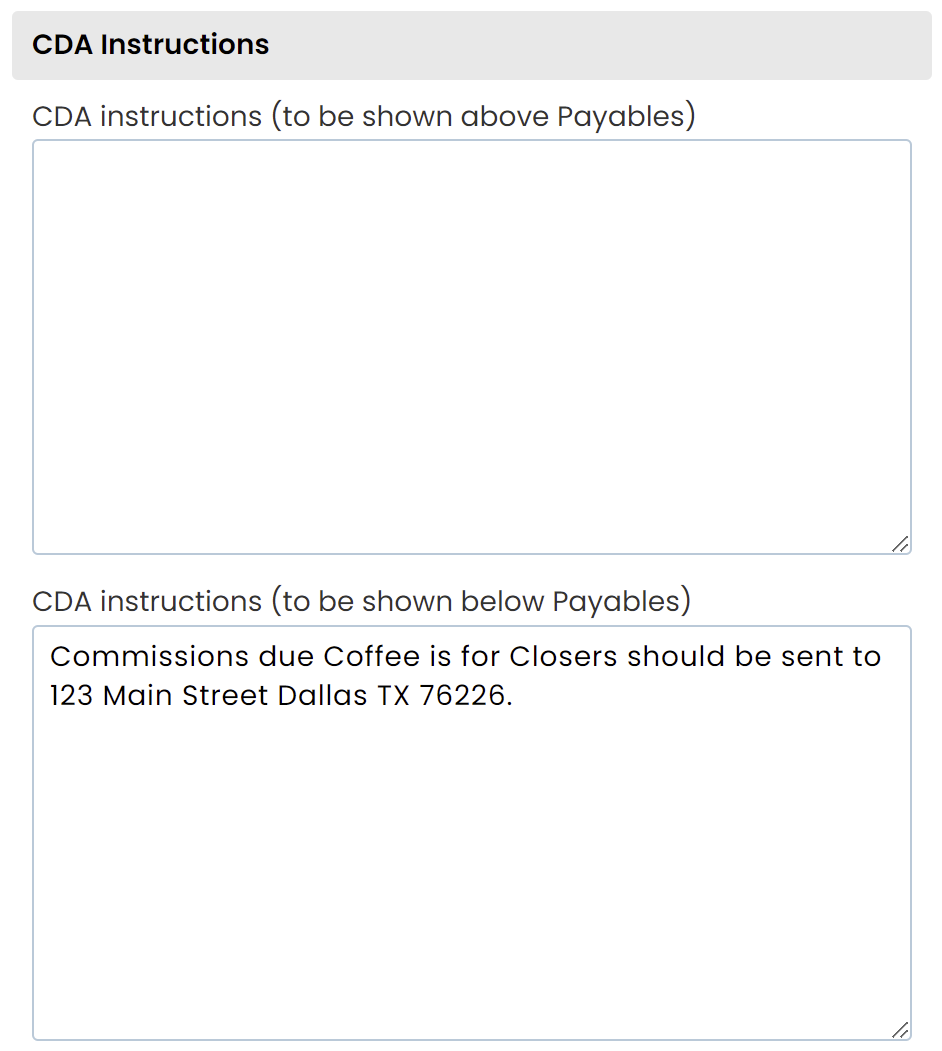
Learn how to Format CDA Special Instructions →
Company Settings 🎥
Configure your commission-related Company Settings to meet your office's specific needs.
2:28
To set up Company Settings:
- Click [Company Settings] from the left menu of Admin / Settings.
Email Monthly Production Summary to Agents
Opt to automatically email each of your agents a Monthly Production Summary including their production details, number of closings, Sales Volume, and commission earned for the last month as well as year-to-date. Learn more about the Monthly Production Summary →
To automatically email the Monthly Production Summary to your agents:
- Under Email Settings, check the box next to, [Email Monthly Production Summary to Agents].

Use Start Dates of Agents to Determine Fiscal Years for Year-to-Date Calculations
If your agents are on a commission plan, you may track their year-to-date figures based on their Start Date.
To track year-to-date figures based on your agents' Start Dates:
- Under Financial Settings, click the box next to [Use start date of agents to determine fiscal years for year-to-date calculations].
If you prefer to base year-to-date calculations on the calendar year (January through December), leave the box unchecked.
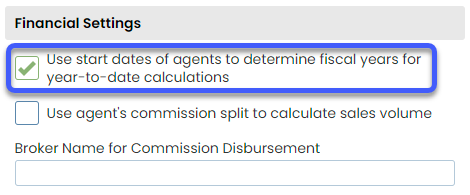
Use Agent's Commission Split to Calculate Sales Volume
Sales Volume can be automatically allocated based on the agent's share of commission when there are multiple agents on the transaction. When you're managing commissions on a transaction, you'll have the option to edit those pre-allocated Sales Volumes, as needed.
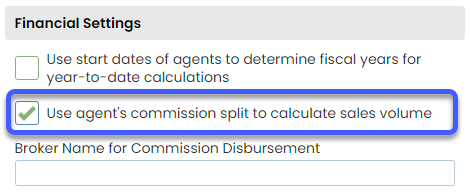
To automatically allocate Sales Volume based on the agent's Commission Split when there are multiple agents on a transaction:
- Check the box next to [Use agent's commission split to calculate sales volume].
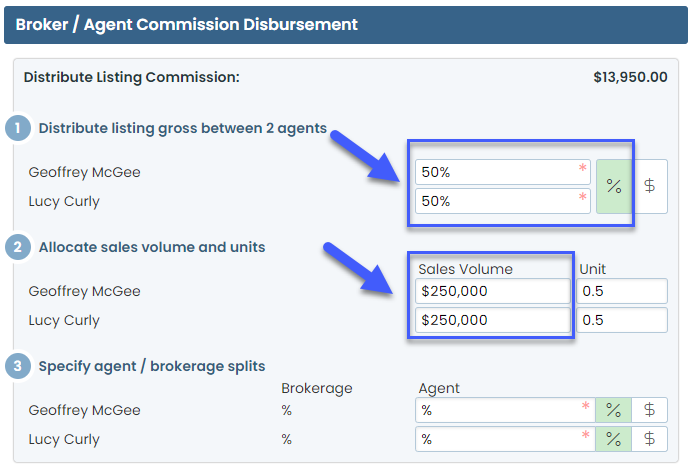
For example, if two agents are splitting the commission 50% on a home that sold for $500,000, the system will divide the Sales Volume 50% and allocate $250,000 to each agent. This will default the Sales Volume amount to accurately reflect the total Sales Volume of $500,000 for the transaction.
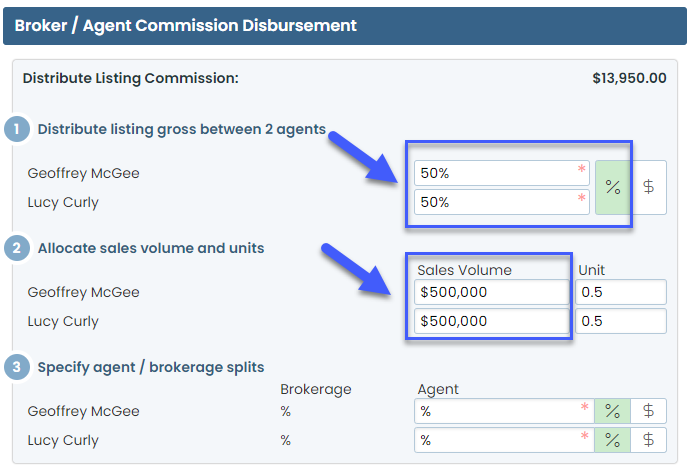
If you prefer to allocate the full Sales Price for each agent as a default, leave the box unchecked.
For example, if the Sales Price is $500,000, each agent will receive $500,000 in Sales Volume. Since $500,000 is allocated to each agent, the company's Sales Volume will reflect $1,000,000.
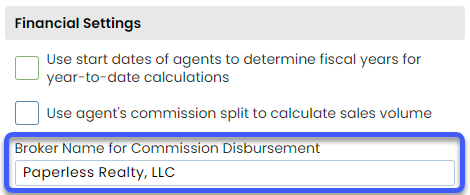
Broker Name for Commission Disbursement
Customize the Broker Name for Commission Disbursement if your brokerage's share of the commission should be made payable to a name other than your Company Name.
To set the broker's payable name as something other than your Company Name:
- Enter the broker's name. Leave blank to use your Company Name.
User Settings 🎥
Enter your agents' current Commission Percent, Next Commission Split, and other info, as well as grant admins permission to Enter Financial Data and / or View Financial Reports.
3:47
To manage user settings:
- Click [Manage Users] from the left menu of Admin / Settings.
Add Agent's Commission Percent, Cap & Other Info
You can enter your agent's current commission split percentage to allow the system to automatically populate that information when you're managing commissions on a transaction.
To add an Agent's Commission Percent Cap, & Other Info:
- Click an agent's name to open their profile.
- Scroll down to the Commission Percent section. If needed, click [+] to expand that section.
- Complete the desired fields (as described below).
- Select [Update User] to save.
Commission Percentage
Enter the agent's share of commission in the Commission Percentage field.
Next Commission Split Threshold
Next Commission Split Threshold tracks how much of an agent's commission needs to be been paid to the brokerage before they'll advance to the next level. If your agents are on a commission plan that allows them to increase to a higher commission split once they've reached their cap, track their Next Commission Split Threshold to allow the system to warn you when the agent has or is about reach their cap.
To set an agent's Next Commission Split Threshold:
- Enter the agent's Next Commission Split Threshold. If your agents are not on a commission plan, leave the field blank.
For example, if your agent is on a 75% commission split until they've paid the broker $20,000 of commission, you would enter $20,000 in this field. Once the broker has earned $20,000, the system will warn you that the agent has or is about to reach their cap.
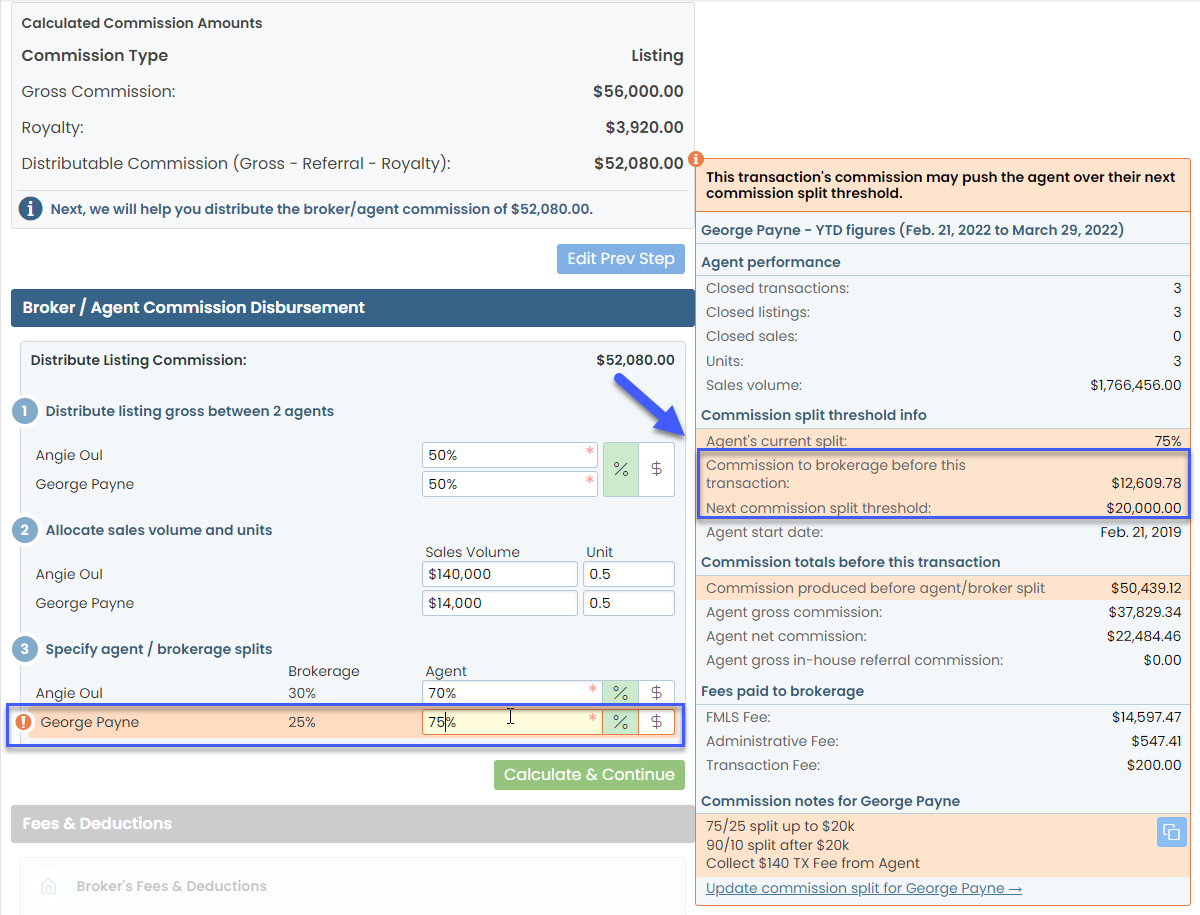
Commission Notes
Enter any Commission Notes such as the agent's commission plan or fee reminders. An agent's Commission Notes are displayed next to their name when managing commissions on a transaction.
To add an agent's Commission Notes:
- Enter the agent's Commission Notes. If your agents are not on a commission plan, leave the field blank.
Payable, LLC or Corp
Set an agent's Payable, LLC or Corp if your agents are paid directly at closing and their payable name should show as their Company Name (or a name other than their First and Last Name).
To set an agent's Payable Name:
- Enter the agent's Payable LLC or Corp. If the agent's payable should be made to their first and last name, leave the field blank.
User Start Date
It is especially important to enter agents' Start Dates if you are tracking their year-to-date figures based on their anniversary date.
To add an agent's Start Date:
- Enter or select the agent's Start Date.
Grant Financial Permissions to Admins
Grant certain admins permission to manage commissions and / or view reports.
To grant financial permissions to an admin:
- From Manage Users, click the admin's name.
- Scroll down to the User Permissions section.
- Check the box next to your desired financial permissions for the admin in each desired Location.
- Select [Update User].
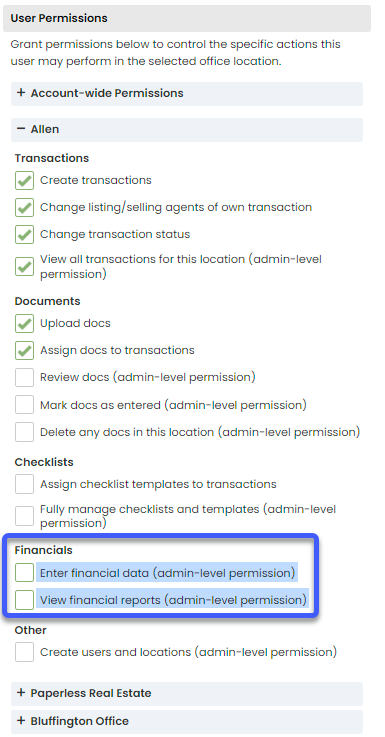
Both financial permissions are admin-level permissions and should not be given to agents as it will give them access to other agents' financial information.
Permissions are based on Location. If you would like an admin to have permissions in multiple Locations, expand each Location and grant desired permissions within each.
Enter Financial Data
Allow admins permission to Enter Financial Data (generate Commission Disbursement Authorizations) for a Location.
To grant an admin permission to Enter Financial Data:
- For each desired location, check the box next to [Enter financial data (admin-level permission)].
View Financial Reports
Allow admins permission to View Financial Reports for a Location.
To grant an admin permission to View Financial Reports:
- For each desired location, check the box next to [View financial reports (admin-level permission)].
Fees & Deductions 🎥
Set up your company's custom Fees and Deductions.
4:39
Agent Fees
Agent Fees are fees paid to the brokerage from an agent's commission.
To add agent fees:
- Go to the Agent Fees page.
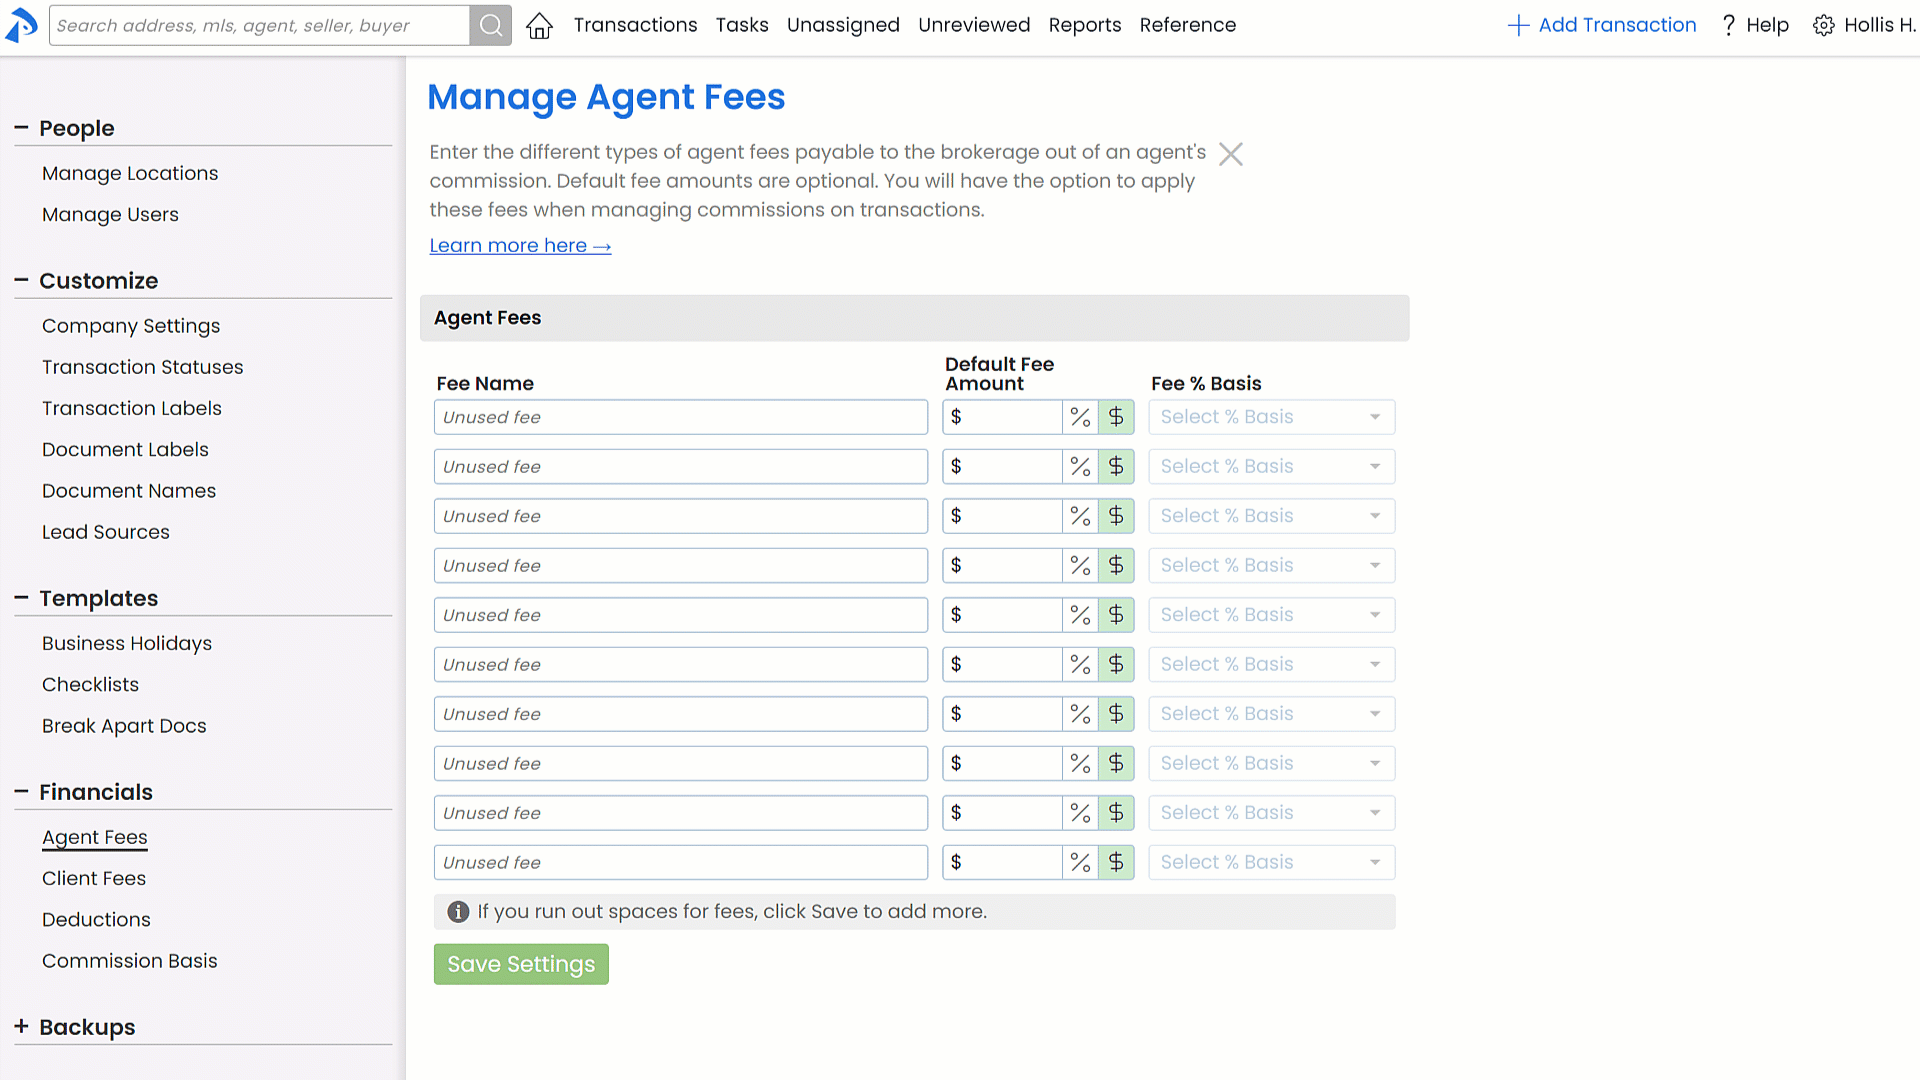
- For each fee, type the fee name in the Fee Name column.
- In the Default Fee Amount column, enter the standard amount for the fee. The amount you enter here will be inserted for that fee when managing commissions on transactions. You can change the amount during that process for any individual transaction, if needed.
If the agent fee varies from transaction to transaction, leave the fee amount blank.
- Choose [%] or [$] to specify whether your default amount will be based on a percent or dollar amount.
- If you selected the [%] option, select the Fee % Basis in the next column to specify the value on which to calculate the percentage.
Fees can be automatically calculated based on a percentage of Gross Commission, Sale Price, Distributable Commission, Broker Gross, Agent Gross, or Gross Commission less Referral. - Click [Save Settings].

Client Fees
Client Fees are fees paid by buyers or sellers outside of normal commissions. Client Fees can be paid directly to the brokerage or agent on the transaction. Some examples of Client Fees include agent bonuses, state fees, or taxes or transaction fees charged to clients.
To add client fees:
- Go to the Client Fees page.
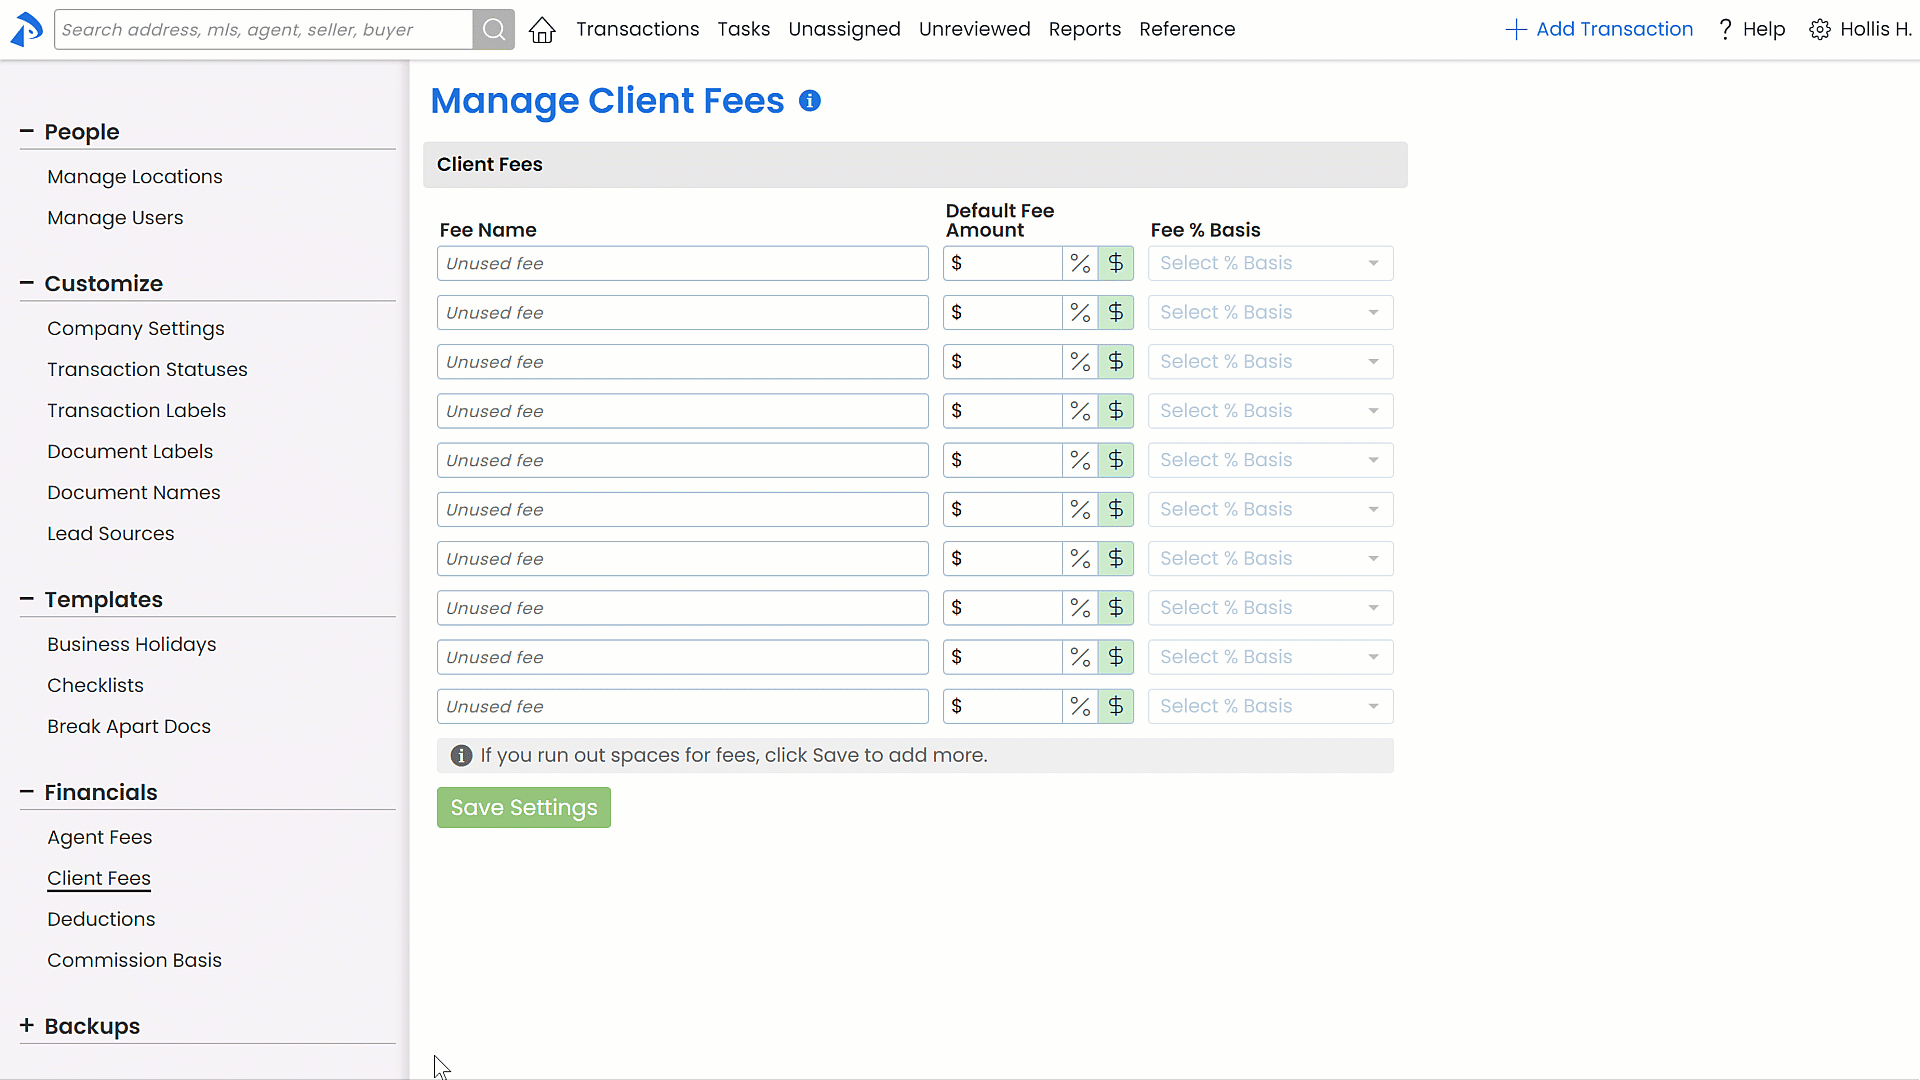
- For each fee, type the fee name in the Fee Name column.
- In the Default Fee Amount column, enter the standard amount for the fee. The amount you enter here will be inserted for that fee when managing commissions on transactions. You can change the amount during that process for any individual transaction, if needed.
If the client fee varies from transaction to transaction, leave the fee amount blank.
- Choose [%] or [$] to specify whether your default amount will be based on a percent or dollar amount.
- If you selected the [%] option, select the fee percent basis in the next column to specify the value on which to calculate the percentage.
- Click [Save Settings].

When managing commissions on transactions later, default fee amounts will auto-populate but can be updated or deleted as needed.
Deductions
Deductions are fees that can be taken off-the-top before the broker-agent split or paid directly from the broker or agent share of commission. Some examples of Deductions include Charitable Contributions, Client Rebates, MLS Fees, Home Warranty Fees, or payments to an in-house user such as an assistant or transaction coordinator.
● Off-the-top Deductions can be used to pay money to the broker, in-house agents or third parties.
● Regular Deductions paid from the broker or agent's share of commission can be paid to in-house agents or third parties.
To add deductions:
- Go to the Deductions page.
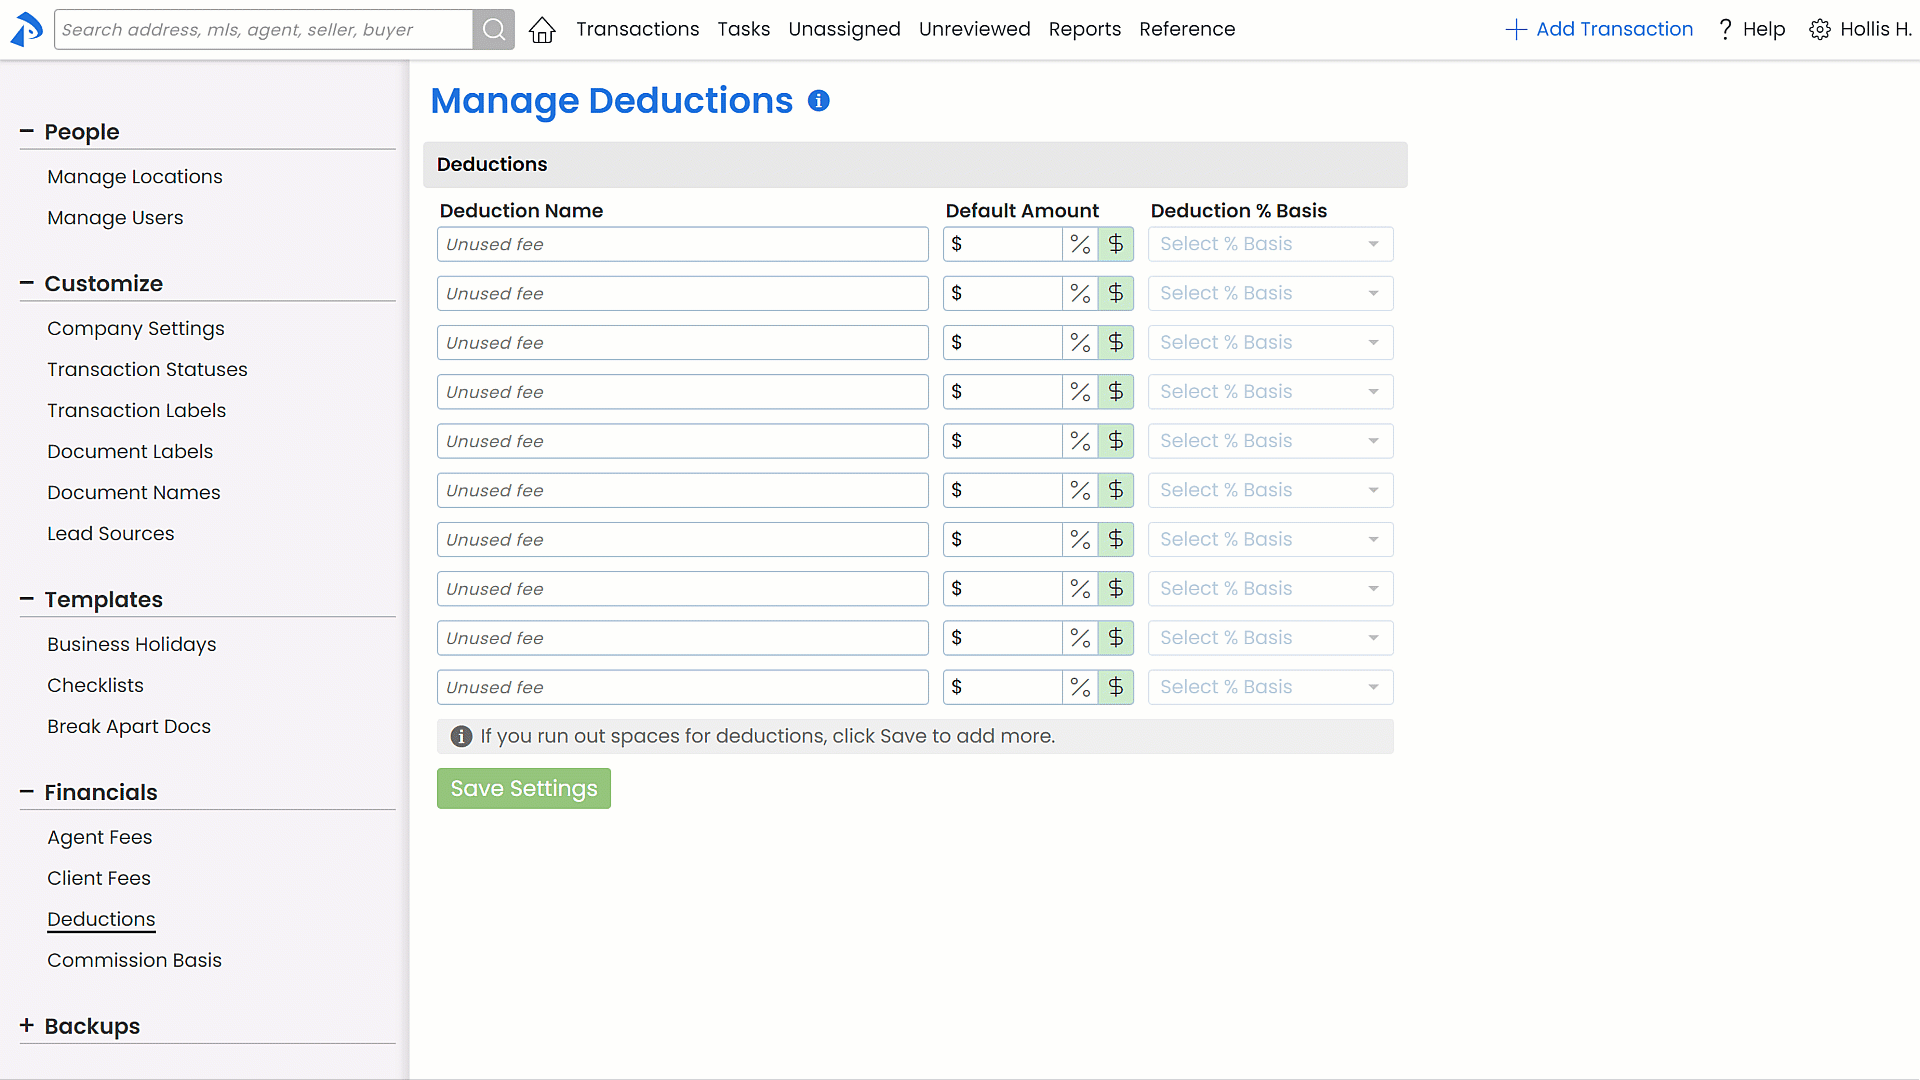
- For each deduction, type the deduction name in the Deduction Name column.
- In the Default Amount column, enter the standard amount for the deduction. The amount you enter here will be inserted for that deduction when managing commissions on transactions. You can change the amount during that process for any individual transaction, if needed.
If the deduction varies from transaction to transaction, leave the deduction amount blank.
- Choose [%] or [$] to specify whether your default amount will be based on a percent or dollar amount.
- If you selected the [%] option, select the deduction percent basis in the next column to specify the value on which to calculate the percentage.
● Off-the-top (OTT) Deductions can be calculated as a percentage of Gross Commission or Sale Price.
● Regular Deductions can be calculated as a percentage of Gross Commission, Sale Price, Distributable Commission, Broker Gross, Agent Gross, or Gross Commission less Referral Commission. - Click [Save Settings].

When managing commissions on transactions later, default deduction amounts will auto-populate but can be updated or deleted as needed.