SUMMARY
Pipeline can automatically add specific checklists to transactions whenever the status, listing/selling side, or label of a transaction gets a desired value.
1:53
Create and Edit Checklists and Settings
- Go to Admin / Settings
- Click your name in the upper right corner, then [Admin / Settings].
- Click "Checklists" from the left menu.
- Click [Add a checklist template] to add a new template or click the name of an existing checklist to edit it.
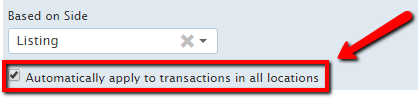
- Apply a checklist template by clicking the "Automatically apply to transactions in all locations" checkbox.
- Click "Save template".
If left unchecked, the automatic assignment of the checklist will only occur when the transaction is in the same location as the checklist. If you don't see this option, it's because only master admins can access it.